Help Center

Help Center

Need help? You’re in the right place. DocMagic’s Help Center pulls together a variety of resources for easy, instant, online assistance.

Find answers to your questions about DocMagic’s products and services along with up-to-the-minute compliance issues. It's easy to search our categorized resources pages, FAQs and user guides. You can even watch a quick video overview or join a live training webinar. See how you can do more with DocMagic!

Are you a borrower with a question?


DocMagic Help

User Guides
Training Guides
FAQs
FAQs
How-To-Videos
Training Videos
Live Training
Live Webinars

SmartCLOSE™ Help

Resource Center
SmartCLOSE Resource Center
FAQs
FAQs
User Guide
SmartCLOSE User Guide
Live Training
Live Webinars

TRID Help (TILA-RESPA Integrated Disclosures)

Resource Center
TRID Resource Center
FAQs
FAQs
Software Updates
Software Updates

Didn't find what you were looking for?

Click here to send us a message. Send any comments or questions to our TRID or SmartCLOSE inboxes. Please report each issue only ONCE and we will respond promptly!

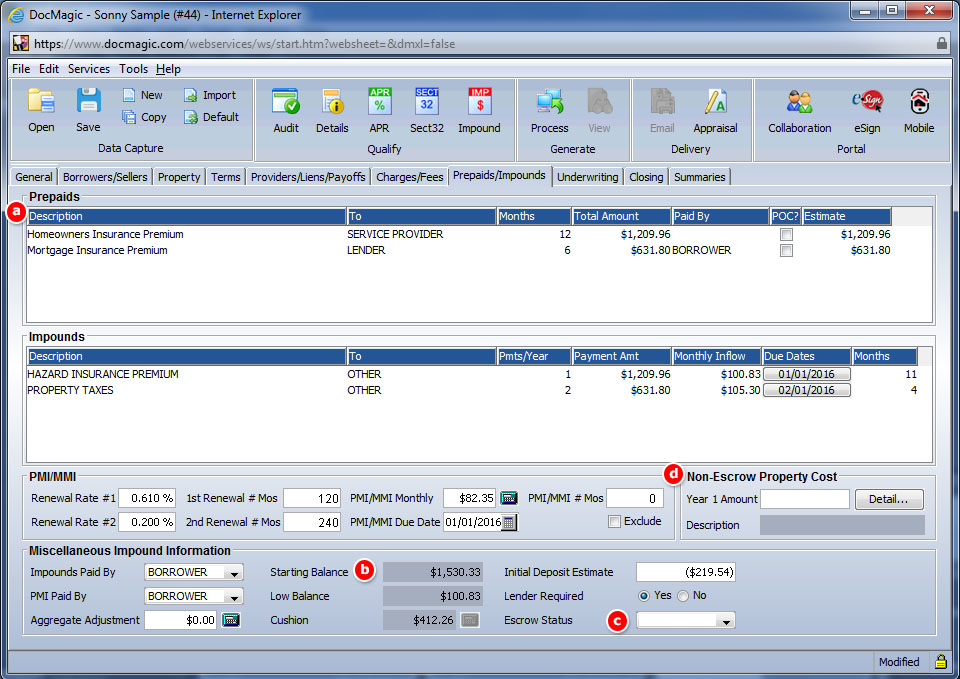
Prepaids/Impounds Tab

To support the new Prepaids section on the Loan Estimate, the “Impounds” tab was renamed “Prepaids/Impounds”.

Impounds screen

  • A Prepaids section has been added to populate the Prepaid Closing Costs section of the Loan Estimate and Closing Disclosure. This section includes POC and payer options. itemized entries of homeowners insurance and property taxes in either the Prepaids or Impunds sections will be automatically combined into the provided lines on the TRID forms so long as the payees and number of months collected are consistent.  Only if there is an inconsistency in payee or months collected will an itemized entry appear as itemized on the forms.
  • The Closing Disclosure will disclose the Impounds section according to the Escrow Account Analysis required by RESPA.  The balances shown will total to the amount shown in the ‘Starting Balance’ field.
  • Users will make the selection for whether there is an escrow account “In Effect”, “Borrower Declined”, or “Not Offered”. These selections will provide the answers required to be disclosed with the Escrow Account disclosure on page four of the Closing Disclosure.
  • Non-Escrowed Property Cost: Users must enter any non-escrowed property costs of which the creditor is aware (and used in underwriting for ATR purposes) here. The total of all yearly charges is entered. The Detail button provides the ability to indicate what costs are included in the total amount. Items entered here will appear in the Estimated Taxes, Insurance and Assessments disclosure.

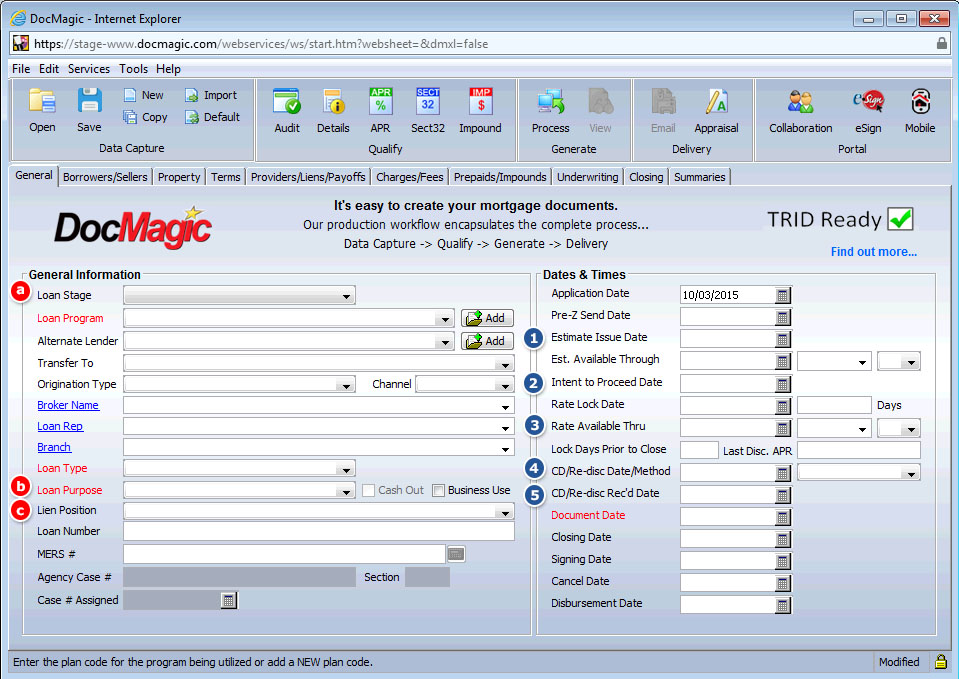
General Tab

General Tab
 

  • Loan Stage: The dropdown for selection of the Loan Stage has been moved to the top left side of the General Information section. 
  • Loan Purpose: Added Home Equity Loans. 
  • Lien position: Users can now chose 1st/2nd/3rd/4th.
  • Dates & Times: This section has been substantially revised: 
  1. Estimate Issue Date: Formerly the GFE Date, this is the date the Loan Estimate is issued. 
  2. Intent to Proceed Date: The date the lender received the applicant’s intent to proceed with the transaction.
  3. Rate Available Thru: The time field has been updated to include options for indicating the required added time zone through which the rate is available to the applicant.
  4. CD/Re-disc Date/Method: This field has been updated to be used for issuance of either the Closing Disclosure or a revised TIL, as a result of a TRID/MDIA-required disclosure or redisclosure three business days prior to consummation of the transaction.  
  5. CD/Re-disc Rec’d Date: Similar to the CD/Re-disc Date/Method this field allows the lender to input the date the applicant actually received the required disclosure or redisclosure to begin the required waiting period.

IMPORTANT:

  • Commitment Date/Expires: These dates have been removed from the dates screen.

DocMagic eSign


We make it quick and easy for you to electronically review and sign your documents in one simple and convenient process.

Enter the information requested in the log in screen (shown below) to begin the process of reviewing and signing your documents:

Email Address: If prompted, enter your email address or the email address you provided to your lender. In most cases, this information will be provided automatically.

Loan Number: If prompted, enter your loan number. Again, in most cases, this information will be provided automatically.

Last four digits of your SSN: Enter the last four digits of your social security number.

Viewing Code: Enter the code displayed in the viewing code box below. The viewing code ensures that your computer is capable of viewing the documents that have been sent to you.

Once all of the fields have been accurately filled in, click the Continue to Next Step button at the bottom of the screen.


You will now be presented with the eSign Disclosure and Consent Agreement which explains your rights and responsibilities under the Federal E-Sign Act.

Please review the eSign agreement in its entirety and if it is acceptable, check the box labeled I HAVE READ AND UNDERSTAND... and click the Continue to Next Step button at the bottom of your screen. Please note: a copy of the eSign Disclosure and Consent Agreement will be automatically emailed to you for your records.

If the agreement is NOT acceptable, click the Decline button and your documents will be mailed to you.


To eSign, or electronically sign your documents, you must first adopt an electronic signature.

Begin by confirming that your name is spelled correctly and select a font for your electronic signature. Once you are satisfied with your selection, check the box at the bottom to approve your choice and click the Continue to Next Step button to proceed.


Take a moment to tour the helpful prompts that explain Electronic signing and then, when you’re ready to begin the document review/signing process, click the End Tour button to get started.


When displayed, documents requiring an electronic signature will contain a “Sign Here” tab at the top of the document. Clicking the “Sign Here” tab will scroll the document directly to the location of the signature box.

The preview pane shows the disposition of any required signature marks. Click on an image to view the page.


Review and sign each document as indicated by clicking the yellow Sign Here box. Your electronic signature will appear in the font you selected. Repeat this process with each document requiring your signature.


Certain documents may ask you to add information or check a box. Below are examples where the signer has made a selection, checked a box and added information. The additional information cannot be changed once the signature box is clicked and the signature is on the document.


  In order to edit the information you must first click on your signature. This unlocks the check boxes and allows you to edit typed information. Once you have made changes, click the signature box to “re-lock” your selections and edited information.


Documents containing a blue Ink Sign box require an ink/pen signature. To print your ink/pen sign documents, click the print icon in the upper right-hand corner of your screen. NOTE: The documents will print with a cover sheet (for returning your documents).


Once ink signed, you can scan and upload the documents to the eSign system, or Fax them back to the number indicated on the cover sheet. Whichever method you use, you MUST attach the cover sheet to the ink/pen signed documents.


At the top right-hand corner of the page is a Signing Status legend that conveniently displays the number of documents you have left to electronically sign, ink/pen sign and documents that require additional information or selection of a check box. Signing Status will ‘count down’ until the signing process is complete.


  Once the process is complete, you will have access to a pdf copy of the documents or you may request that a paper copy be sent to you.

The control panel below indicates completion of the signing process.
 

Print

Entering Impounds in DocMagic Online

1. Begin in DocMagic Online by selecting the Impounds Tab.  Click on the white area under Impound Description to reveal the dropdown box.  Select your Impound Descriptions.  For this guide we are selecting County Property Taxes and Hazard Insurance.  Click the OK button and the Descriptions are added to the worksheet.
 
 
2.Starting with the County Property Taxes enter the data for the taxes.  In this next image we are entering 2 payments per year.  If your taxes are due quarterly add a 4 in this section.
 
3.In the next image we have added the amount that will be paid for the taxes.  Since we there are two payments per year we have entered an amount that is ½ of the annual taxes.  When we click in the Monthly Inflow box DocMagic will automatically calculate the amount to be collected each month for the impound account. Click on the Edit button in the Due Dates section.
 
4. Below we have added the Due Dates or Dates when the Impound will make the payment.  Click the OK button and click into the Months section to have DocMagic calculate the amount of months that should be collected to begin the Impound account.
5. Below we have added the Impound information for the Hazard Insurance.  Now it is time to review Starting Balance, Low Balance and the Cushion.  
6. Click on the Aggregate Adjustment calculator when your low balance exceeds your cushion.
7. You must select who the Impounds are paid by and enter yes or no for Lender Required.  If you are processing closing documents then add the GFE Initial Deposit amount.
 
Print
 

Upfront MIP for FHA Loans

Click on the green plus button to begin adding your defaults.

Select a new charge from the list that appears and press the Add button.

Next you can use the drop down box to set the type of fee fixed, % of Sales Price etc.

If you select Fixed in the Type field, then you can add the dollar amount here.  *Note:  Defaults that have been previously added are in the list at the left side.

Now you can select who the charge is paid by and who the charge is paid to.

Check the POC Box if the charge is paid outside of closing.  The APR box is check only if the charge is included in the APR and the SR box can be checked if the charge is Seller Responsible.  Out of the box the criteria is set to Always.  The next slide will show you how to change the Criteria to something other than Always.

Press the green plus button to begin refining when this charge will apply.

Set the field section for the field in DocMagic that will determine the application of the fee above.

After you have set the Field you can then select the Value that will be applied.  In this case the loan type will be set to one of the available loan types in the drop down box.

This view shows that a $35 charge for the Credit Report will be the default for all Fixed Conventional loans.  Click the finished button to apply this default and repeat the process.

 
Print
 

GFE Amount

Source for GFE Amounts

Values in the "GFE Amount" entry fields should reflect the fees/charges that were disclosed in the last GFE provided to the borrower(s). If you do not want to manually enter the GFE Amounts, you may pull values from any one of the three sources described below:

  1. Previously processed Predisclosure/Pre-Closing Package - Amounts from the "Charge Amt" column of the last processed predisclosure or pre-closing package, whichever package was processed later, for this same worksheet will be loaded into the "GFE Amount" entry fields. This is the recommended source as values entered in the "Charge Amt" column for either the Predisclosure or Pre-Closing package were used to complete the GFE.

  2. Current Worksheet Values - Amounts from the "Charge Amt" column in this same worksheet will be copied to the corresponding fields in the "GFE Amt" column. In other words, the "GFE Amount" entry fields will match exactly the entry fields in the "Charge Amt" column. Note that selecting this option will result in the values in the "GFE" and "HUD-1" columns of the comparison tables on page 3 of the HUD-1 being identical unless you modify the values in the "Charge Amt" column to reflect actual settlement costs and fees after selecting this option.

  3. An alternate Worksheet file - Amounts from the "Charge Amt" column in another worksheet will copied into the "GFE Amount" entry fields. Simply specify the client I.D. and the worksheet file to use.

Press the clear GFE amounts button below to instantly clear ALL GFE amount fields.

Clear All GFE Amount Entry Feilds

RSS Feed

SOLUTIONS THAT WORK. TECHNOLOGY TO STAY COMPLIANT.