Welcome to DocMagic's Remote Online Notary tutorial!
For a downloadable PDF version of this guide, click here
Please note that as of April 1st, 2024 participants may no longer complete Remote Online Notarizations on a phone.
An FAQ table is at the bottom of this page - your questions may be answered there.
In this specialized, step-by-step walk-through of the R.O.N. process, we will help you become proficient with:
| |
| |
| |
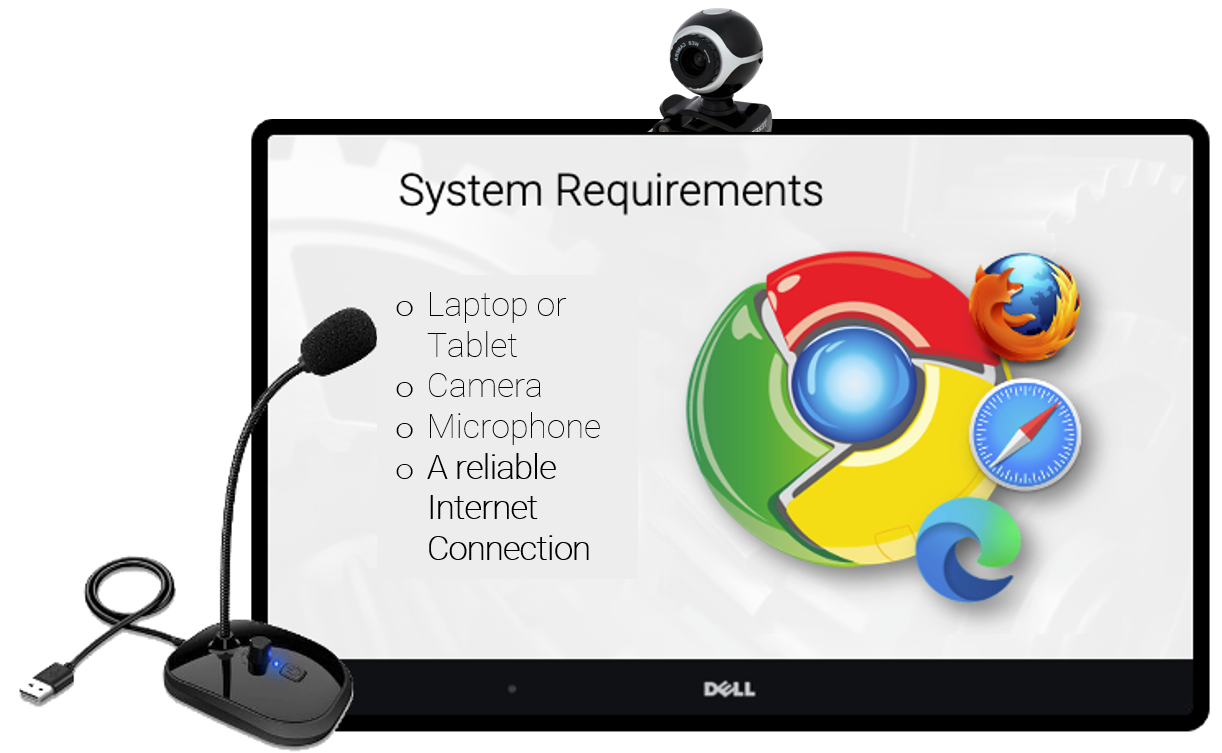
Before proceeding, please make sure that you have the following hardware:
| |
| |
What are the benefits of an eClosing?
| |
| |
Now - let's get started with the process of Remote Online Notarization through DocMagic!
| |
1.
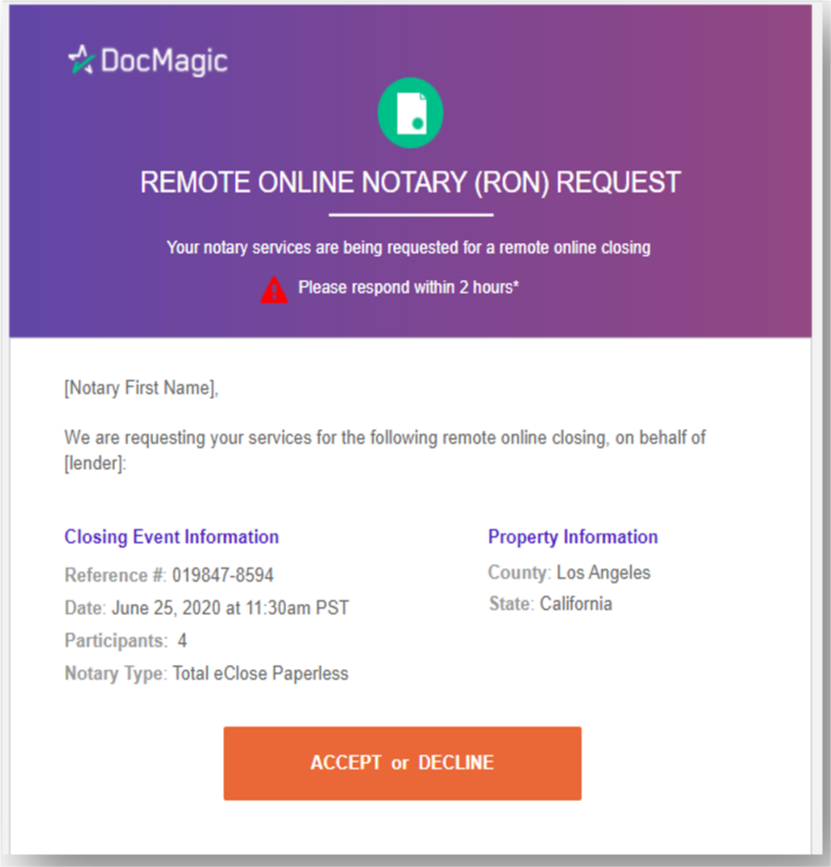
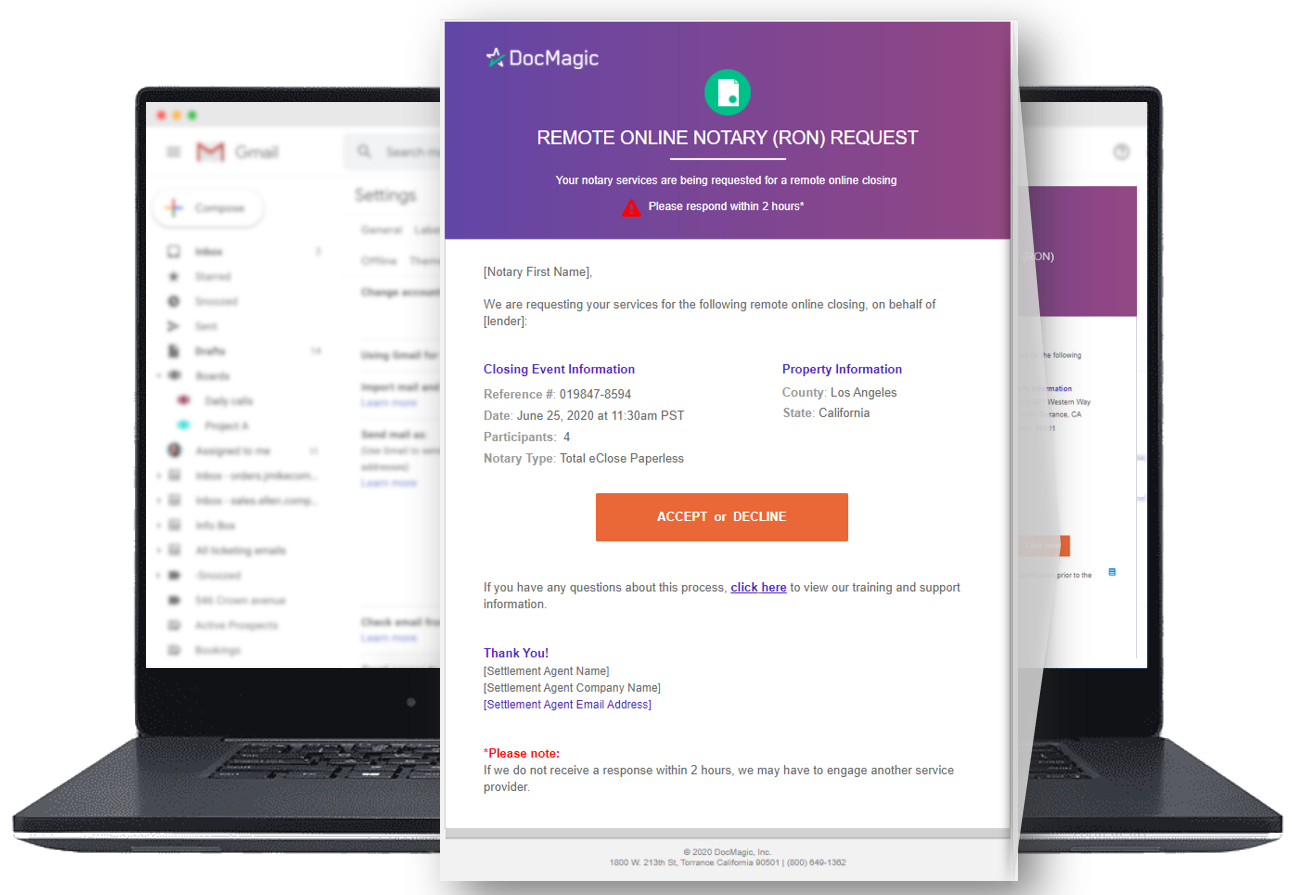
| The process starts when you, the Notary, receive a request for R.O.N. services from the Settlement Agent.
The email includes the option to accept or decline the request.
|
| |
2.
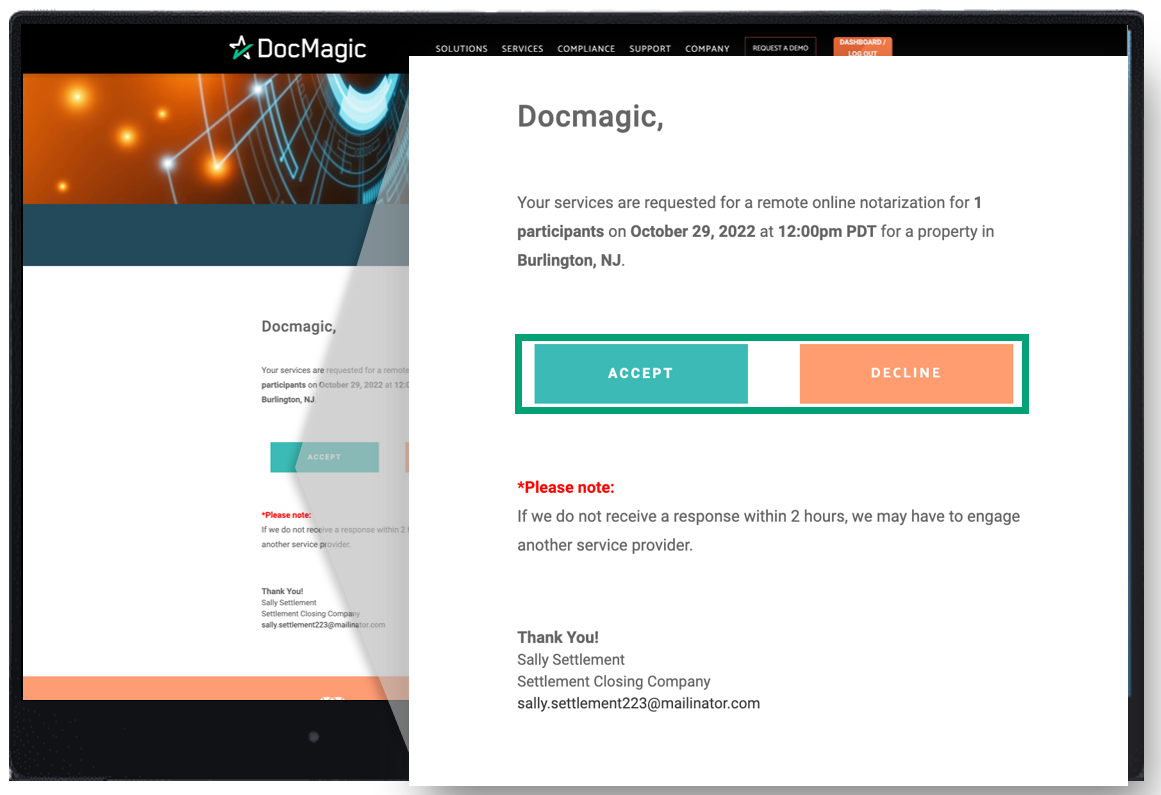
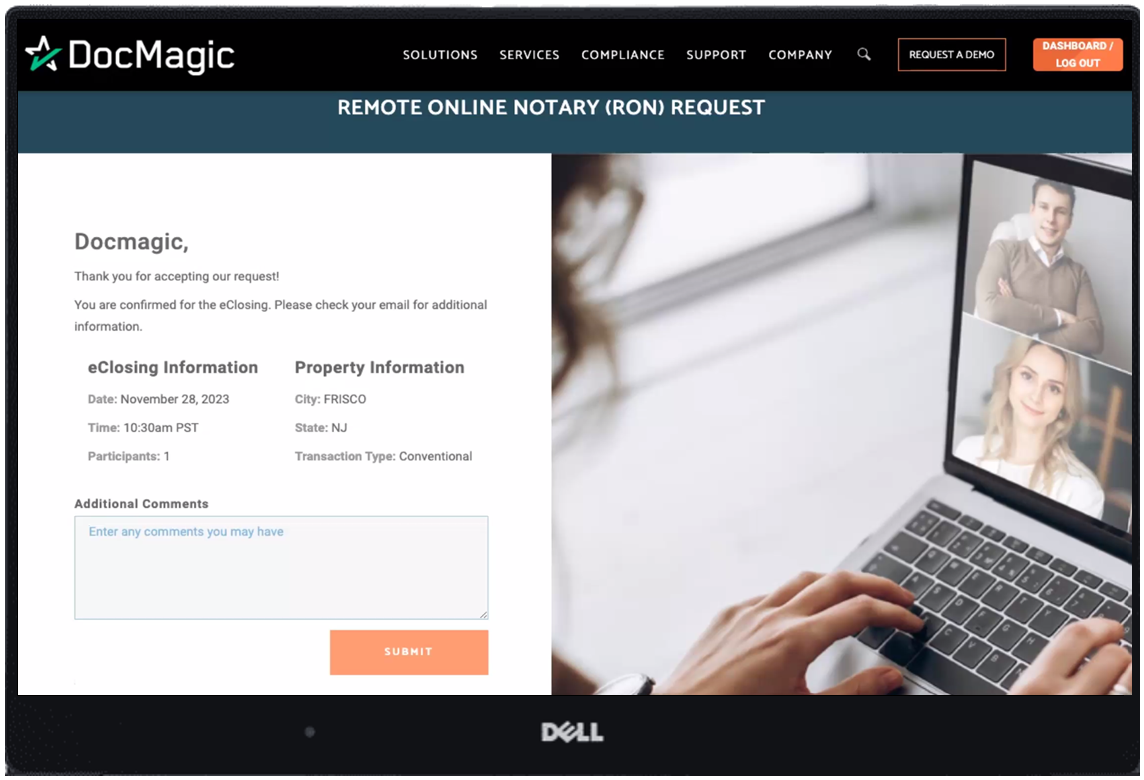
| You'll be taken to a page where you may accept or decline the RON request.
|
| |
3.
| Clicking Accept on the previous page confirms your acceptance. You don't need to do anything else here.
However, you have the option to pass on information to the Settlement Agent. Just type what you want in the comment box and click Submit.
Please don't try logging in on this page - notaries can't log in.
|
| |
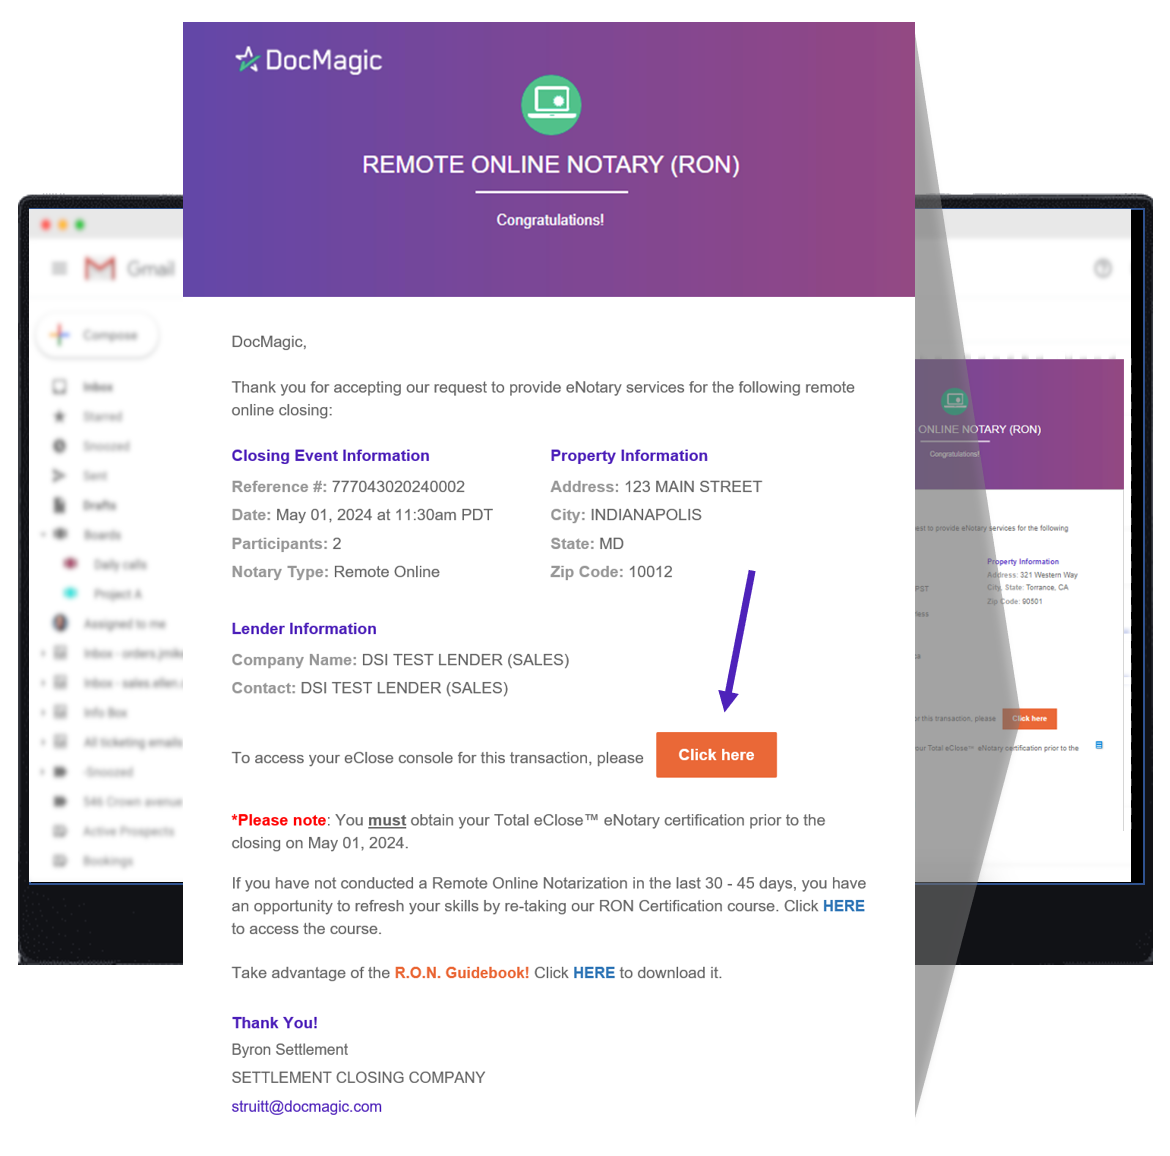
| 4. | Once you accept the request, you'll get a confirmation email which provides secure access to the eClose console. The orange "Click here" button takes you there. This is how you'll get into your Notary portal. You do not log in through our website.
In the past, you would need to re-certify if you did not conduct a R.O.N. closing within 6 months. This is no longer the case; you do not need to re-certify.
|
| |
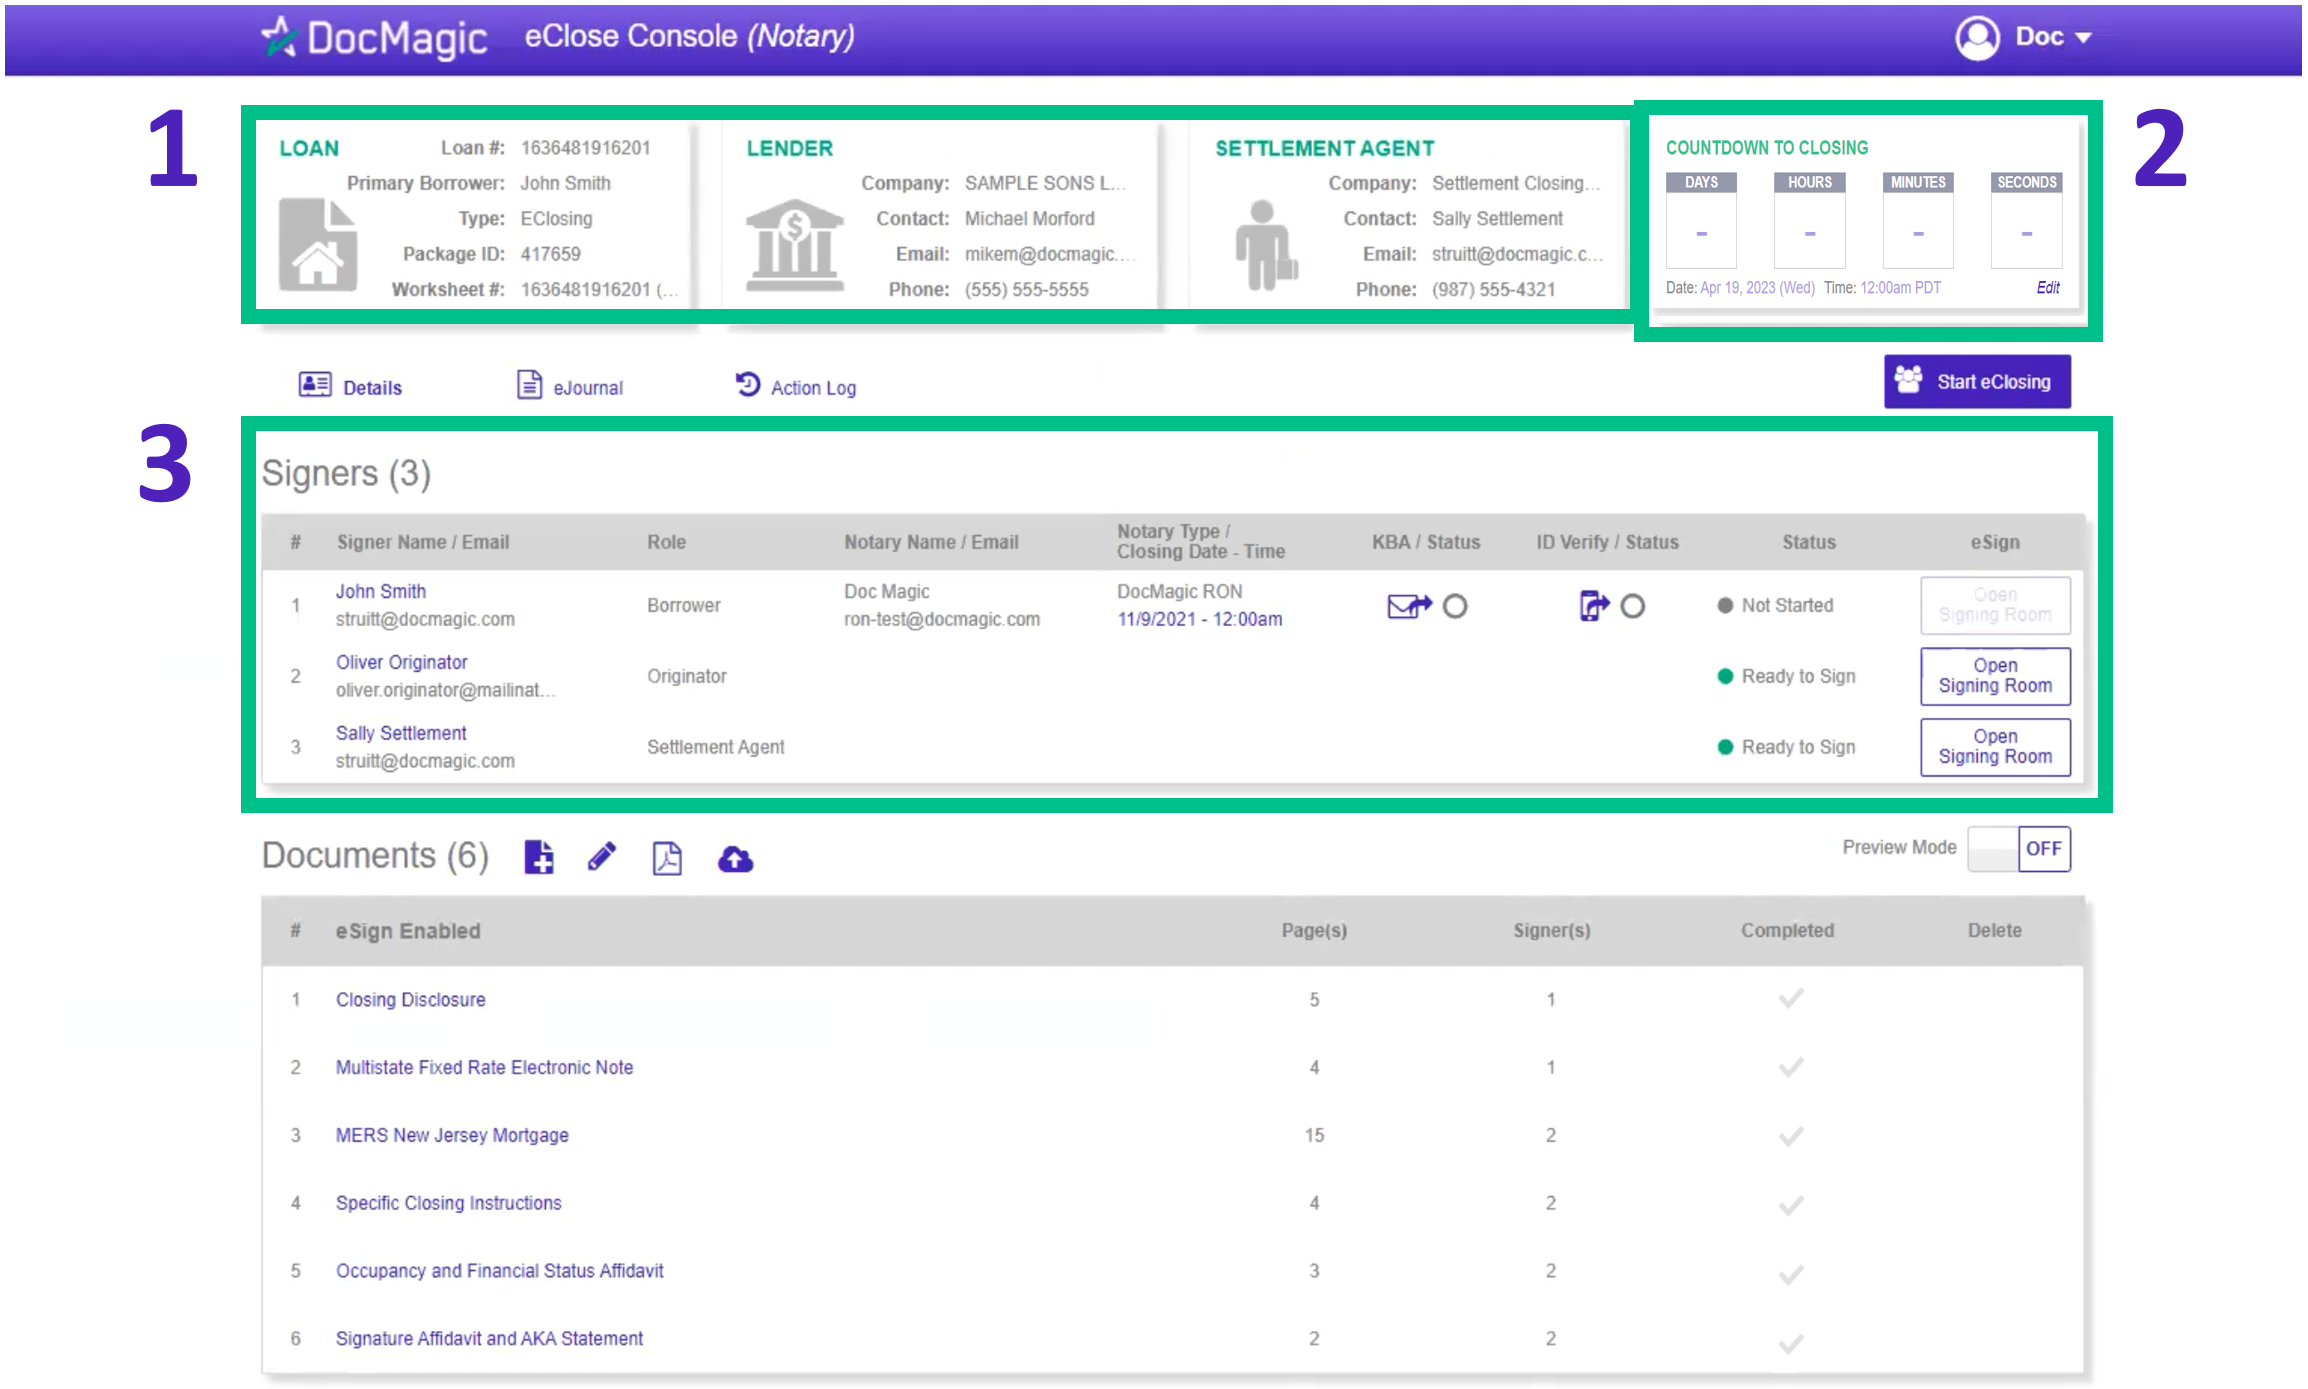
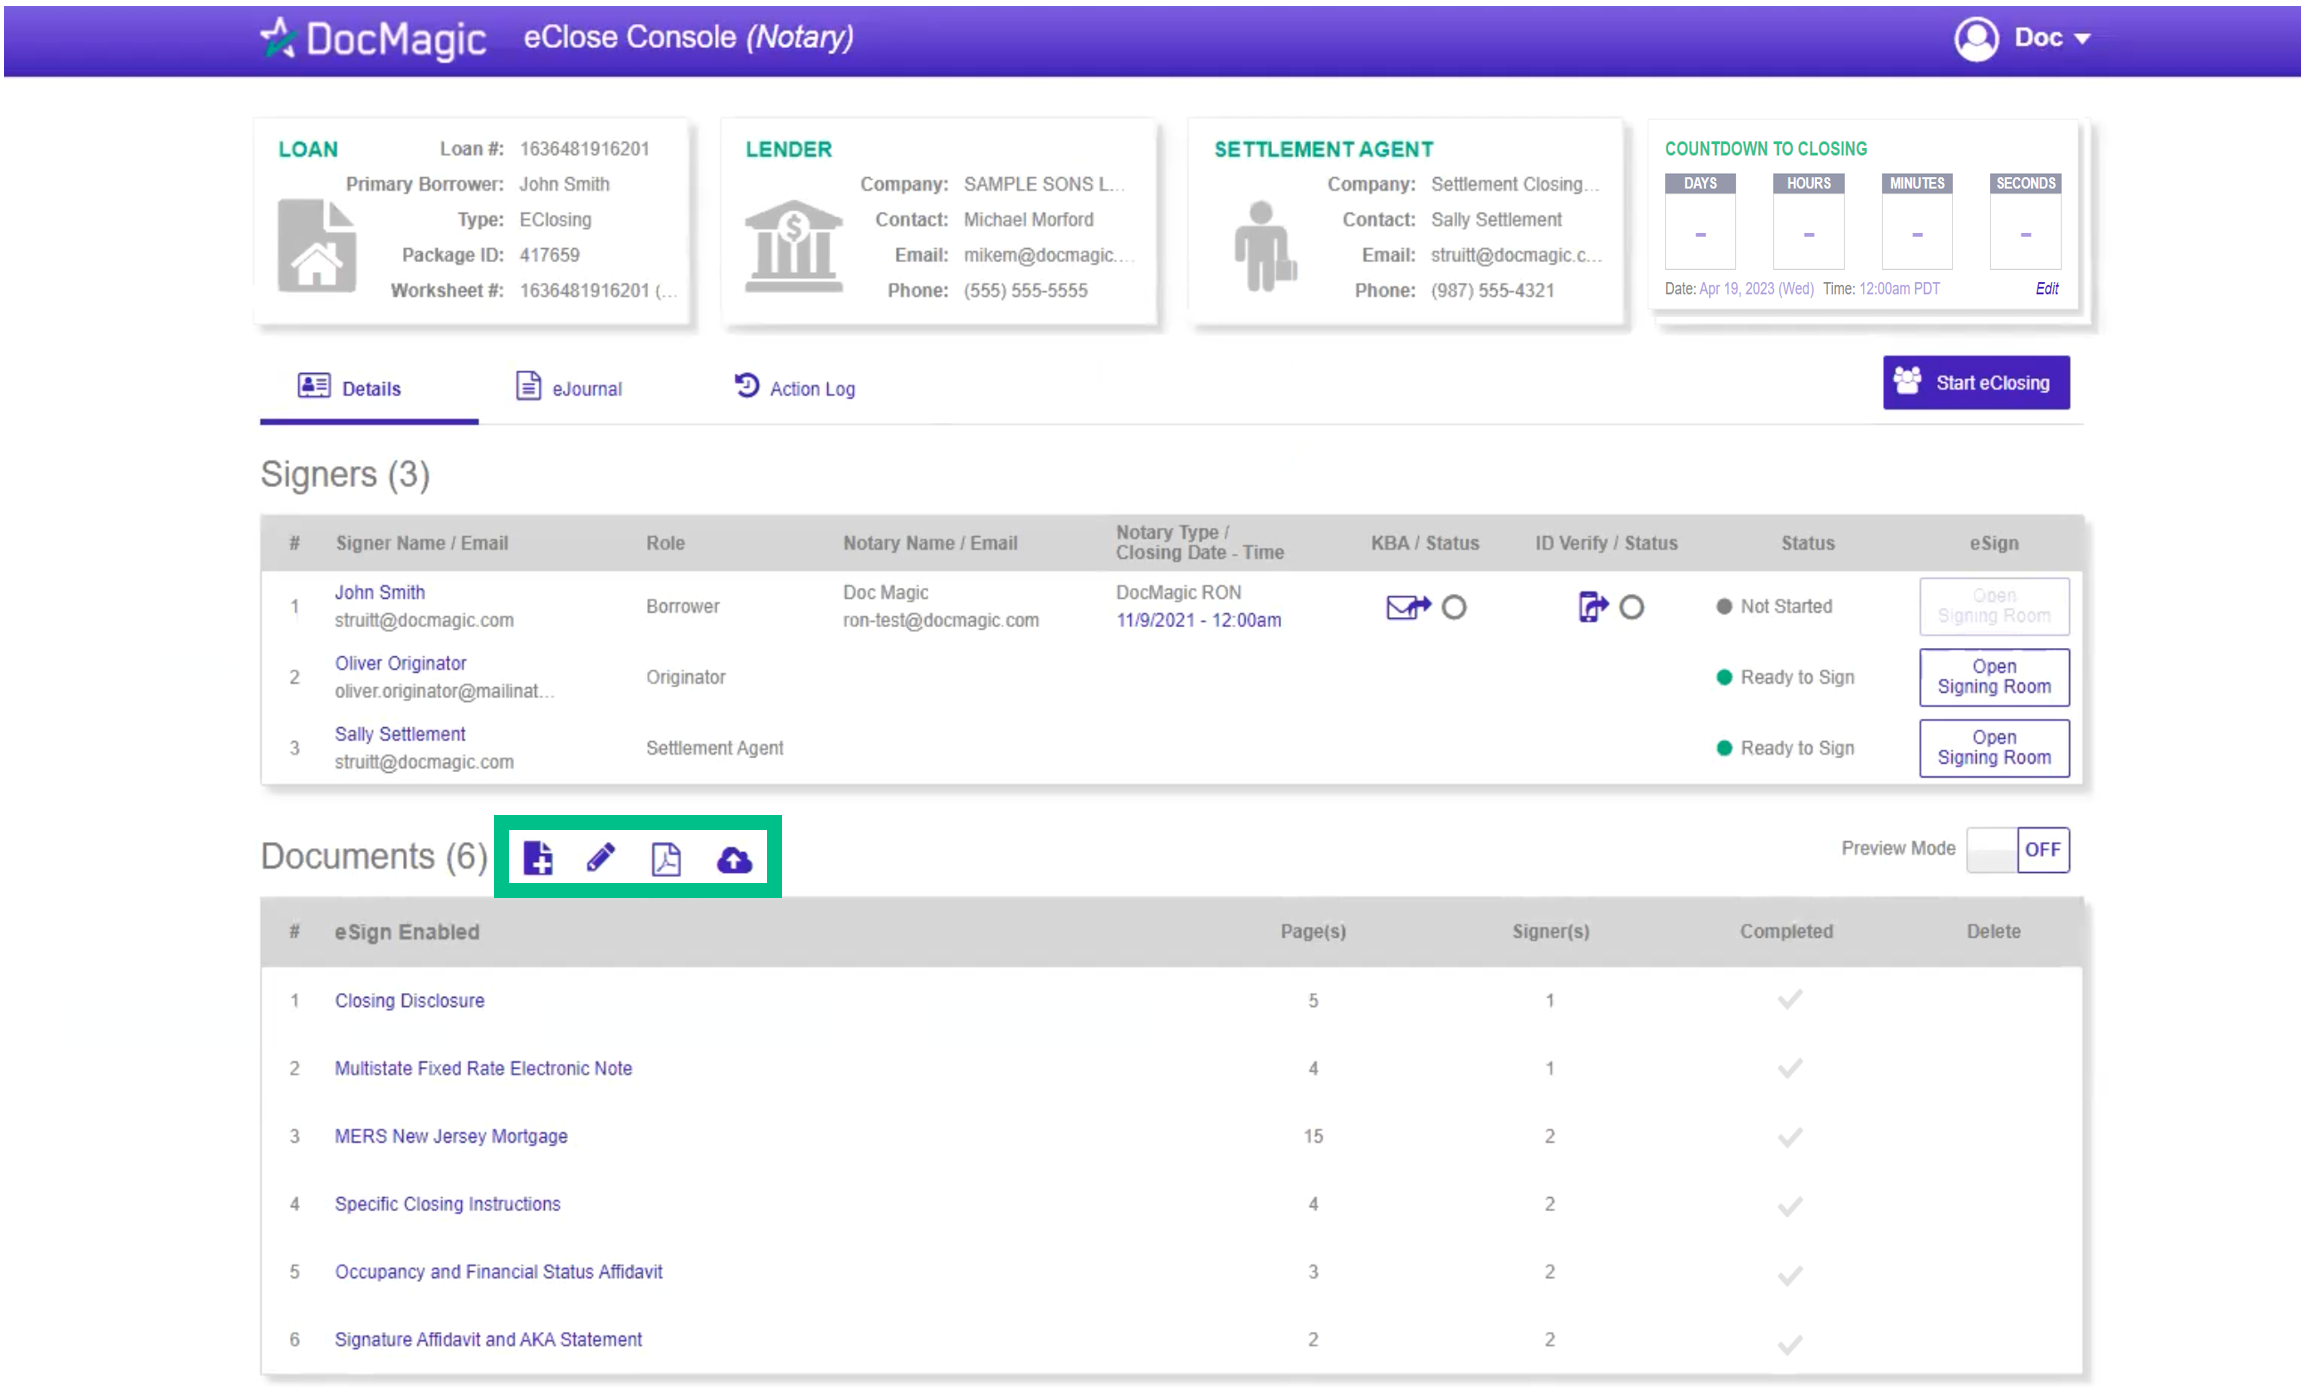
| 5. | After entering your Notary Access Code (given to you during your Secure Insight Certification) and the Viewing Code, you will be in your Notary eClose Console, displayed below.
1. All pertinent information regarding the parties the transaction is at the top of the notary portal.
2. The eClosing Countdown Clock keeps you on track right up to the moment of closing. The Edit button at the bottom of the Countdown Clock allows you to edit the closing time for all participants.
3. The Signers area highlights all participants, Knowledge Based Authentication (KBA) and I.D. Verification.
|
| |
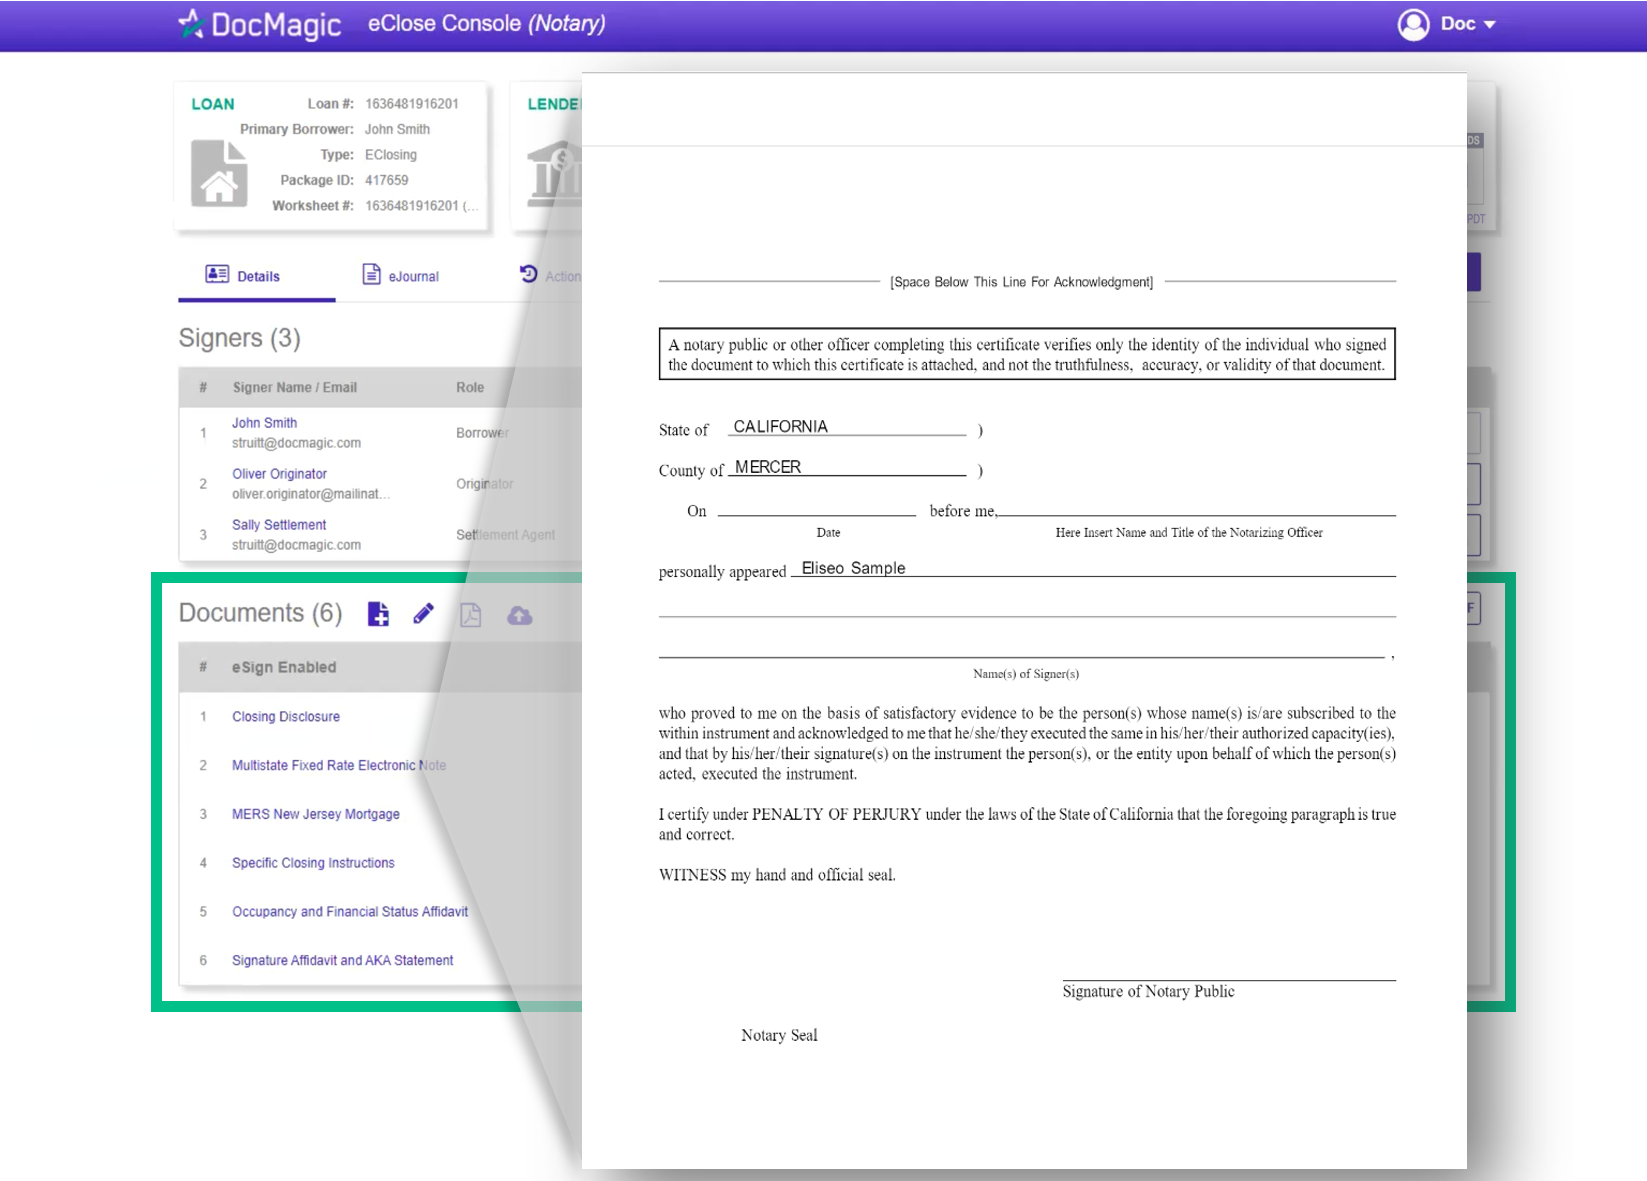
| 6. | The Document area includes all the documents in the package that will be eSigned. You can click on each document separately to review for accuracy.
|
| |
| 7. | The four icons next to "Documents" cover the following functions:
The leftmost icon - the piece of paper with the plus sign - allows you to upload new documents to the package. Clicking that icon will allow you to upload files from your computer.
The next icon over, the pencil, allows you to tag documents (add text fields, signature lines, etc.). See Step 7 (below) for more details.
The second icon from the right, the PDF icon, allows you to download a PDF copy of the entire document package.
The rightmost icon - the cloud with the arrow pointing up - allows you to upload ink-signed documents to the package. You can only upload ink signed documents with QR codes that help the system place the documents in the correct stacking order.
It is extremely important that you do not mix up the first and fourth icons and upload documents to the wrong place.
|
| |
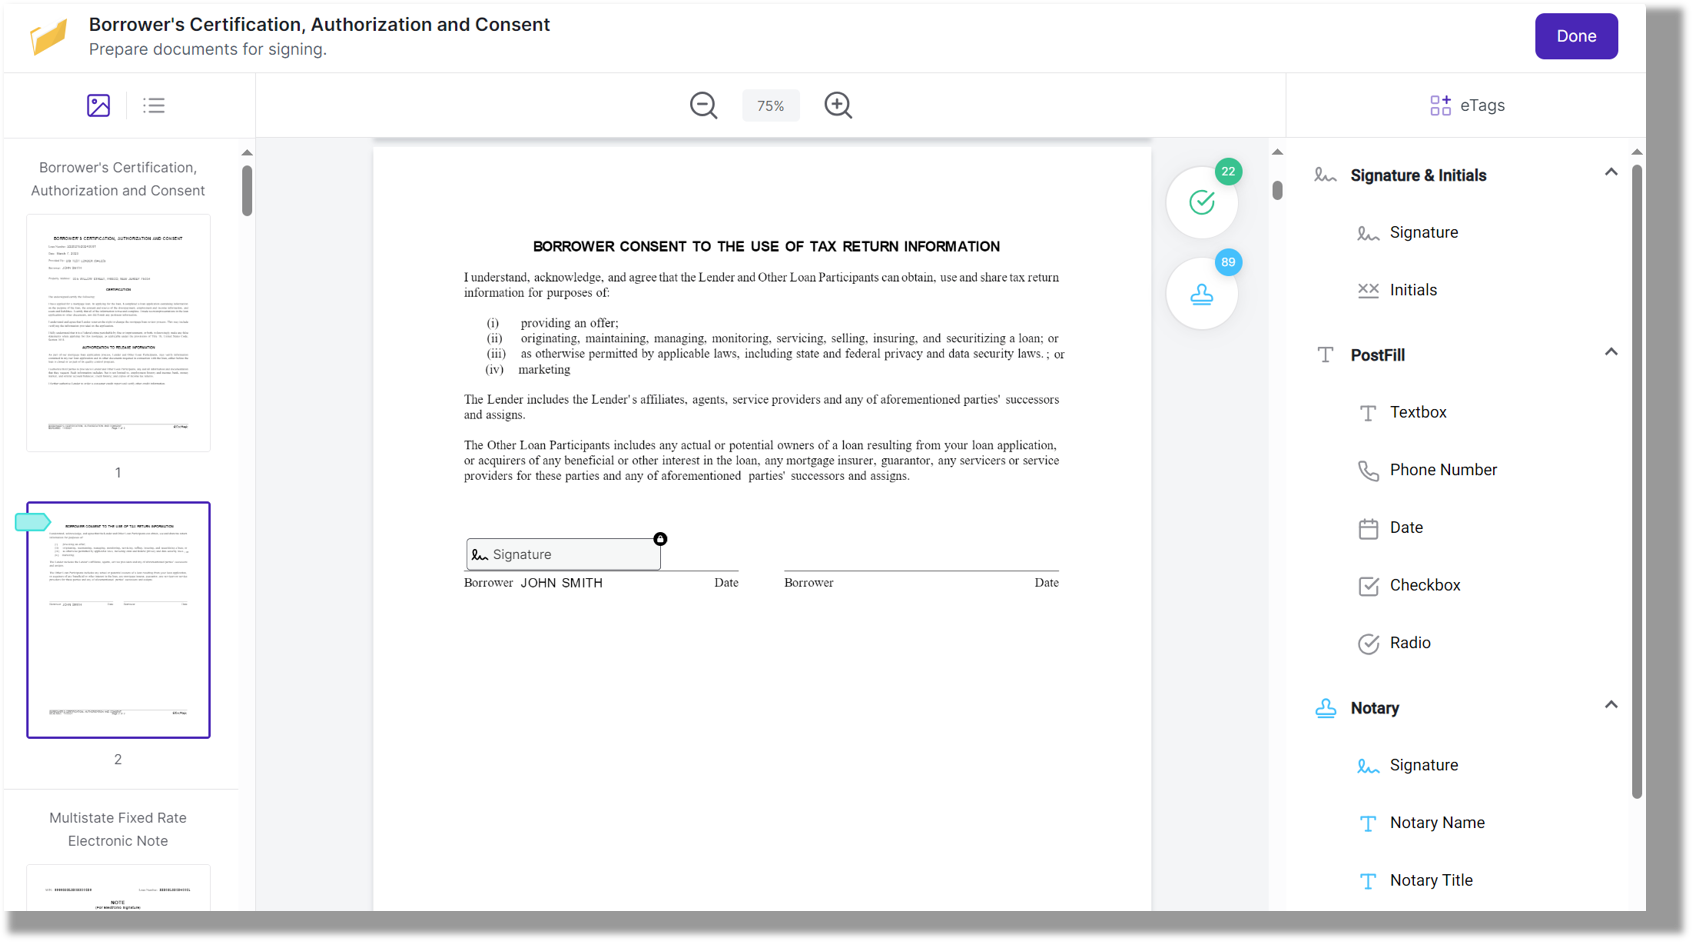
| 8. | We strongly recommend that each notary clicks on the pencil icon and goes through all the tags a few hours prior to the signing.
Please click here for a comprehensive guide on the Document Editor pictured below.
|
| |
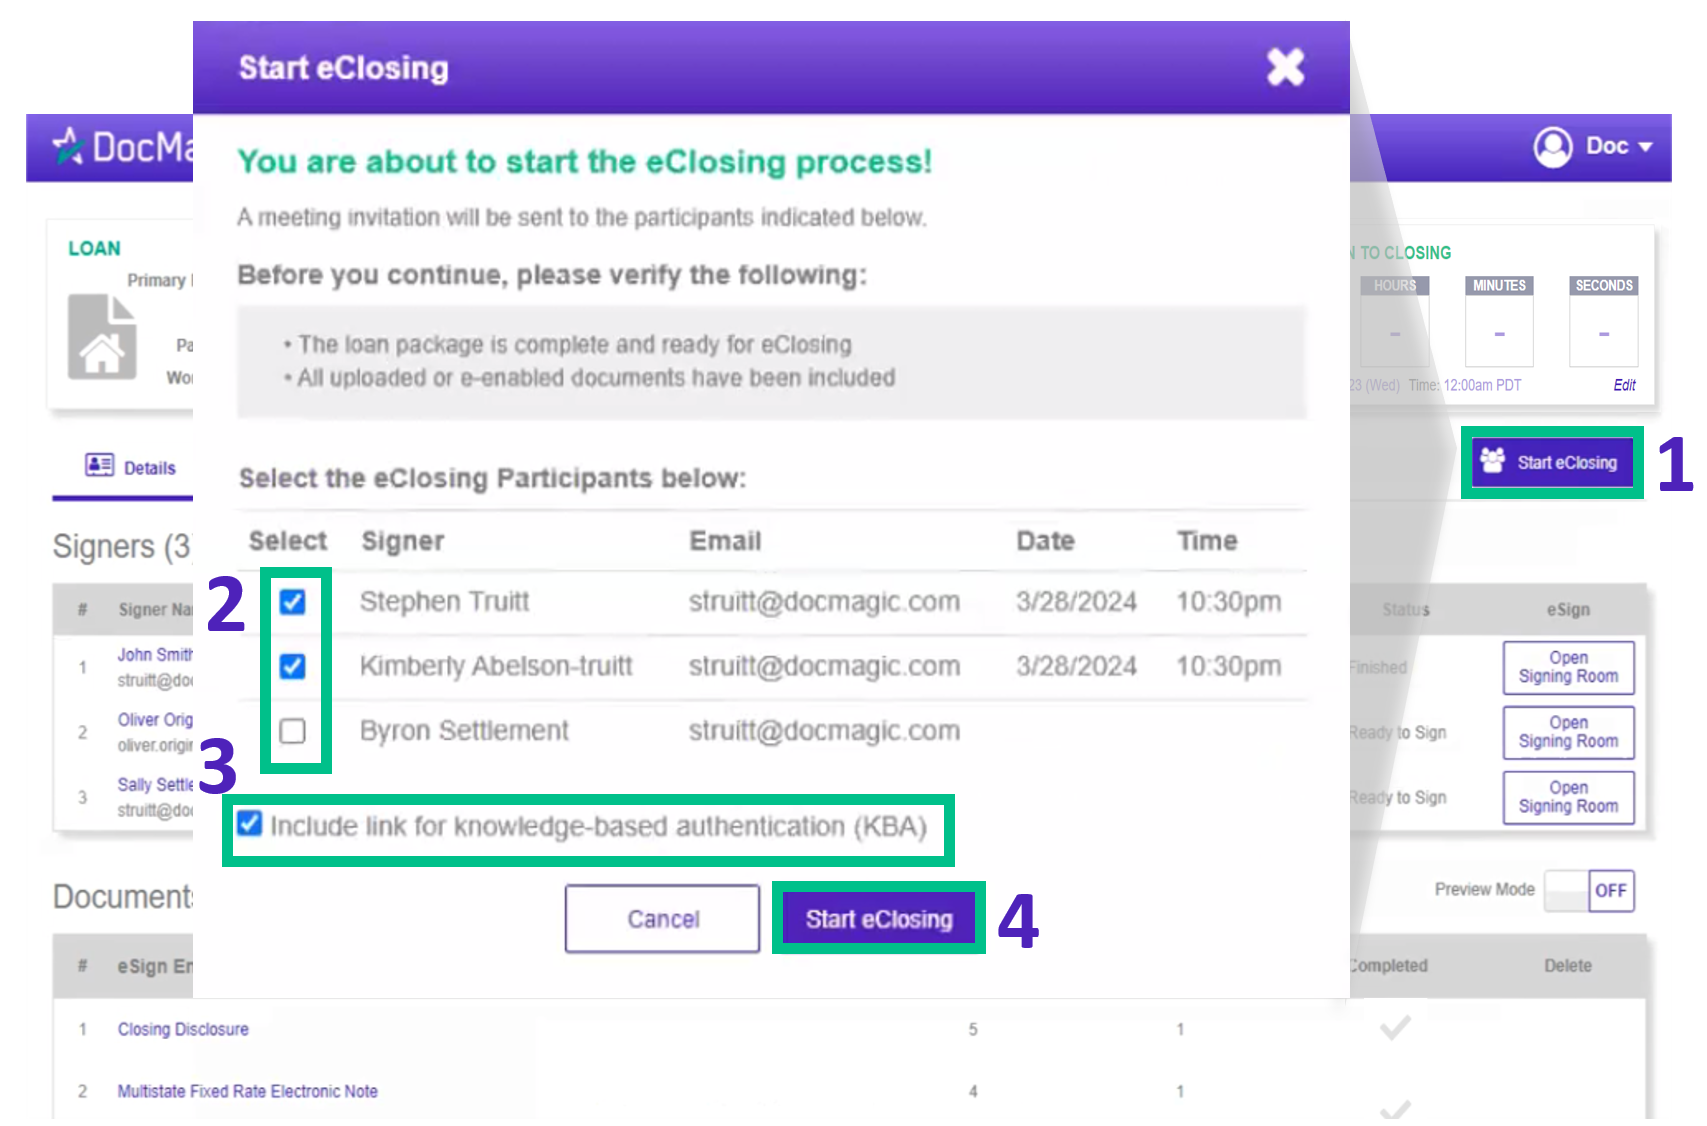
| 9. | 1. Click the Start eClosing button which activates the Start eClosing dialogue box.
2. Choose the participants that you want to be included in the signing room.
a. You'll need to repeat this process if another participant will be signing at a different time.
b. Choose both if you will be signing both at the same time.
3. Borrowers are now required to complete KBA by default. Lenders may contact our support team to allow borrowers to bypass KBA in states that do not require it.
4. Hit Start eClosing to start the process.
|
| |
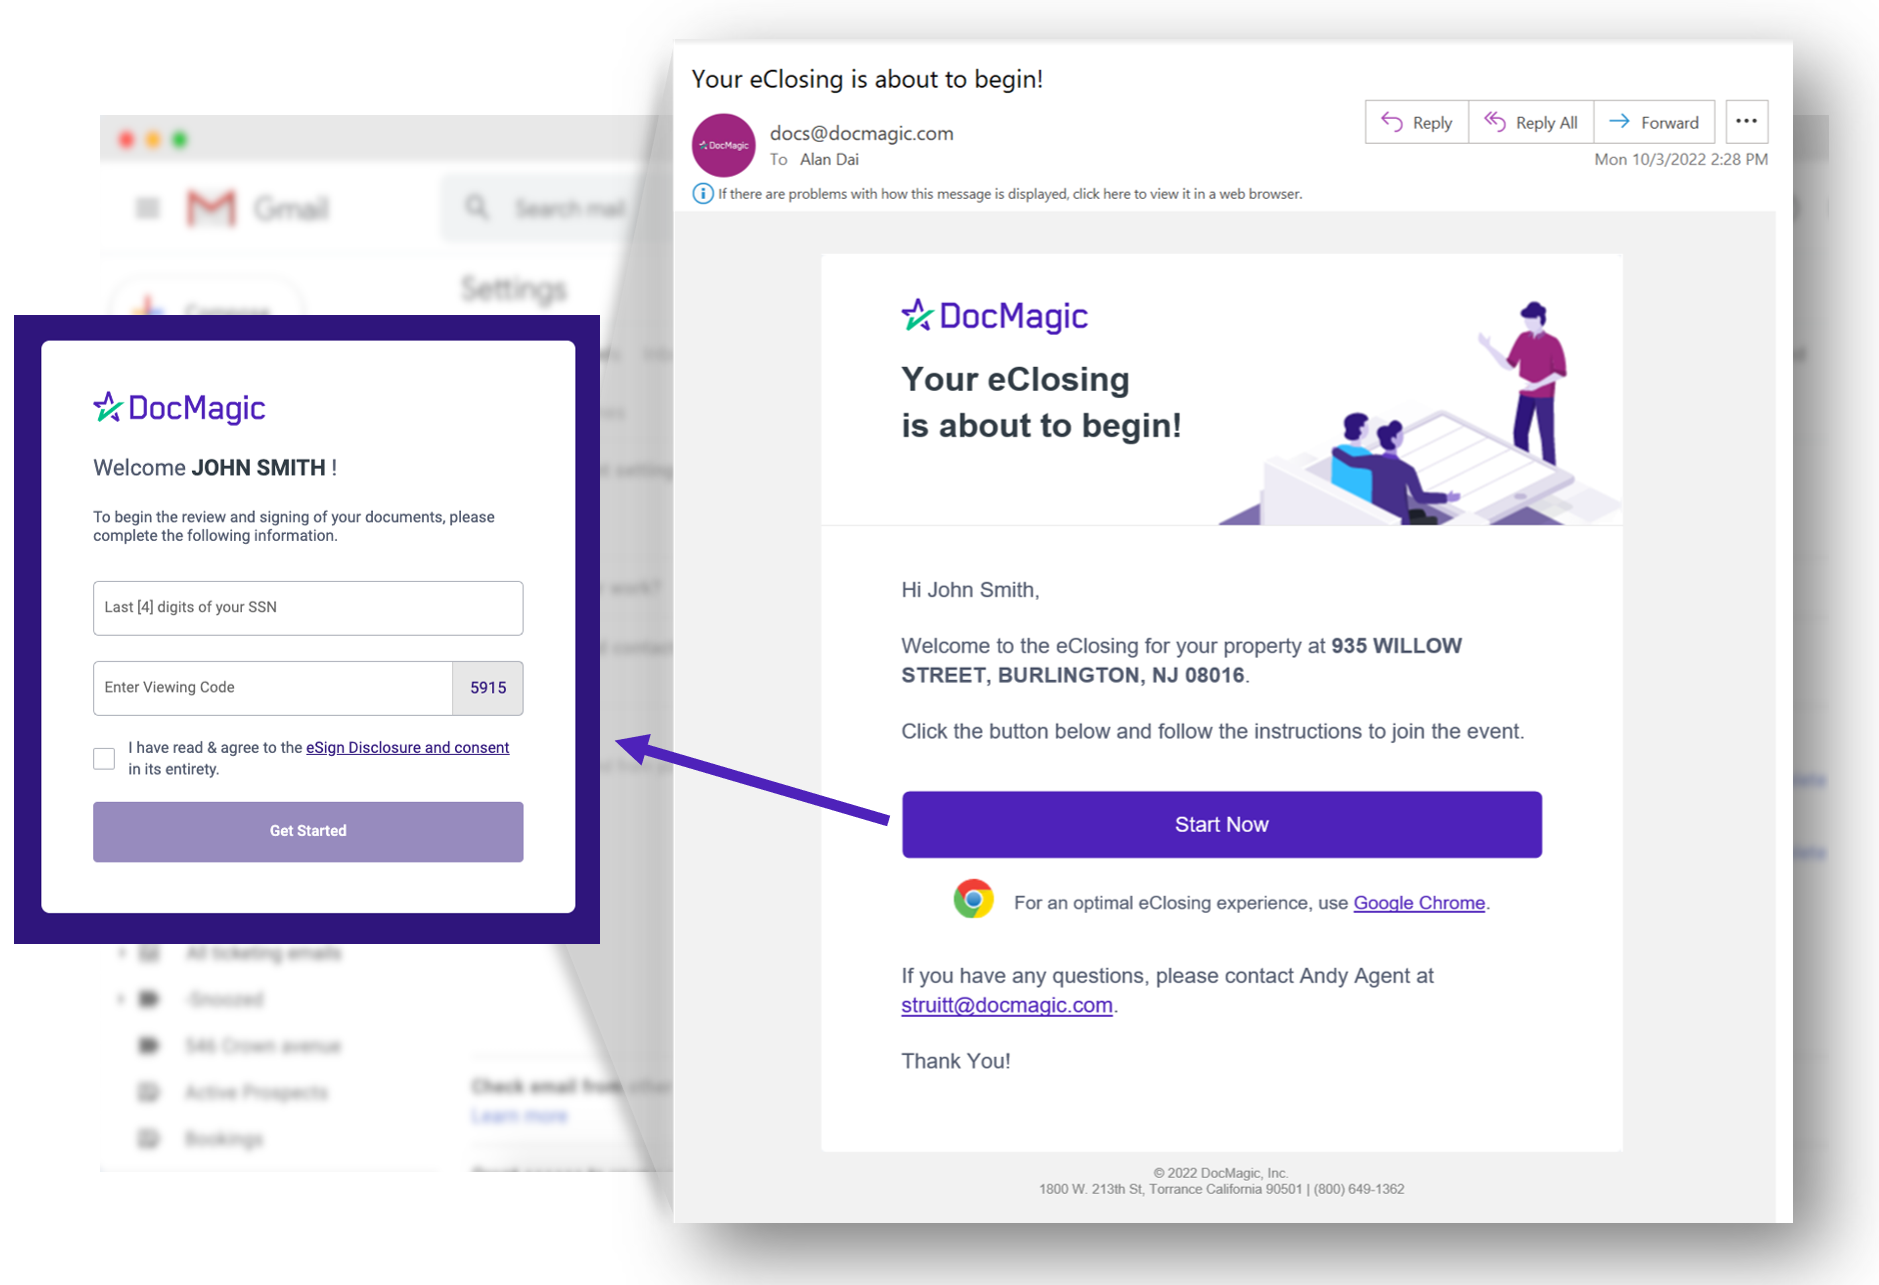
| 10. | Participants will receive an invitation email containing all pertinent closing information and a Start Now button to enter the eClosing event.
When borrowers click Start Now, a new window will automatically open in their web browser. They'll be prompted to type the last 4 digits of their Social Security Number and the viewing code shown on screen. They'll also need to check the box agreeing to the eSign Disclosure and Consent form (which can be read by clicking the underlined purple text). Then the Get Started button will illuminate, which they will click.
In the rare event that a "login error" occurs, have them close the browser tab and click on the Start Now button in their email.
If the borrower does not have an SSN, a Settlement Agent or Lender can create an Access Code for the borrower to access the eSign experience.
|
| |
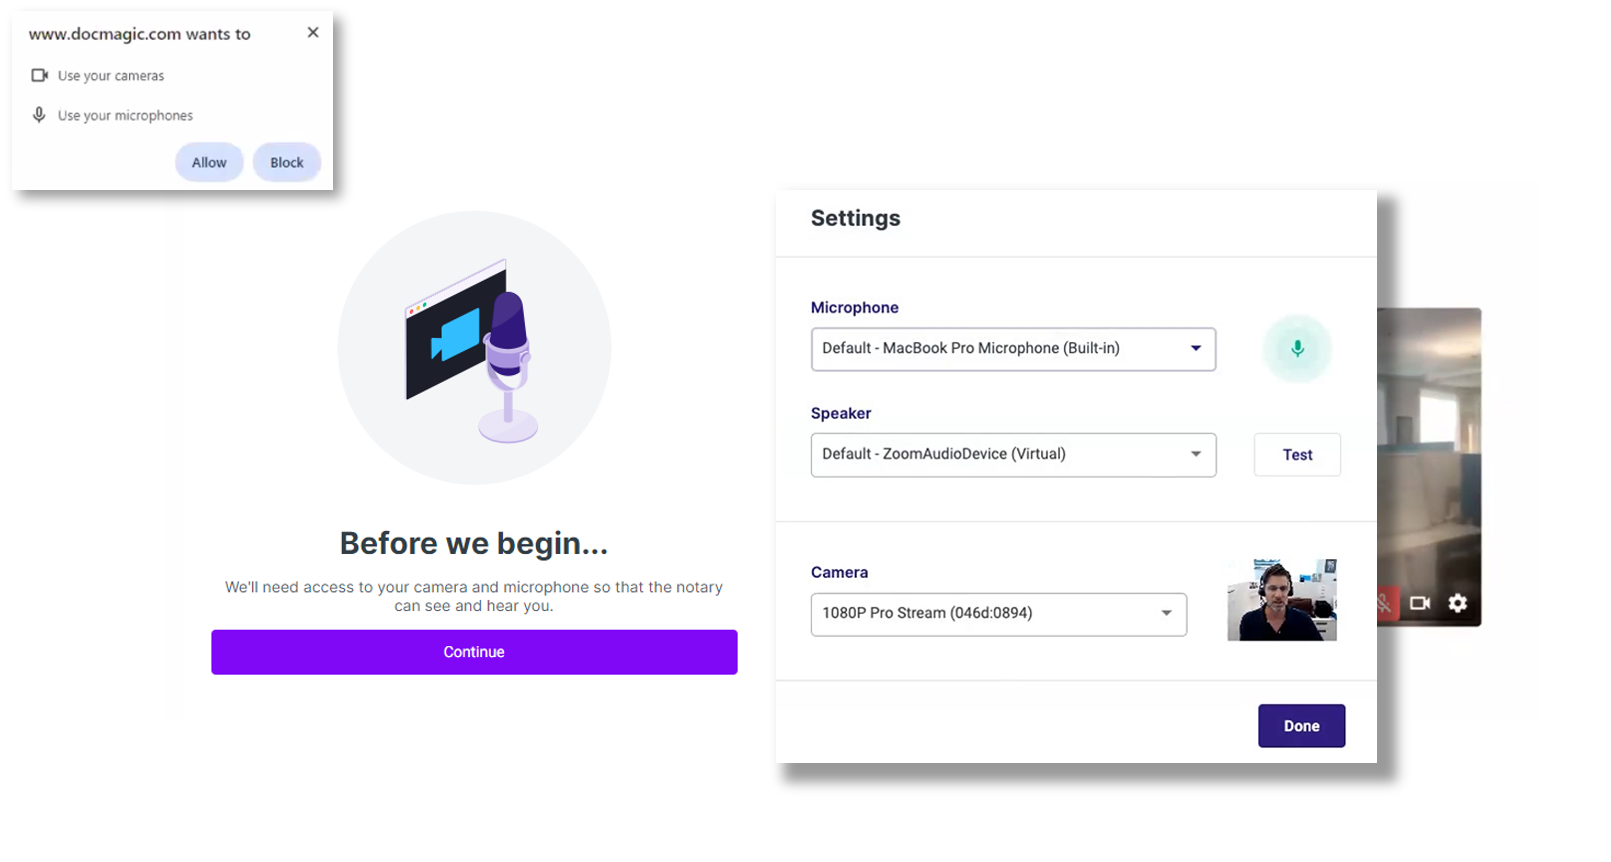
| 11. | The borrower will be reminded to make sure their microphone and camera are activated. If they are prompted by the browser, please have them allow camera and microphone access.
If they're having technical difficulties, have them click on the Settings icon to ensure that the correct microphone, speaker, and camera are selected.
|
| |
| 12. | The borrower will then be asked if other signers will be joining the session on the same device.
If there are multiple borrowers but they are not using the same device, please have each of them select Just me. This is strictly asking if multiple signers will be on a single device.
In addition, borrowers cannot participate in Remote Online Notarizations using a phone.
|

| |
| 13. | Meanwhile, you'll be taken here after clicking Start eClosing.
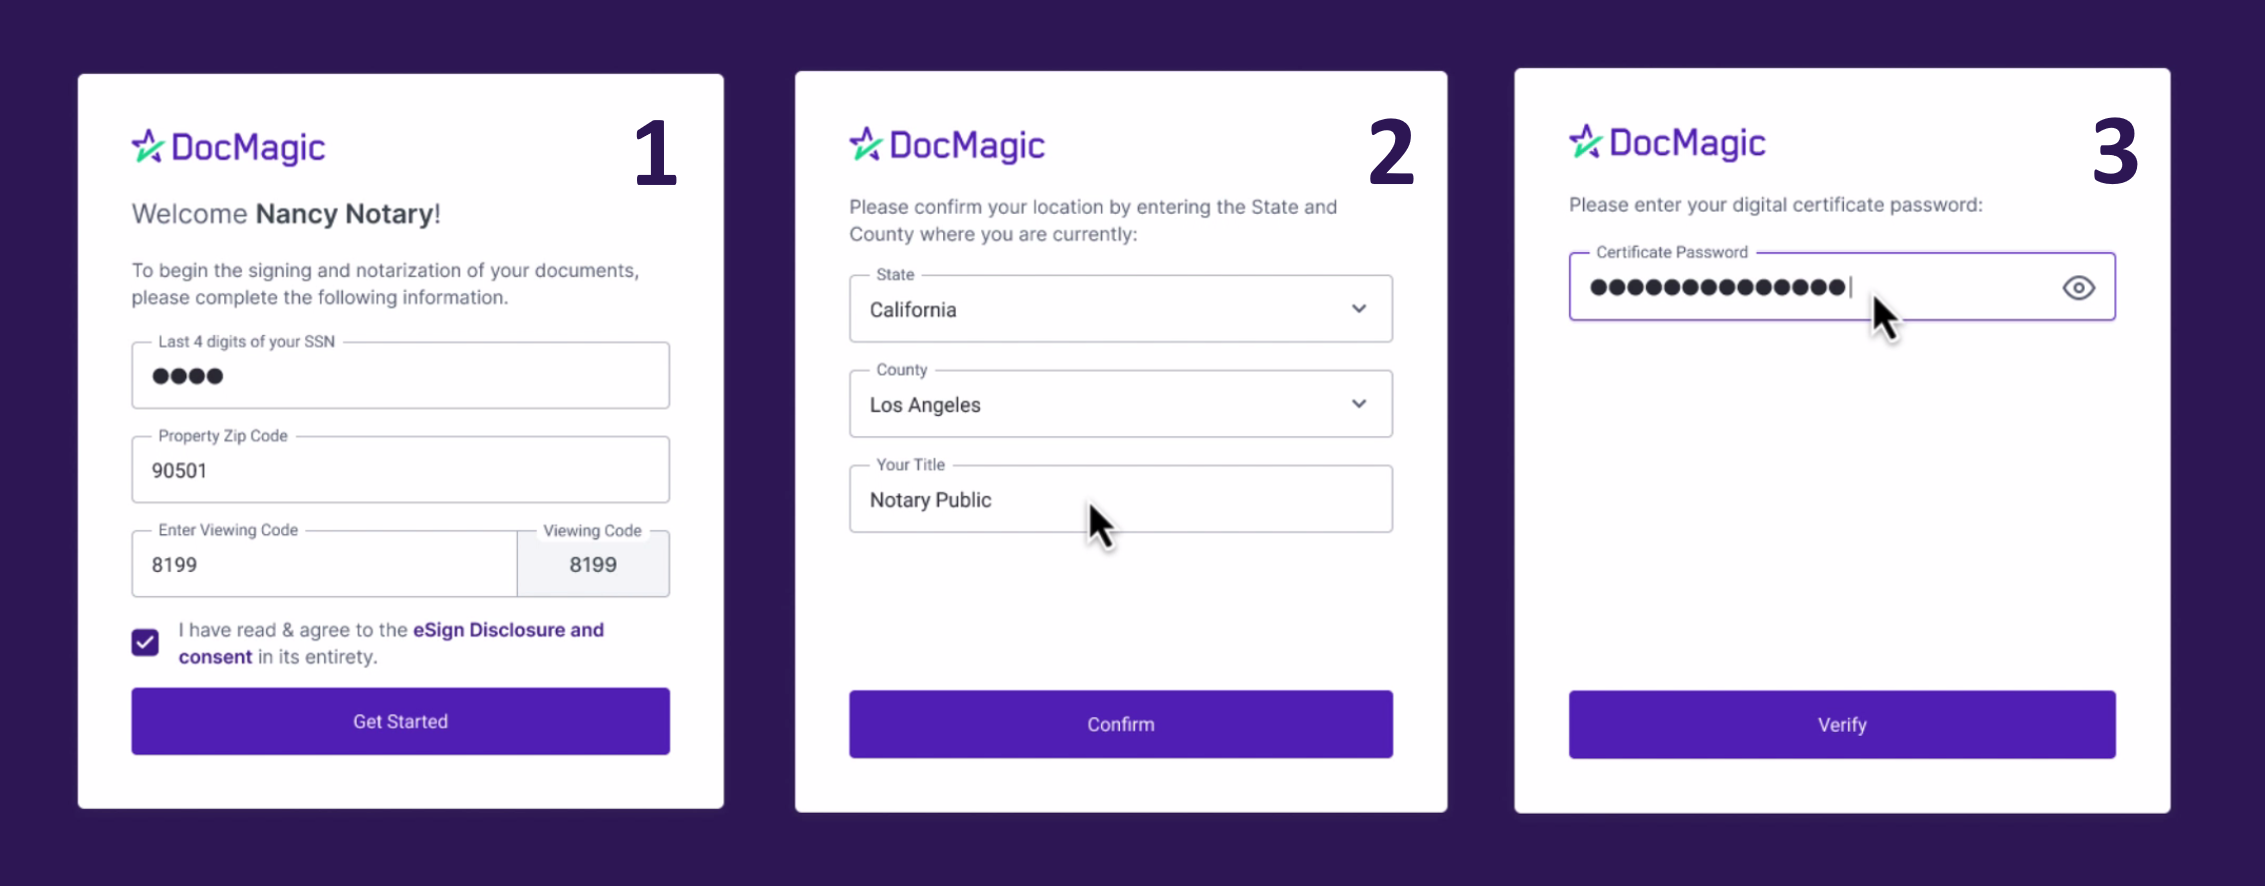
1. Enter the last four digits of your social, the zip code of the property, and the viewing code displayed below. You'll also need to check the box agreeing to the eSign Disclosure and consent form before getting started.
2. Next, confirm your State, County, and Title before proceeding.
3. If you uploaded your certificate to Secure Insight during your onboarding process, you will also need to enter your certificate password.
|
| |
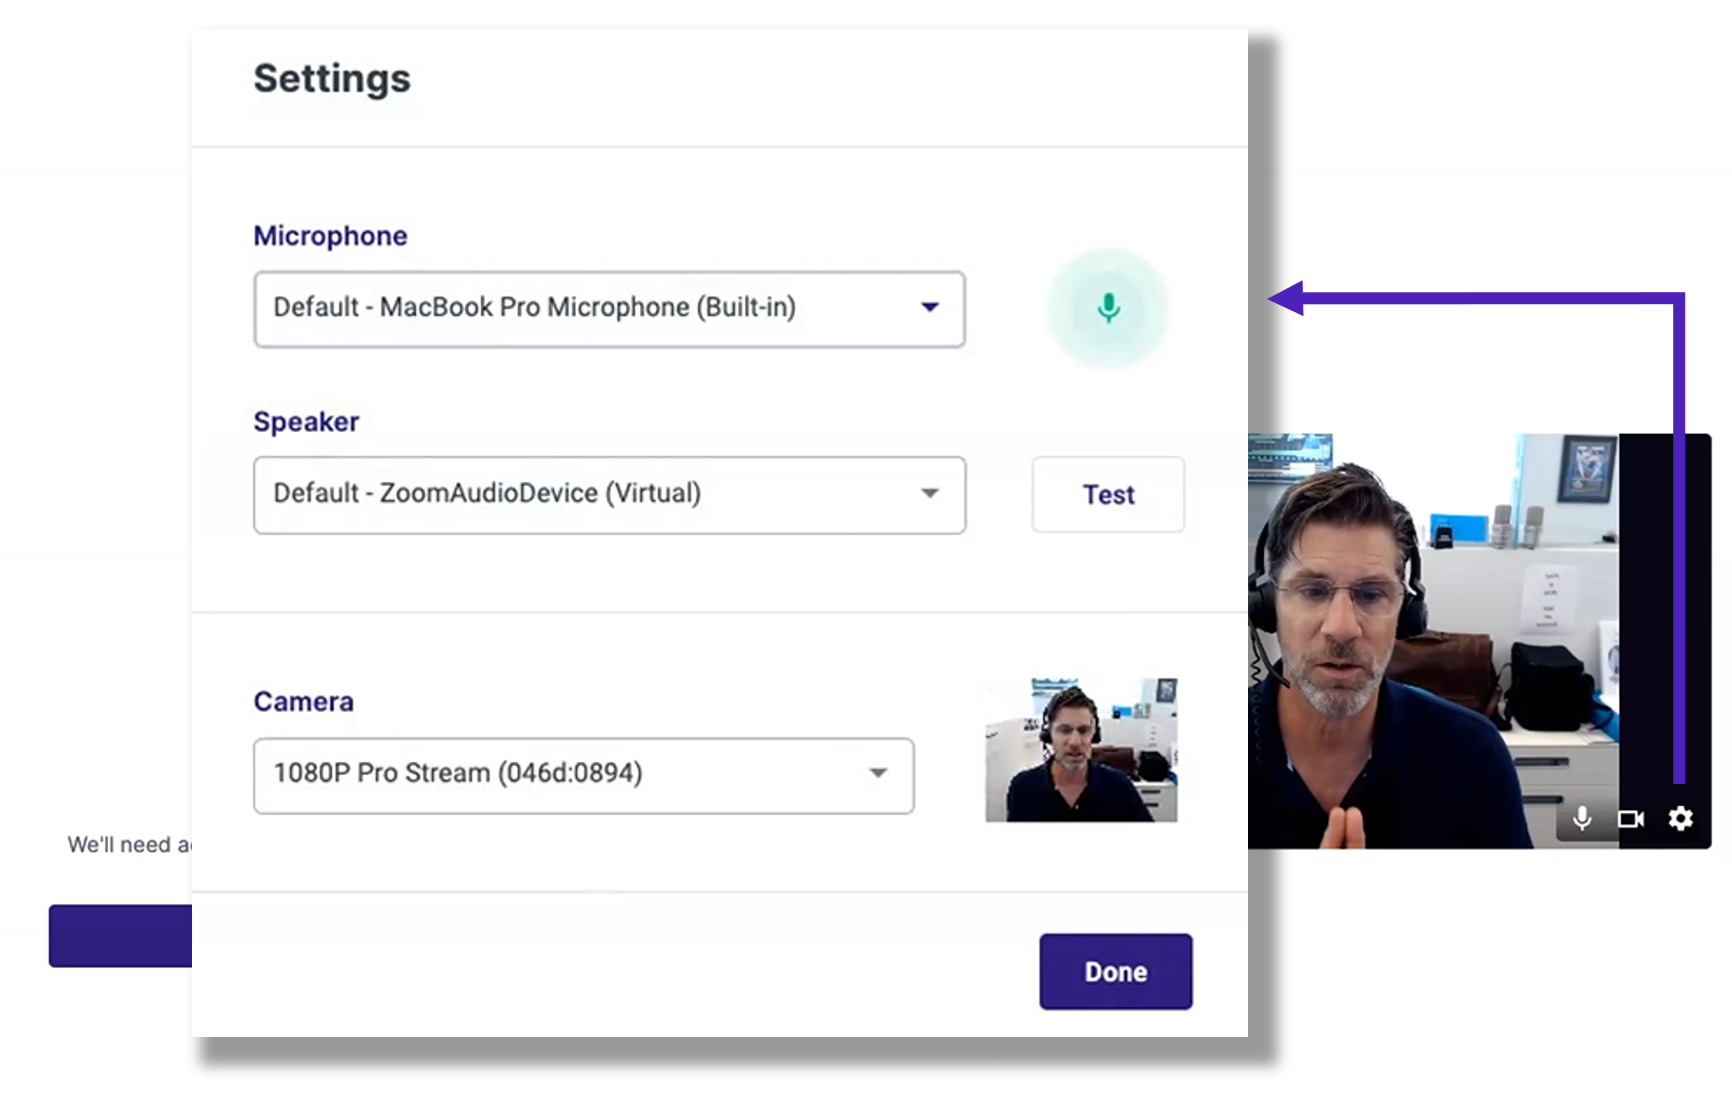
| 14. | Just like the borrower, before you join the meeting, you'll also be brought to this meeting room to ensure that your camera and microphone are working and accessible.
Please note: If you are connected to a VPN and are experiencing issues logging into the signing experience, it may be due to VPN filtering traffic with proxies or other web filtering technologies. To resolve this, disable traffic filtering.
|
| |
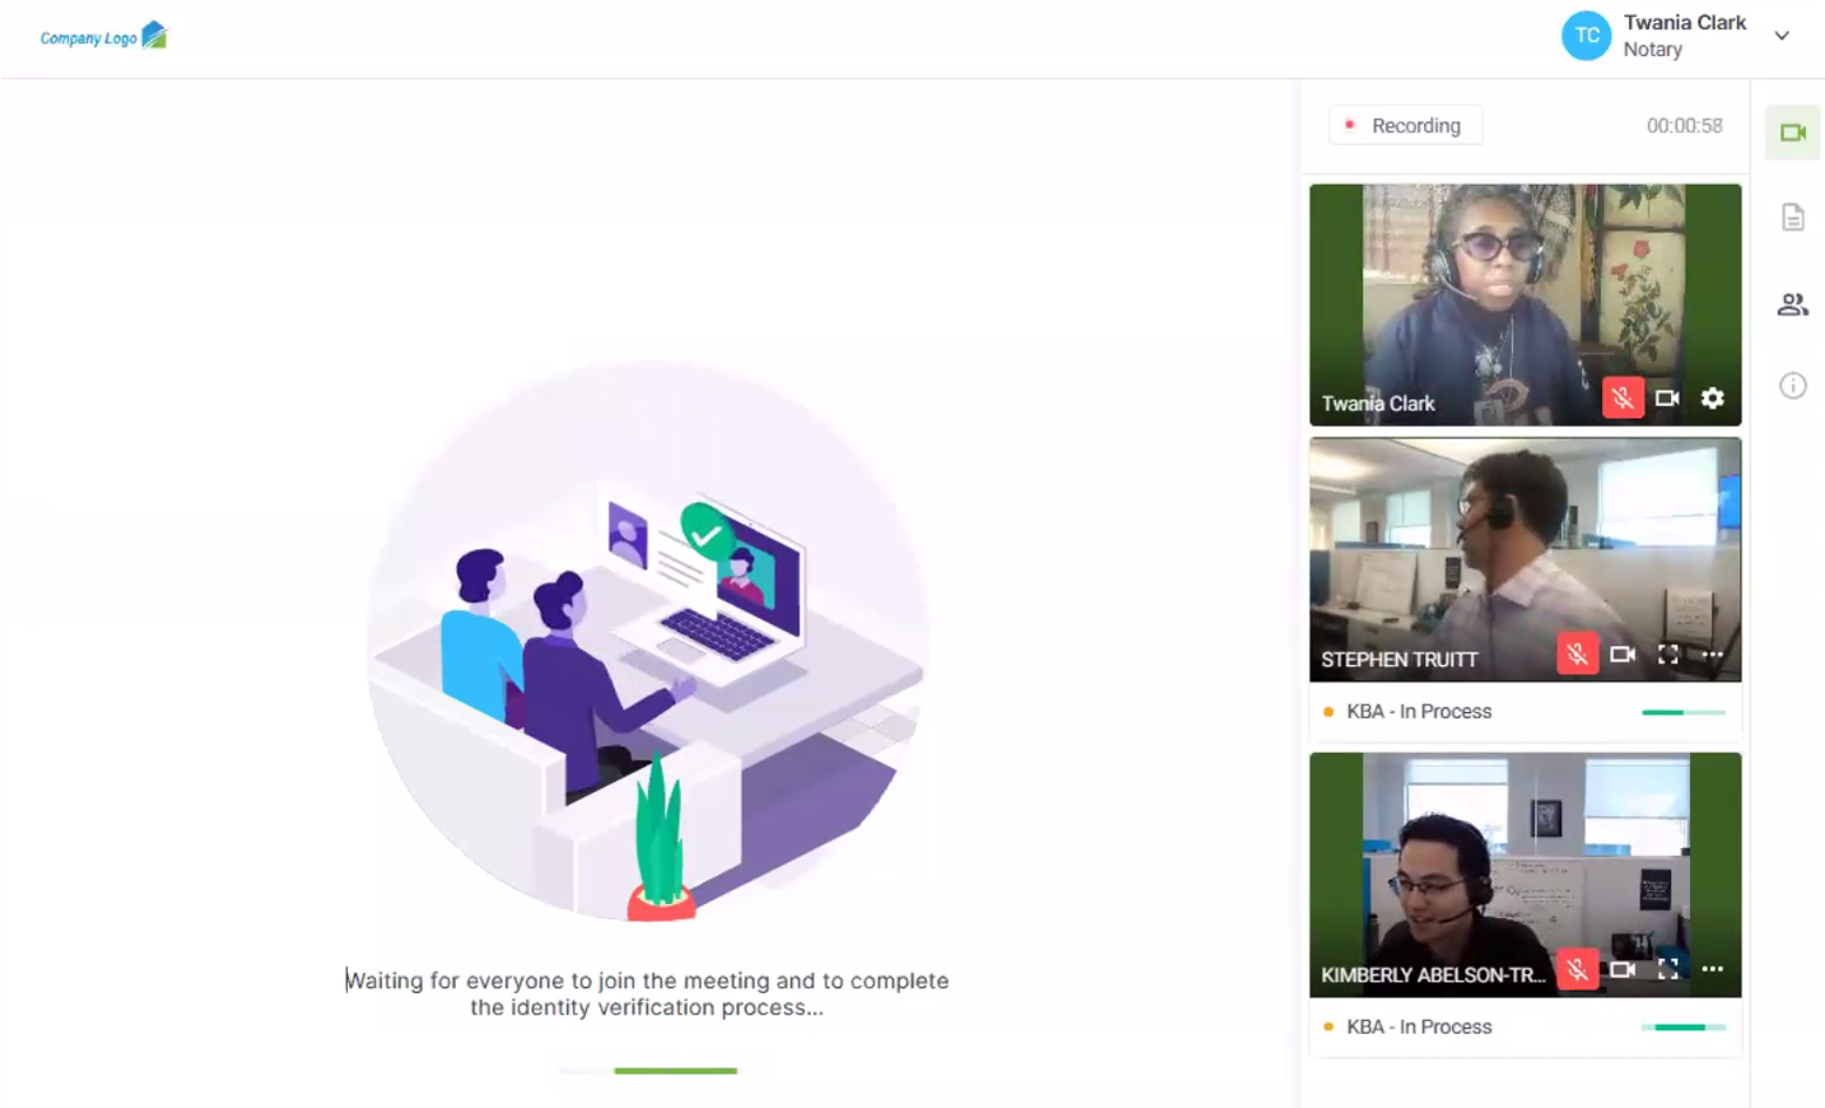
| 15. | The moment the meeting beings, the session is automatically recorded.
If Knowledge Based Authentication is enabled for the session, the borrower(s) will need to verify their identity when they first join.
You'll see a KBA - In Process status under participants that are currently going through the process. You will not be able to see the participants KBA - only the message displayed that says "waiting for everyone to complete the identity verification process".
|
| |
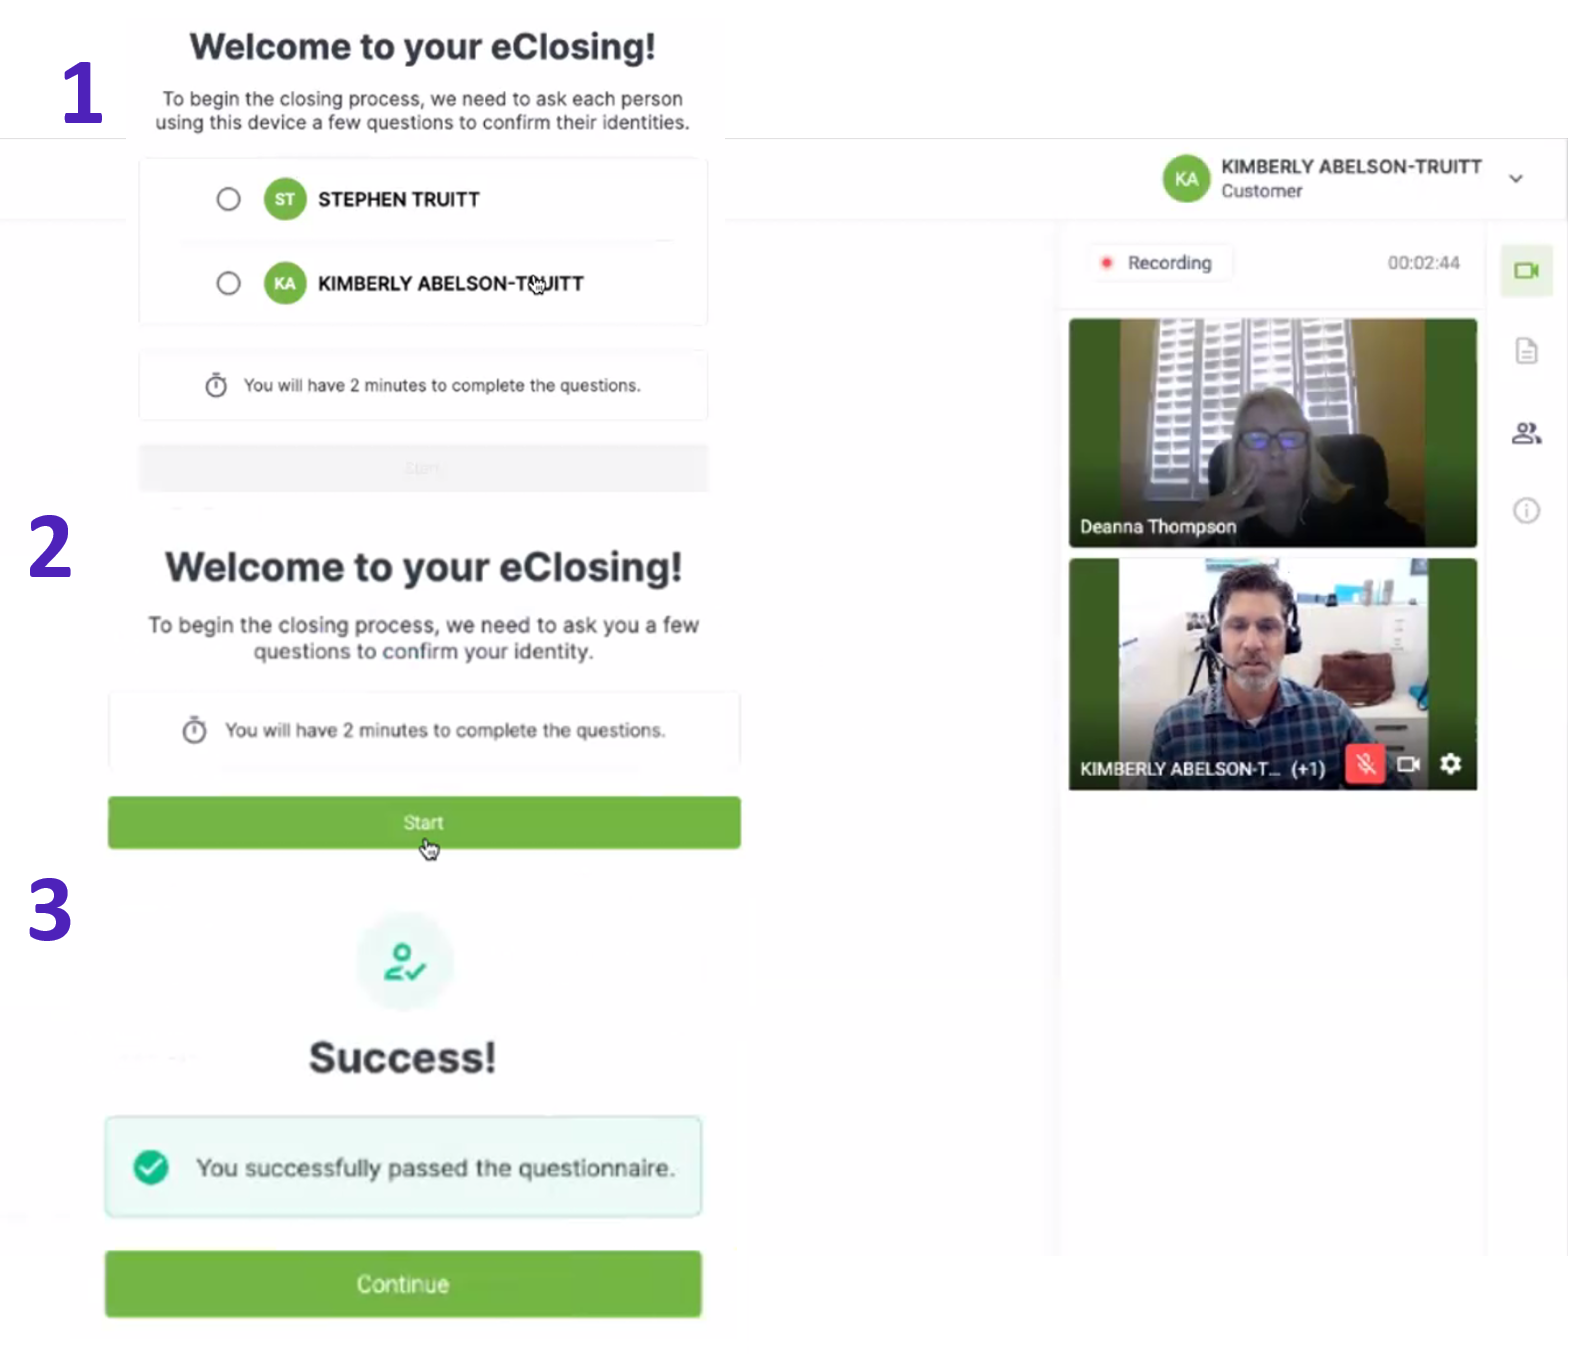
| 16. | The participant will only be allowed 2 attempts to give 4 out of 5 correct answers. If they do not pass after two attempts, they will be locked out for 24 hours.
1. If there are multiple participants on the same device that need to do KBA, they will choose who goes first.
2. Once a participant hits Start, they will have a two-minute limit to answer their questions.
3. When the Participant successfully completes the assessment, they will receive this confirmation where they can click Continue to join the closing room.
|
| |
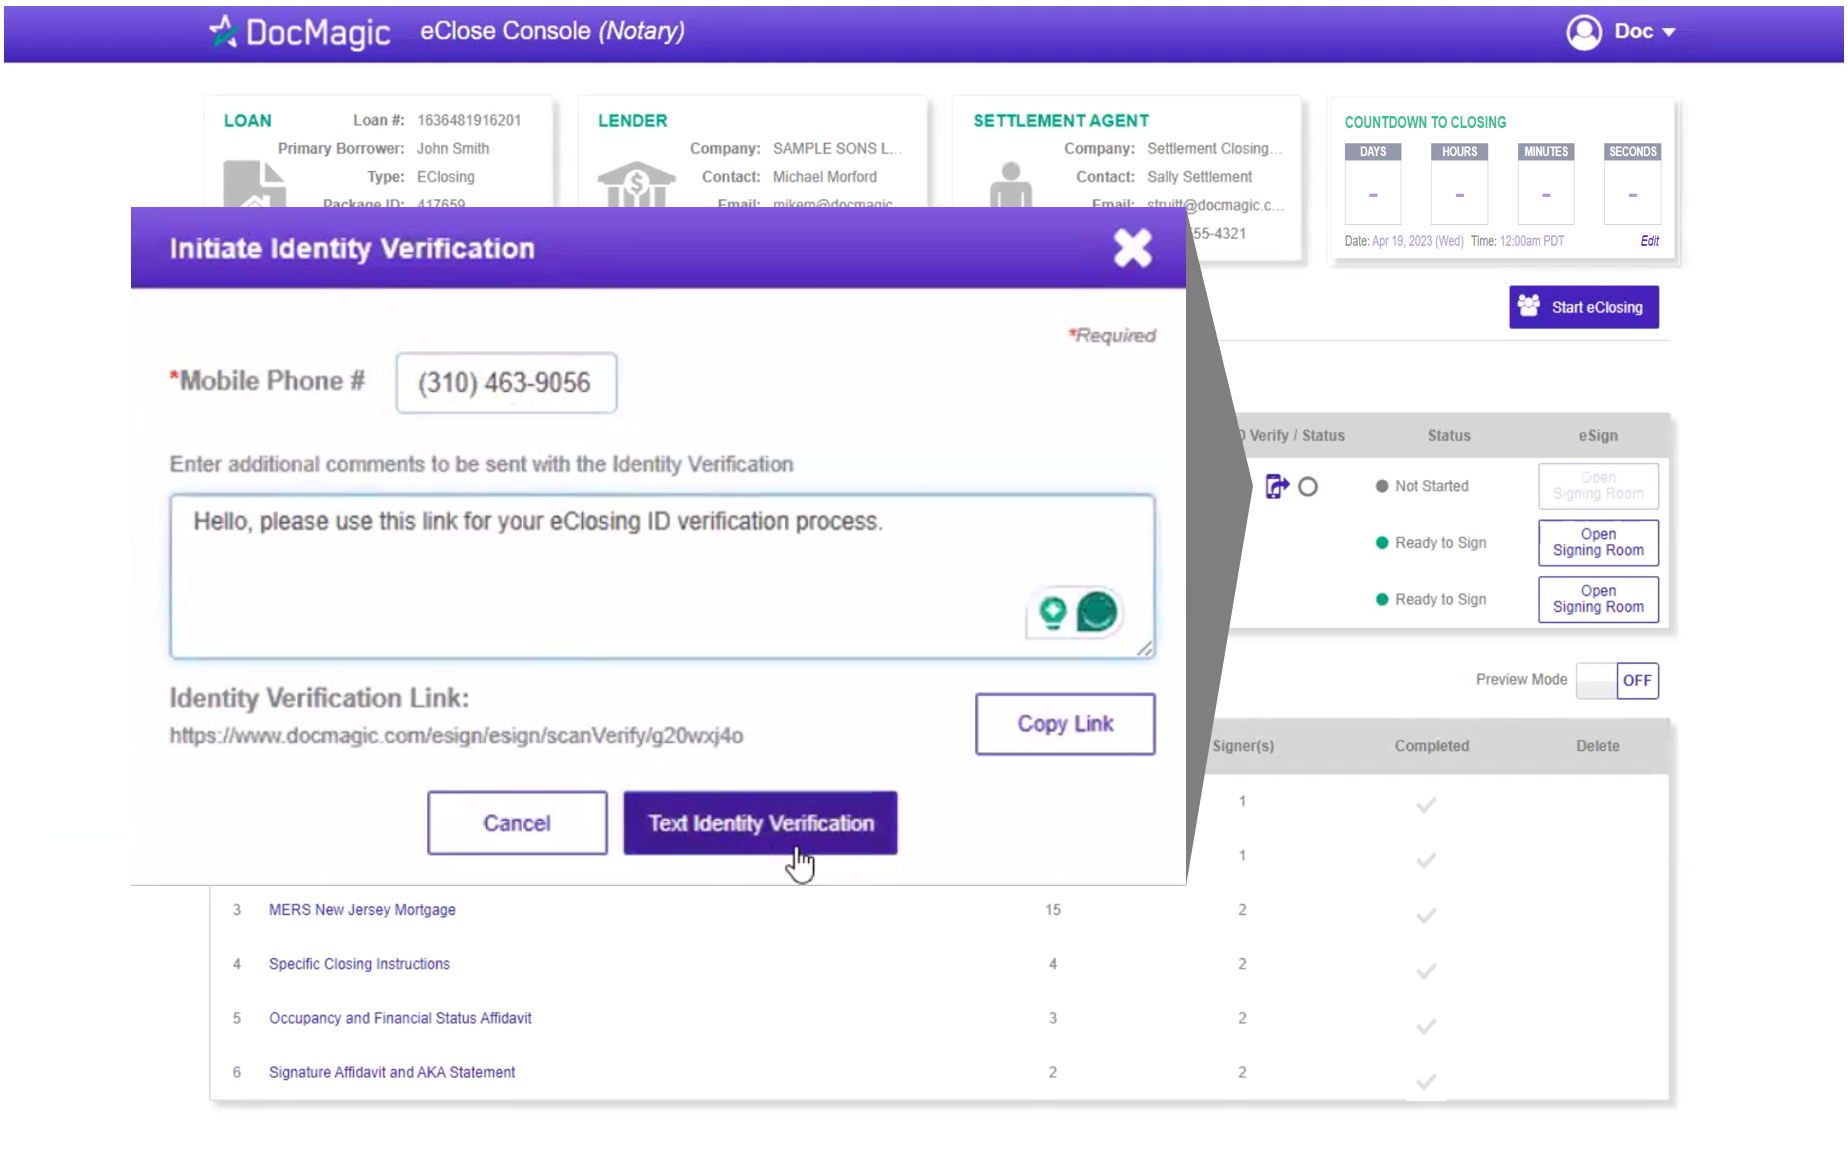
| 18. | If required, the ID Verification process must be done during the actual signing. Go back to your Notary Portal and click on the phone icon (the actual icon, not the circle next to it) for the borrower that needs to have their identity verified.
In the window that appears, verify that the phone number is correct then click the Text Identity Verification button.
If applicable, you may verify more than one participant with the same phone number. The identity verification link is unique.
|
| |
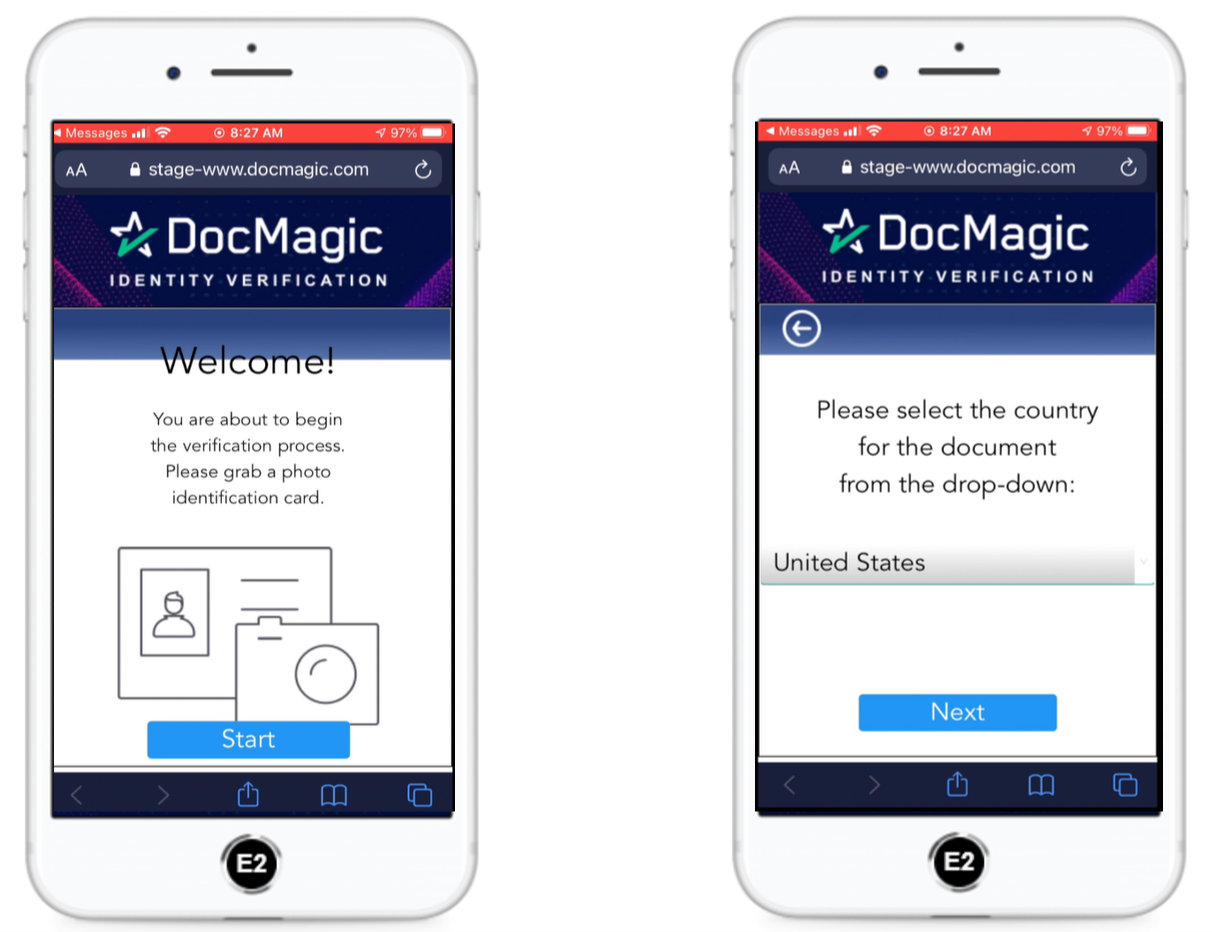
| 19. | The borrower will receive a text message containing a link to complete the I.D. Verification process.
They will be taken to a screen that asks them to retrieve a photo identification card.
After that, the borrower must select the country that issued their identification.
|
| |
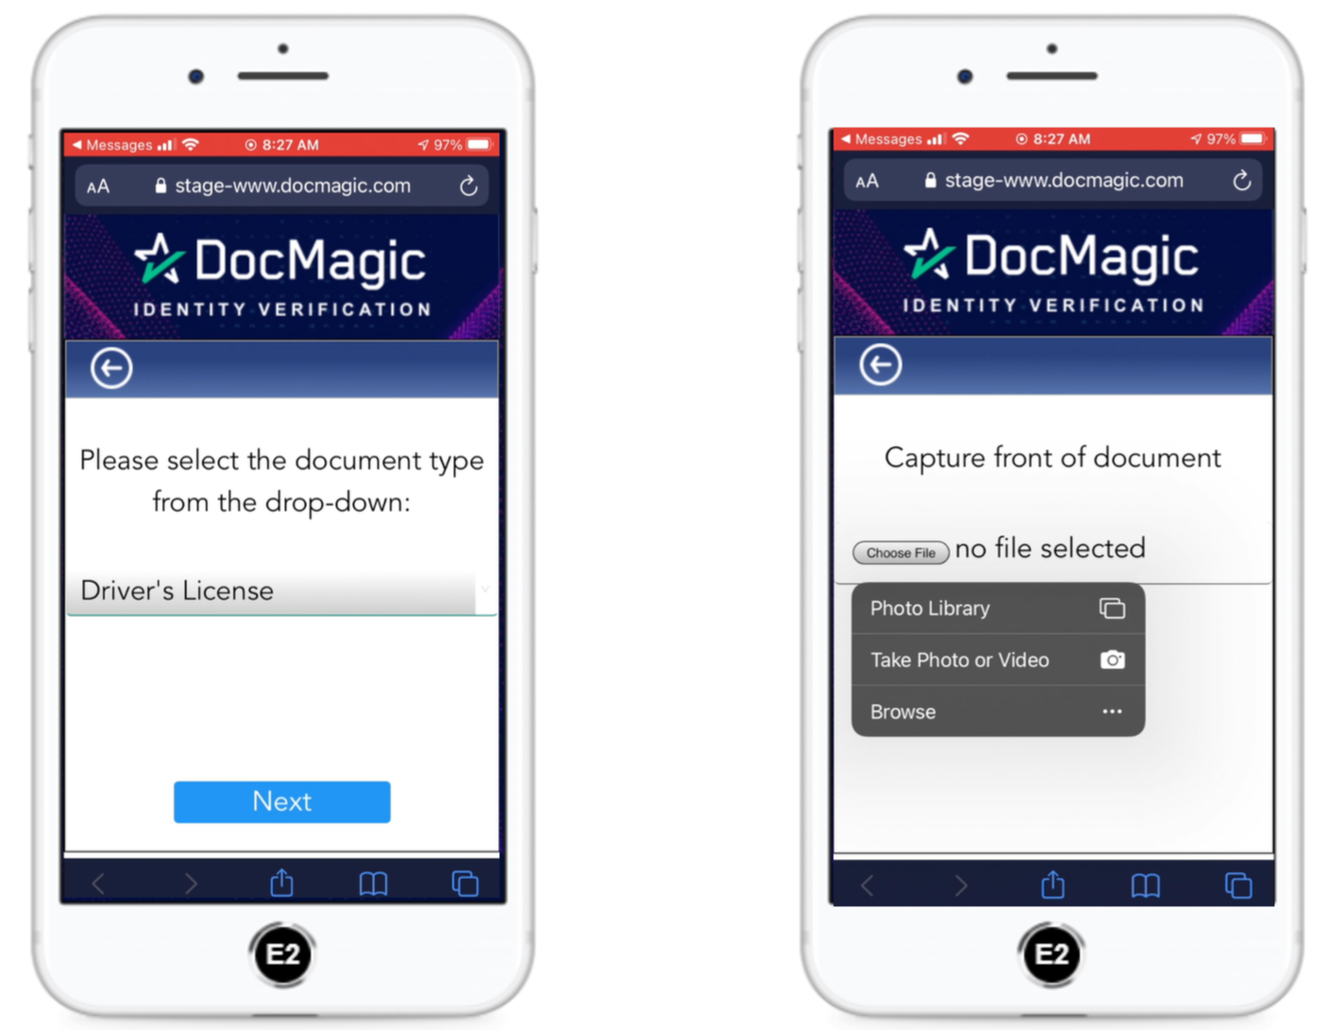
| 20. | The borrower will then choose their form of I.D. from the drop-down menu.
After that, they will select a file from their phone or take a photo and upload it.
Please note that the borrower will have to repeat the process and upload both sides of their I.D.
|
| |
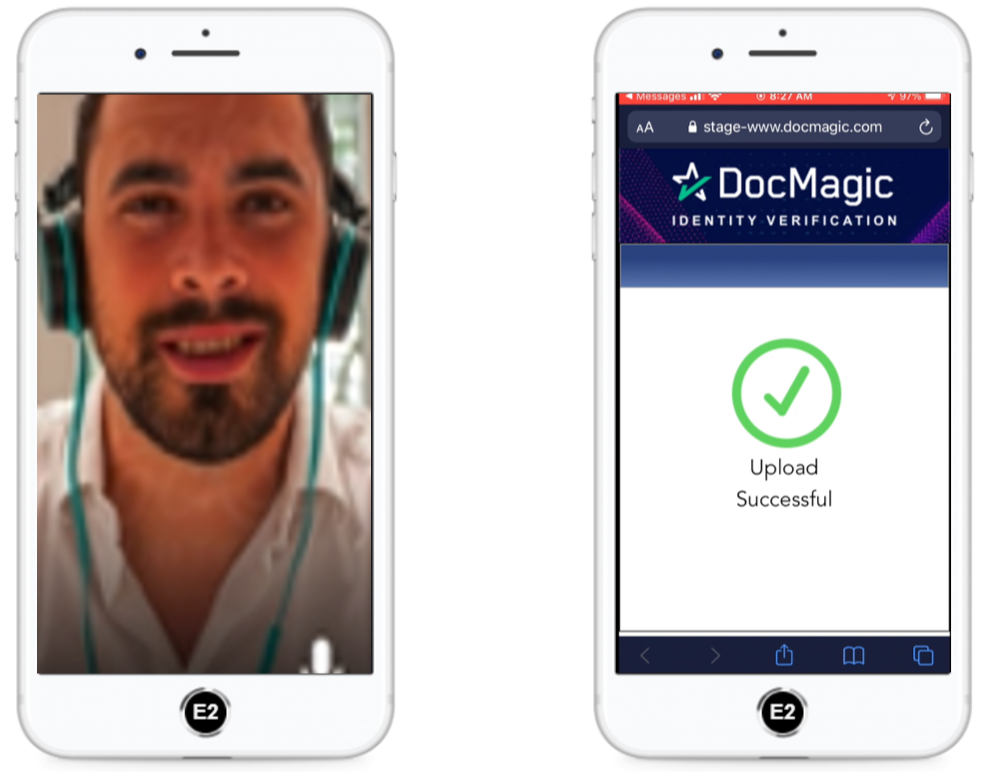
| 21. | The borrower may also be asked to take a selfie so the system can compare the image with the official identification.
A green check mark, seen on the right phone, indicates that the upload of the I.D. was successful. |
| |
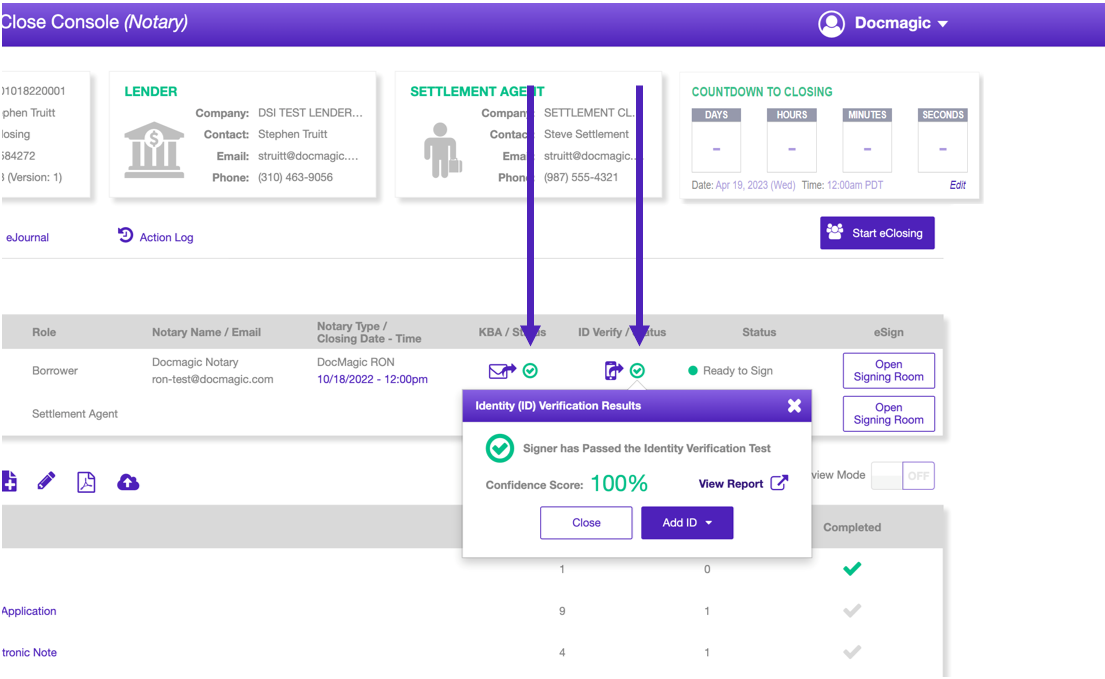
| 22. | If the ID Verification is successful, the window with the green check mark will appear below.
The goal is to have green check marks under both the KBA and ID Verify fields.
|
| |
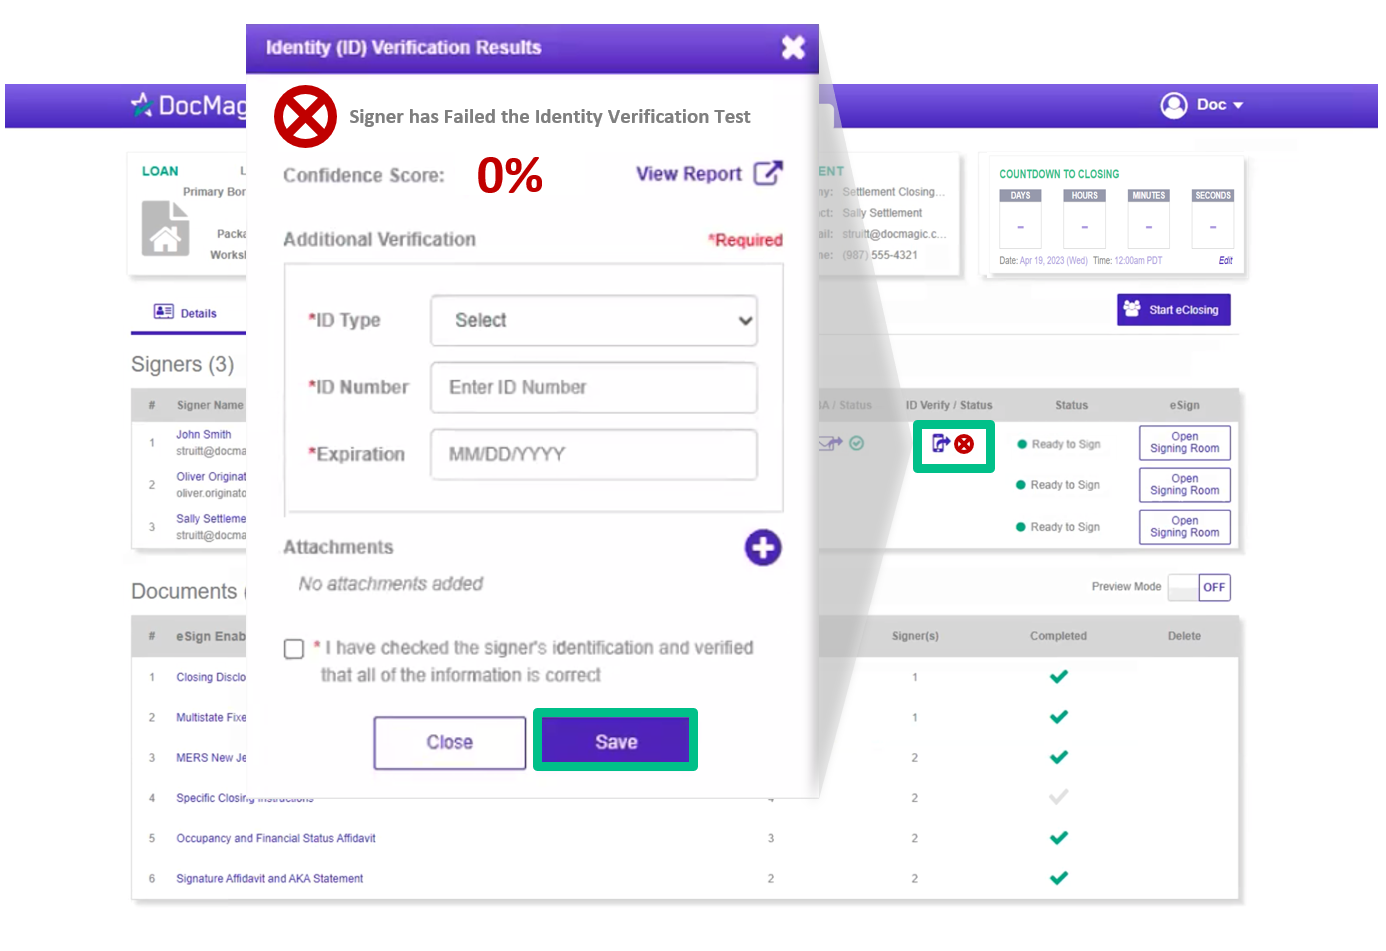
| 23. | If the I.D. Verification fails, click on the red circle with an X.
In the window that appears, you may manually enter in the Borrower's I.D. information, upload photos yourself, and approve the information.
|
| |
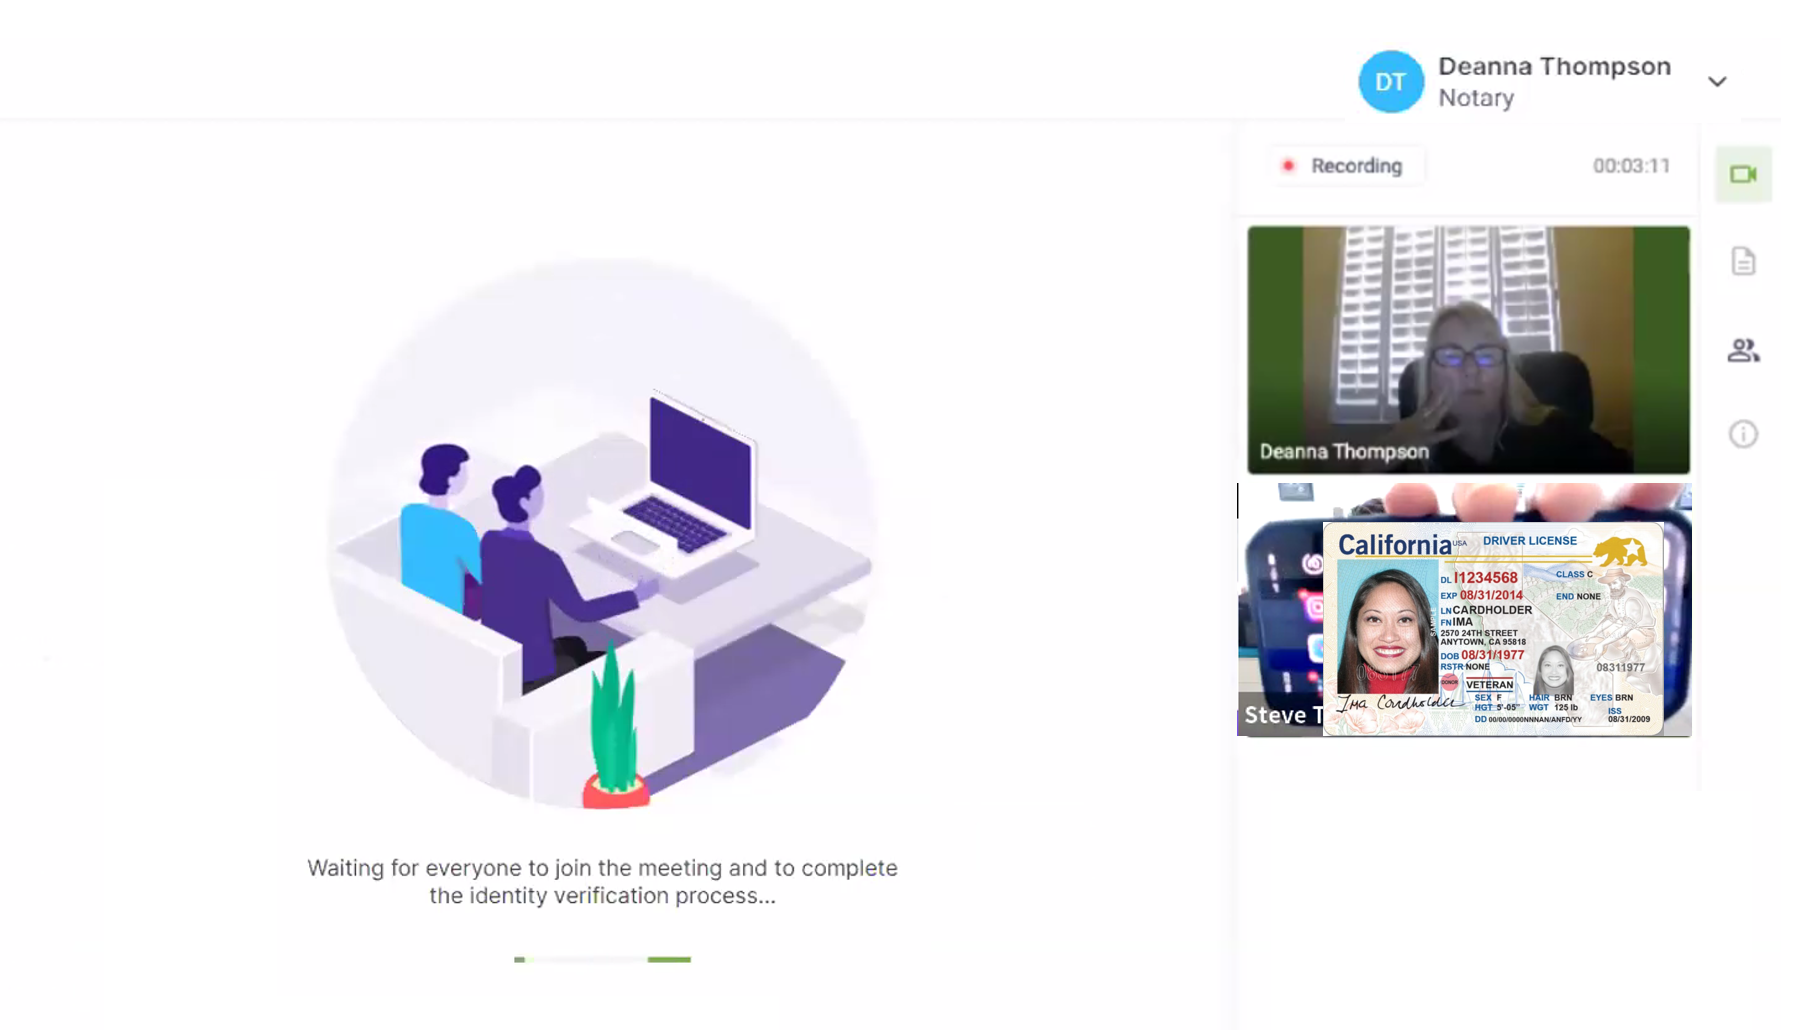
| 24. | If the upload of the identification in the I.D. Verify process is rejected, you may use the video to establish proof of possession of a government issued I.D.
The borrower can hold up their I.D. while you take a screenshot.
|
| |
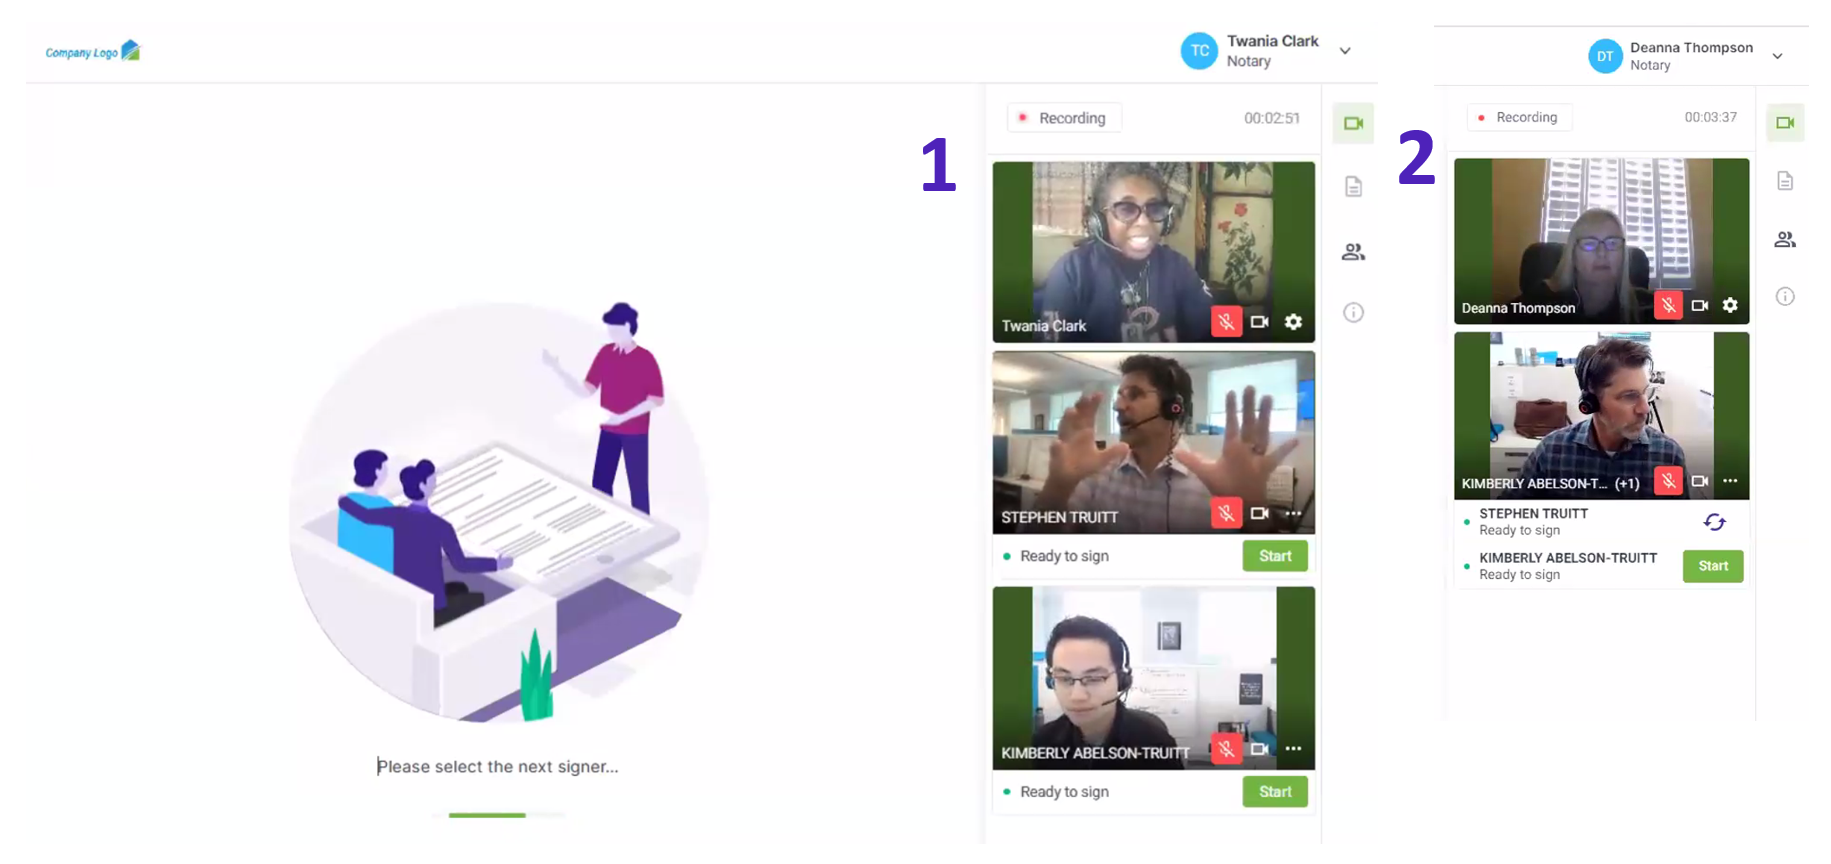
| 25. | Once the borrower(s) complete their KBA and ID Verify (if applicable), their status(es) will change to Ready to Sign and their Start button will illuminate indicating it is safe to begin the signing process.
When you're ready for the signer to begin, click their Start button and they can begin the eSignature process.
1. If you have multiple borrowers on their own devices, you can pick which one will sign first.
2. If you have more than one borrower on the same device, you have the option to toggle which signer will go first by clicking on the two curved arrows.
Only one signer can execute documents at a time.
|
| |
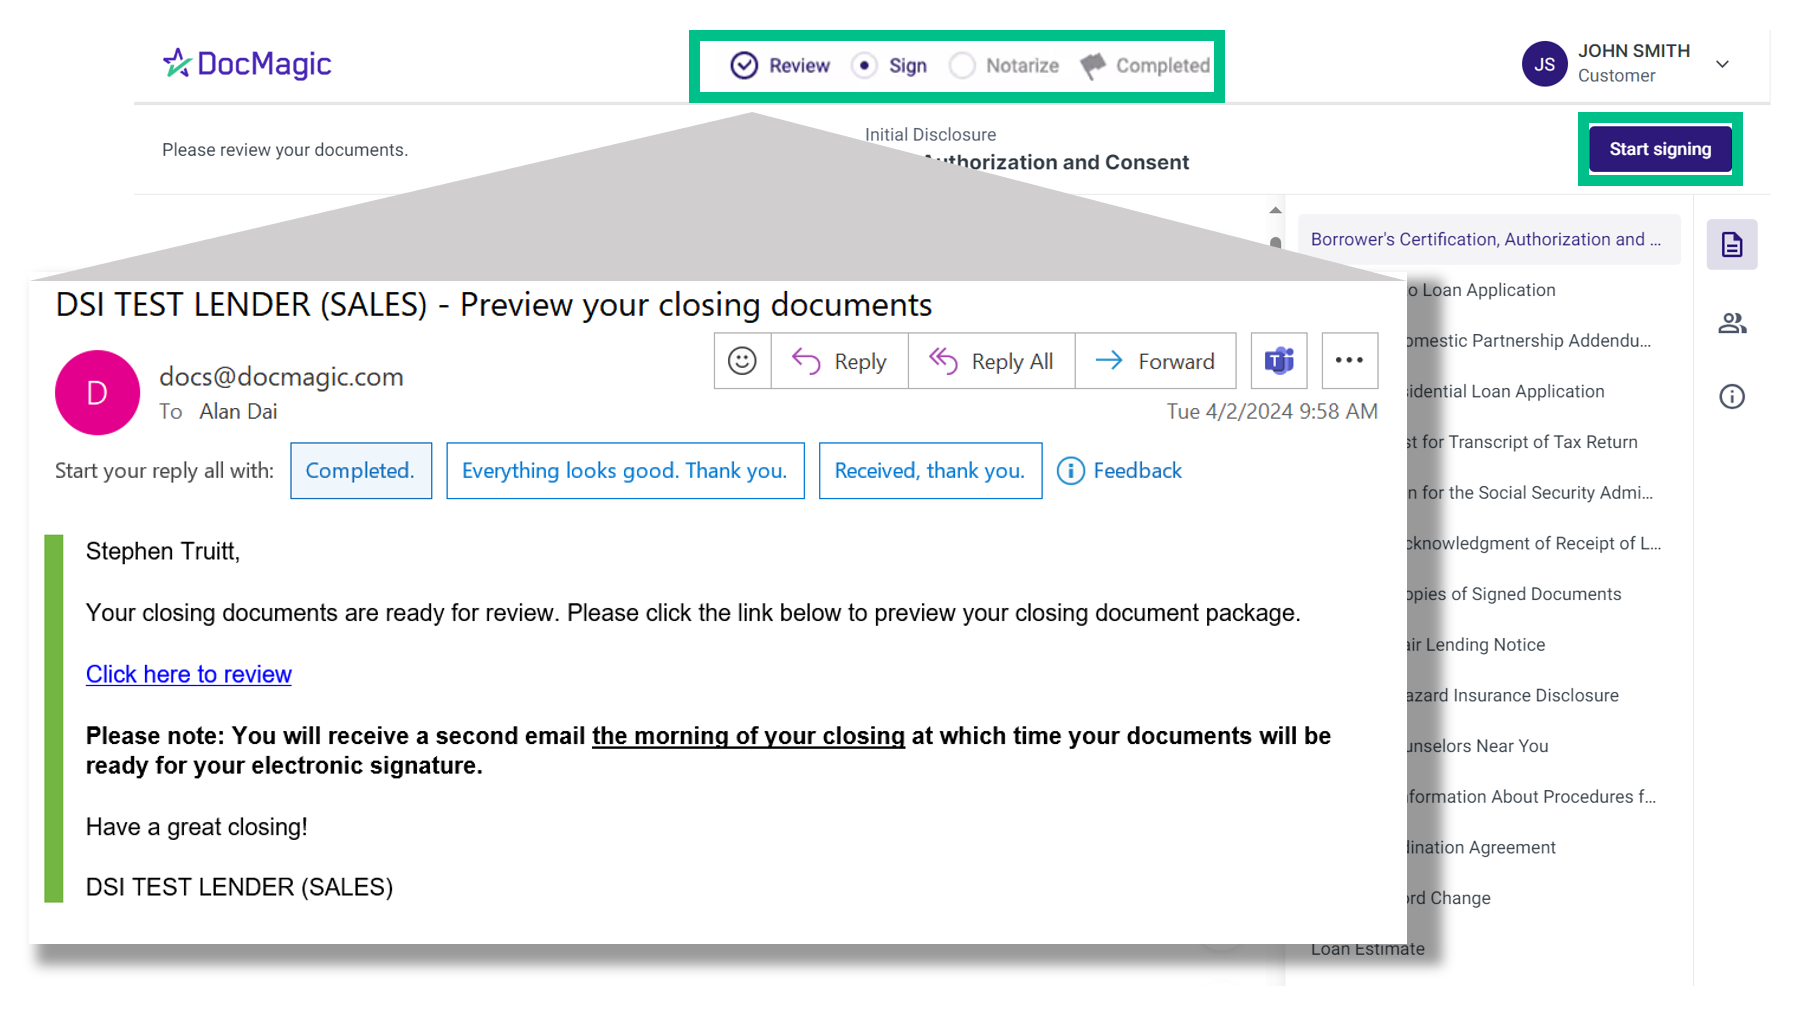
| 26. | When the borrower enters the signing room, they'll find indicators that show progress of the Review, Signing, and Notarization processes along the top.
If Preview Mode is on, the borrower can review their document package, accessing it from a link that is emailed to them. We advise that the borrower reviews the documents during this period, so that they can focus on just signing during the experience.
If the borrower is done reviewing the set of documents, they can click "Start signing" in the top right.
|
| |
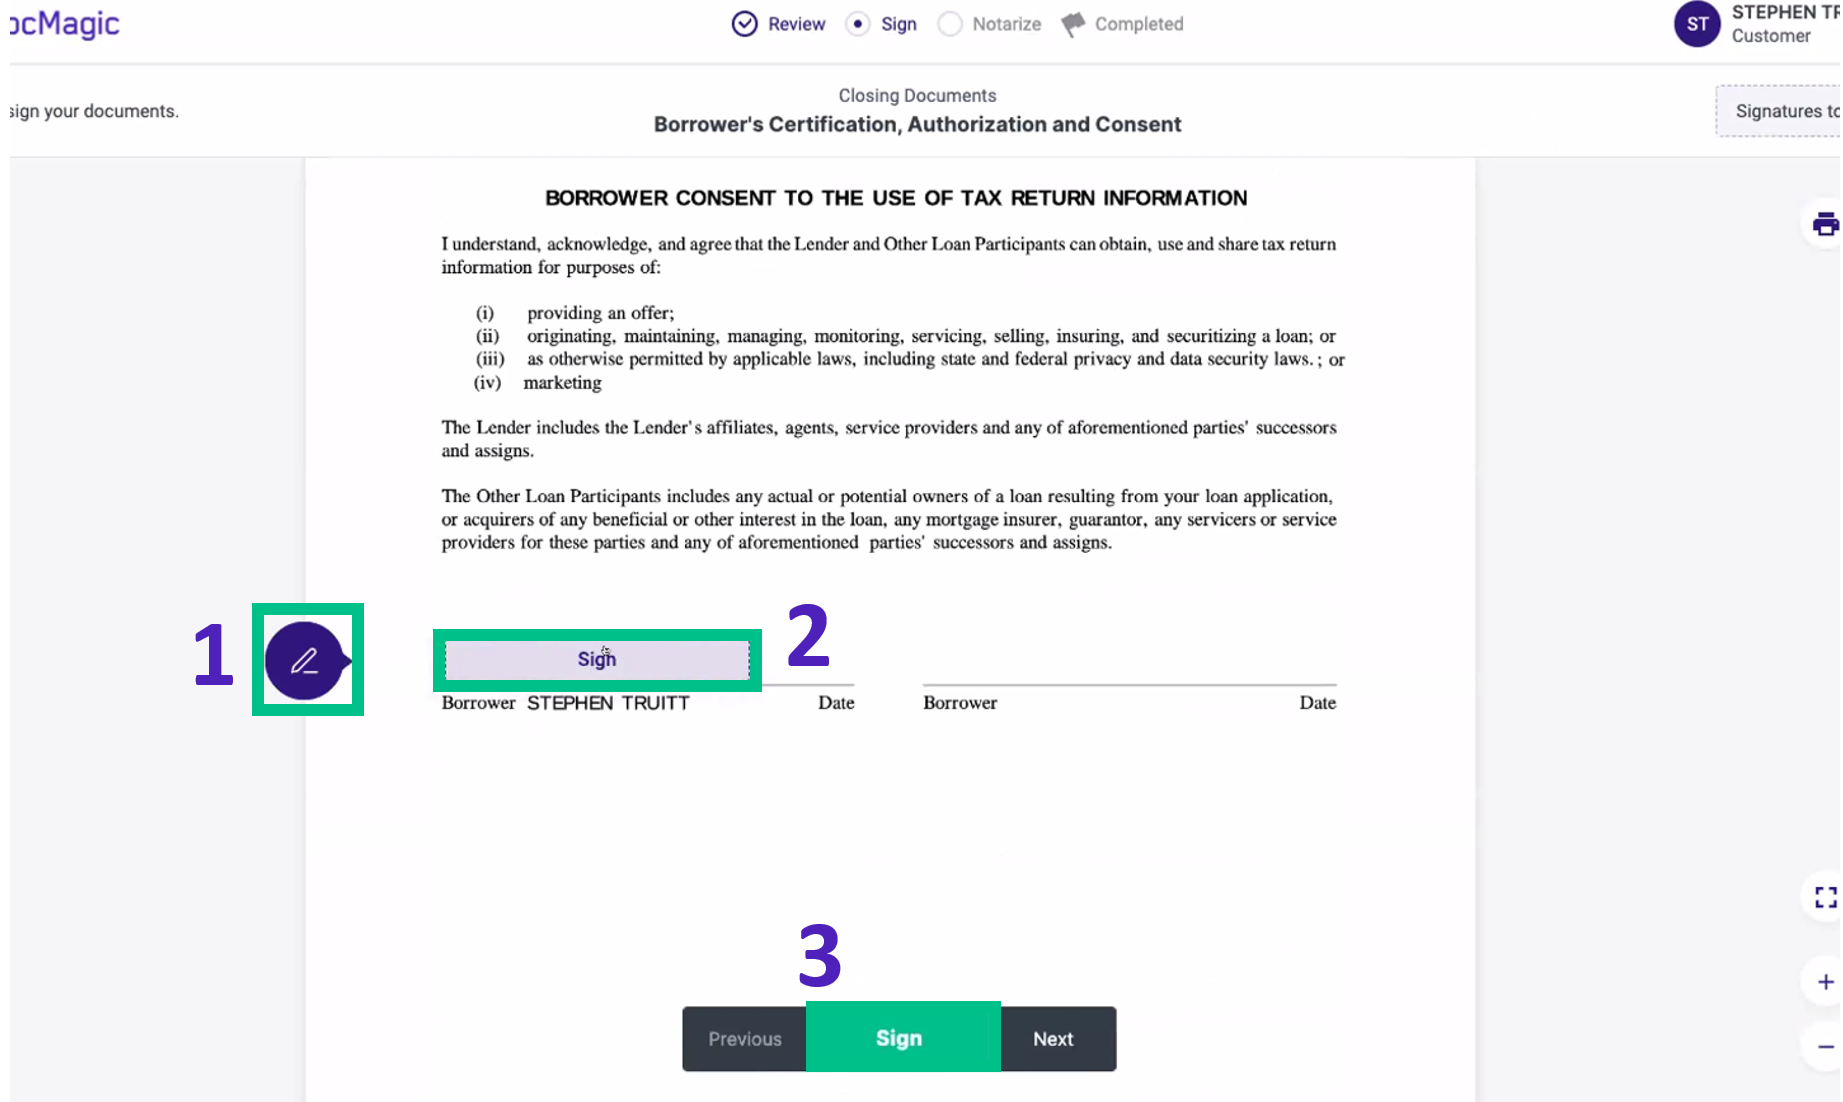
| 27. | There are three options for click signing. You as the Notary will be able to watch them sign.
1. Click on the pencil to the left of the signature line.
2. Click the box that says Sign
3. Click on the green Sign box on the bottom of the page.
For more information on the borrower's signing experience, please visit here.
|
| |
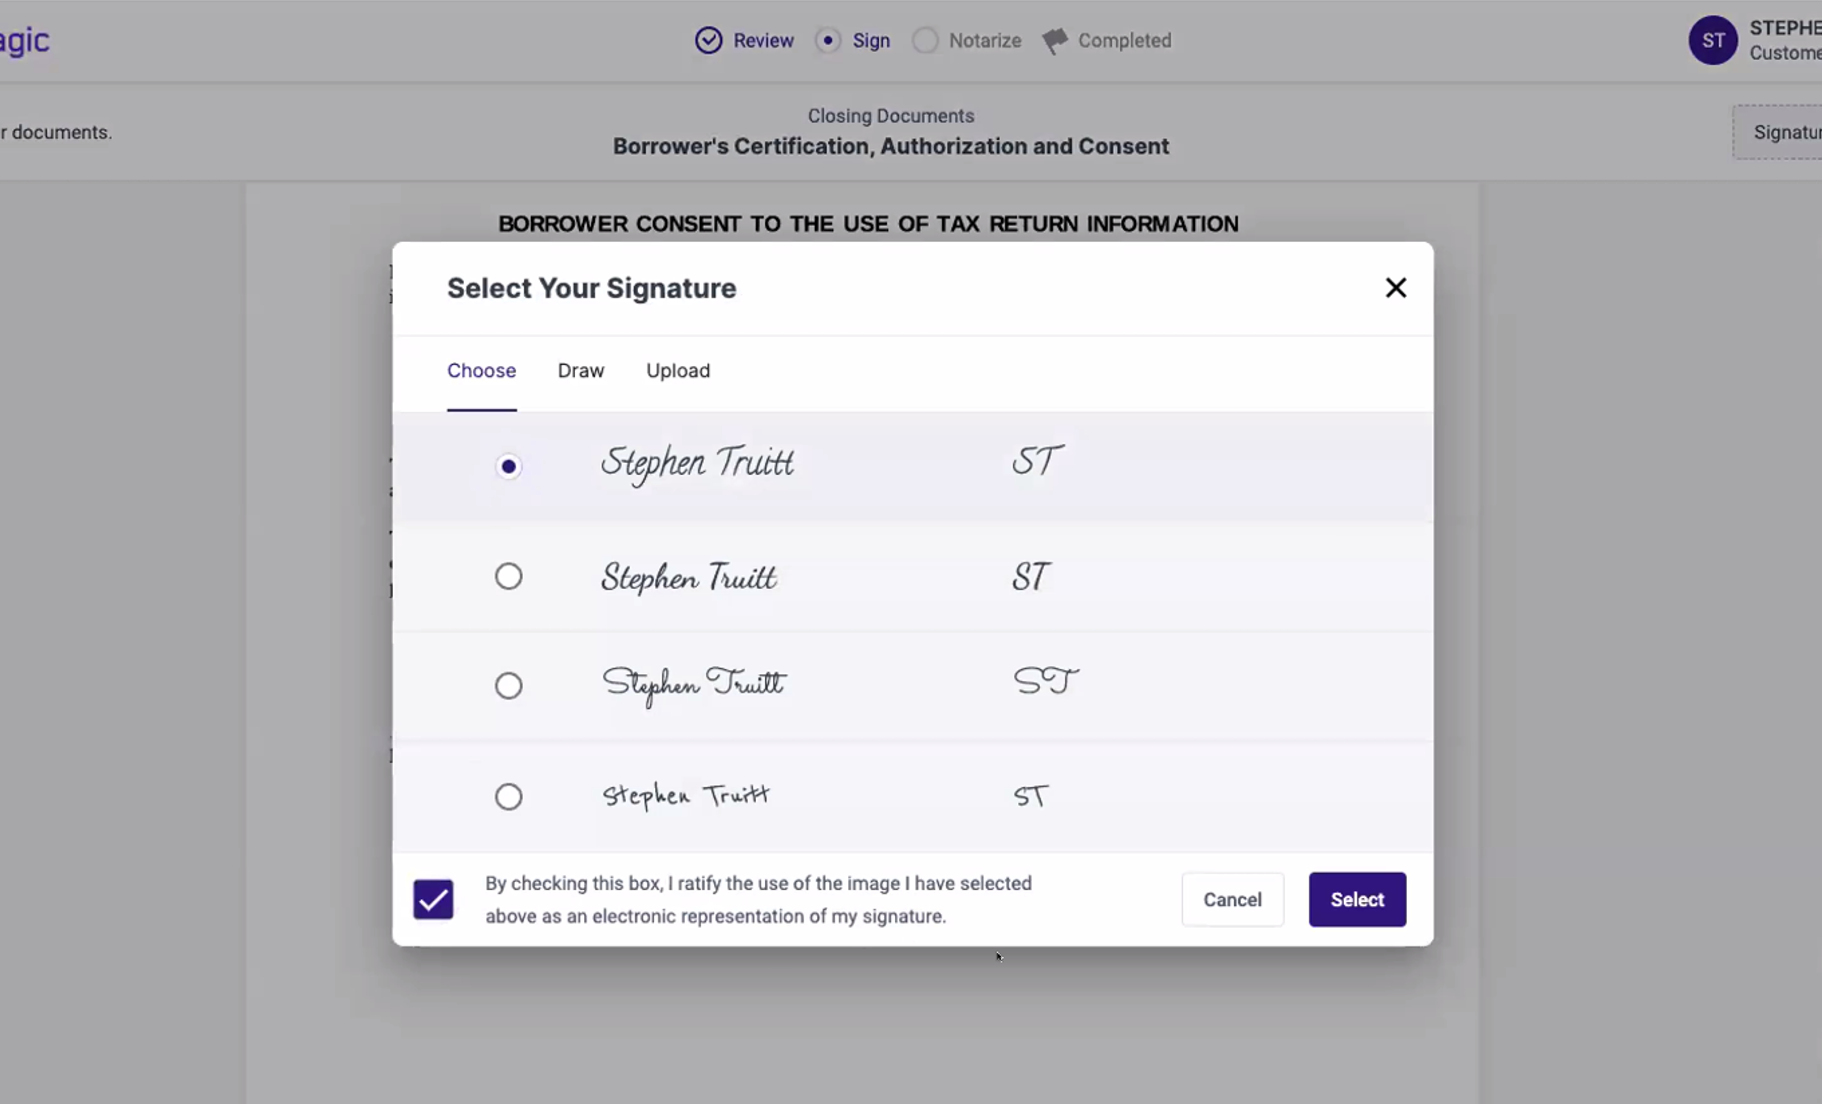
| 28. | The borrower will have the option of choosing a representation of their signature, draw their own, or upload a .png or .jpg of their signature to be used:
The borrower will also need to check the box at the bottom left of the window to approve the use of their electronic signature, then they will click Select in the bottom right.
Once a signature is applied, the page will automatically advance to the next signature tag or text box.
For more information on the borrower's signing experience, please visit here.
|
| |
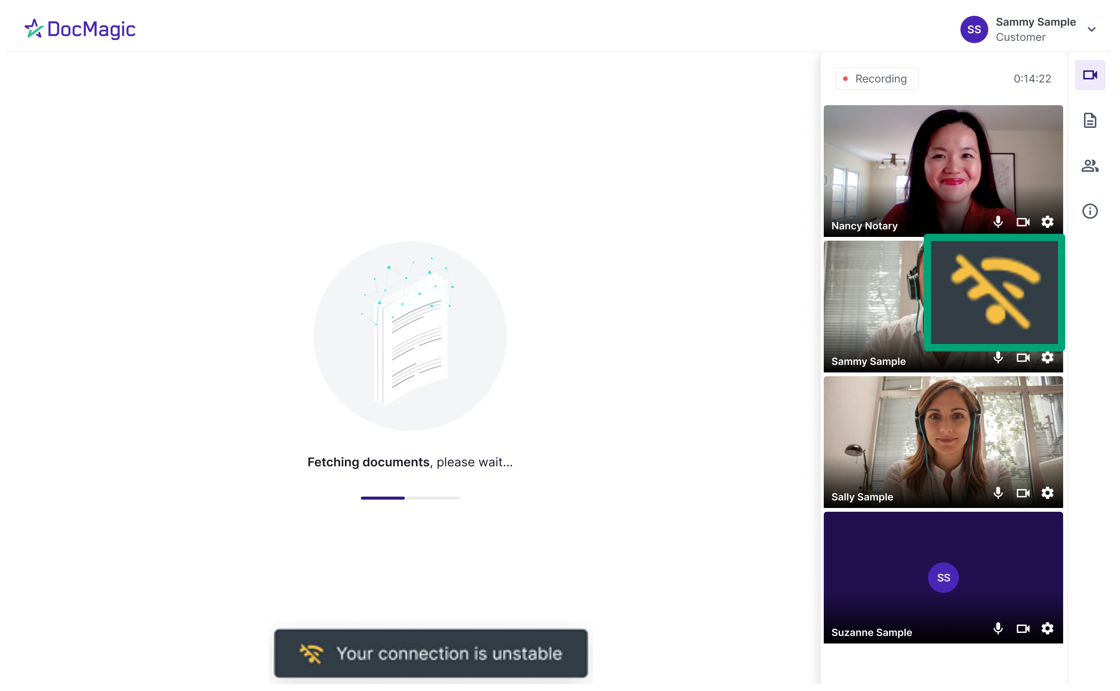
| 29. | If a participant is experiencing a slow internet connection, you will see an icon appear in the top right of their camera feed, enlarged below for clarity.
The participant will also see a "Your connection is unstable" message at the bottom of their screen. If the connection is completely lost, their screen will grey out. In both cases, the system will try to restore the connection.
|
| |
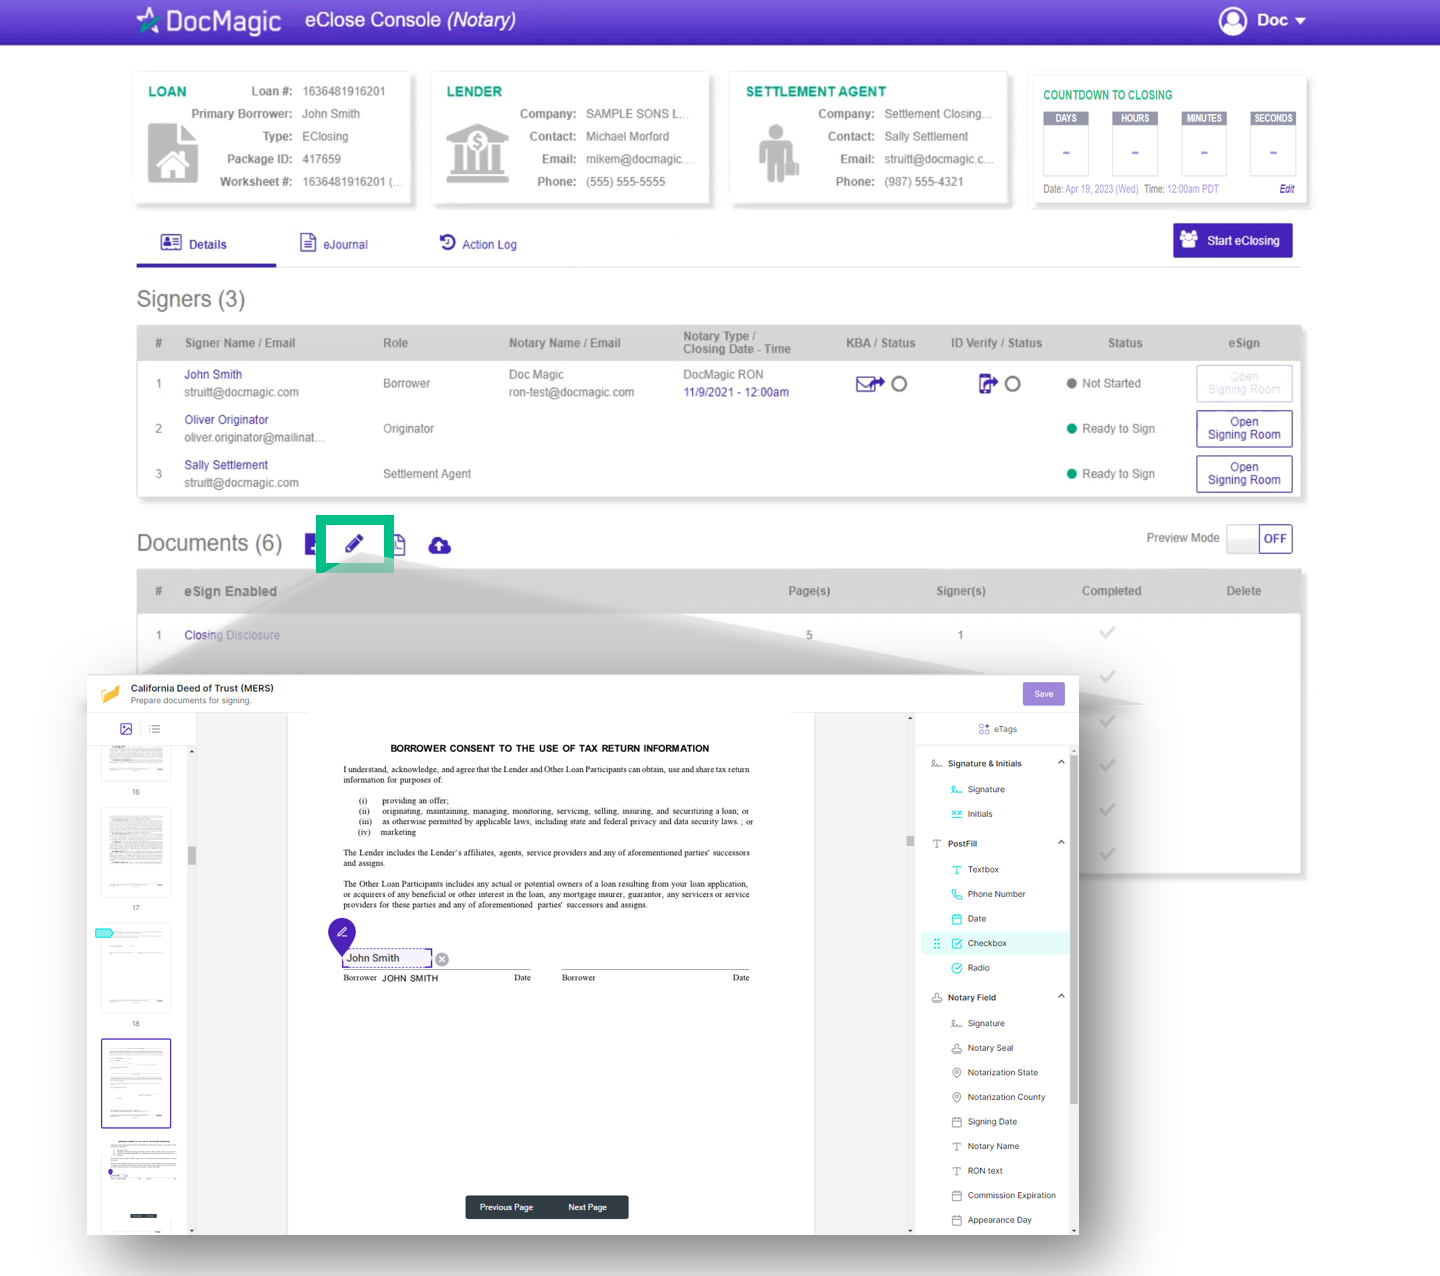
| 30. | If you find an improperly tagged document during the signing experience, you may go back to the Notary Portal (pictured below) and fix it by clicking on the pencil icon (highlighted).
|
| |
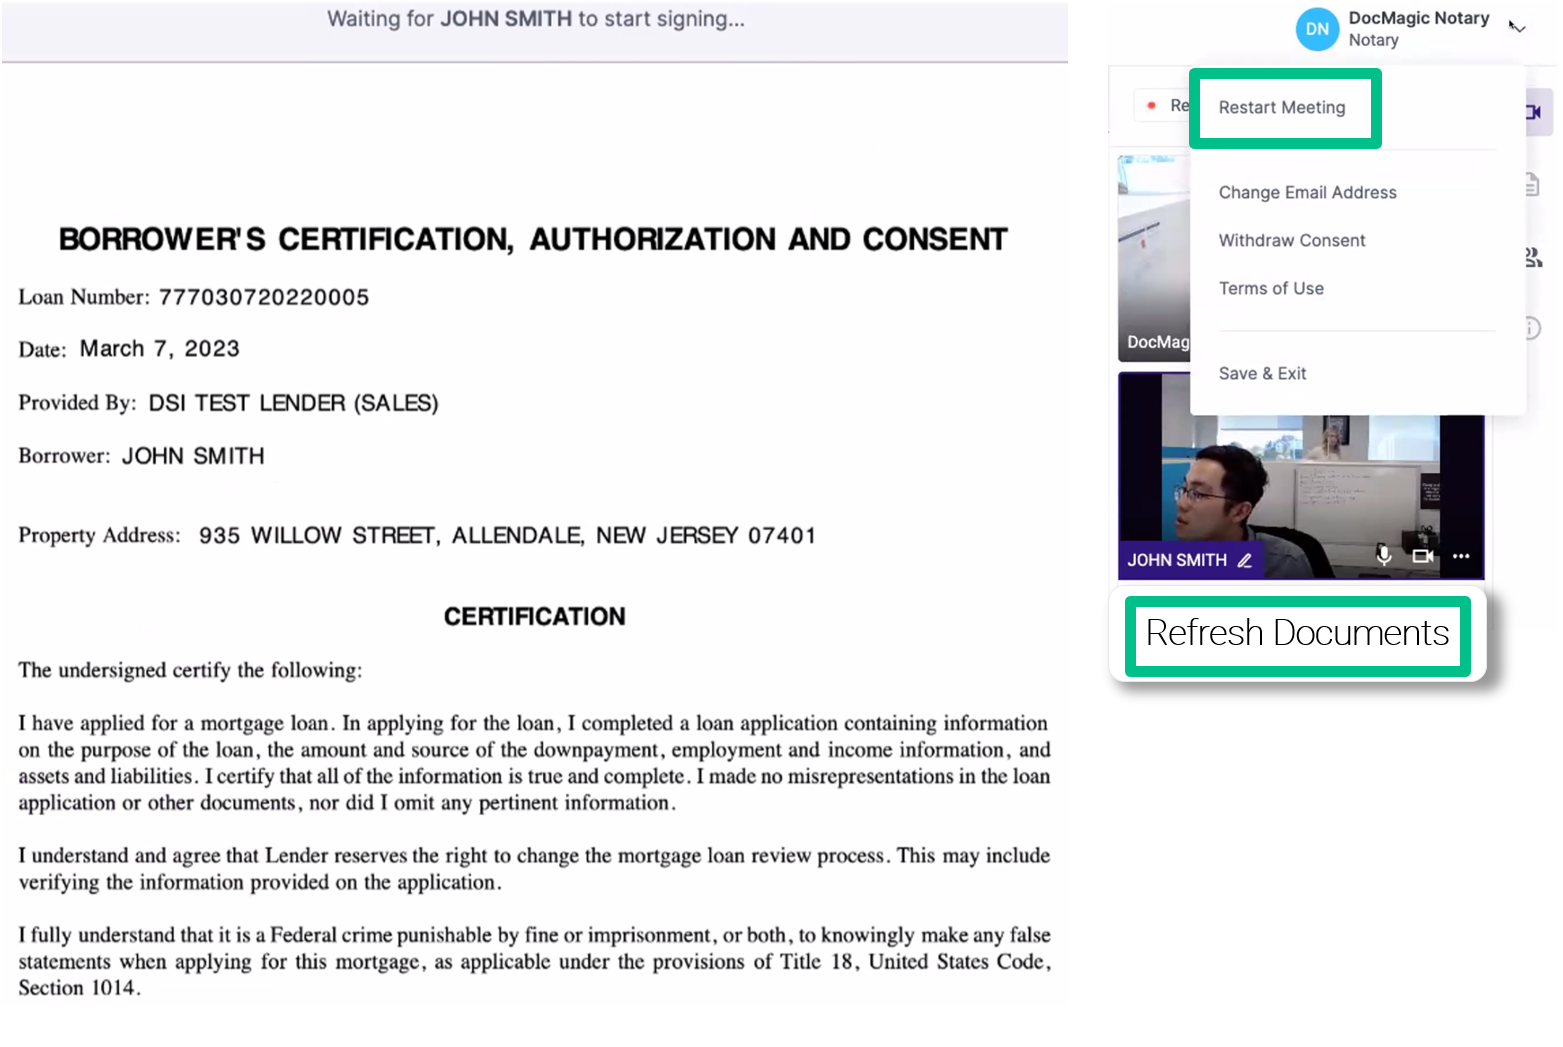
| 31. | After you've made the tagging correction, go back to your signing experience. Start by clicking the three dots at the bottom right of the borrower's screen, then click Refresh Documents. Your changes will show.
If that doesn't work, click your name in the top right, then Restart Meeting.
|
| |
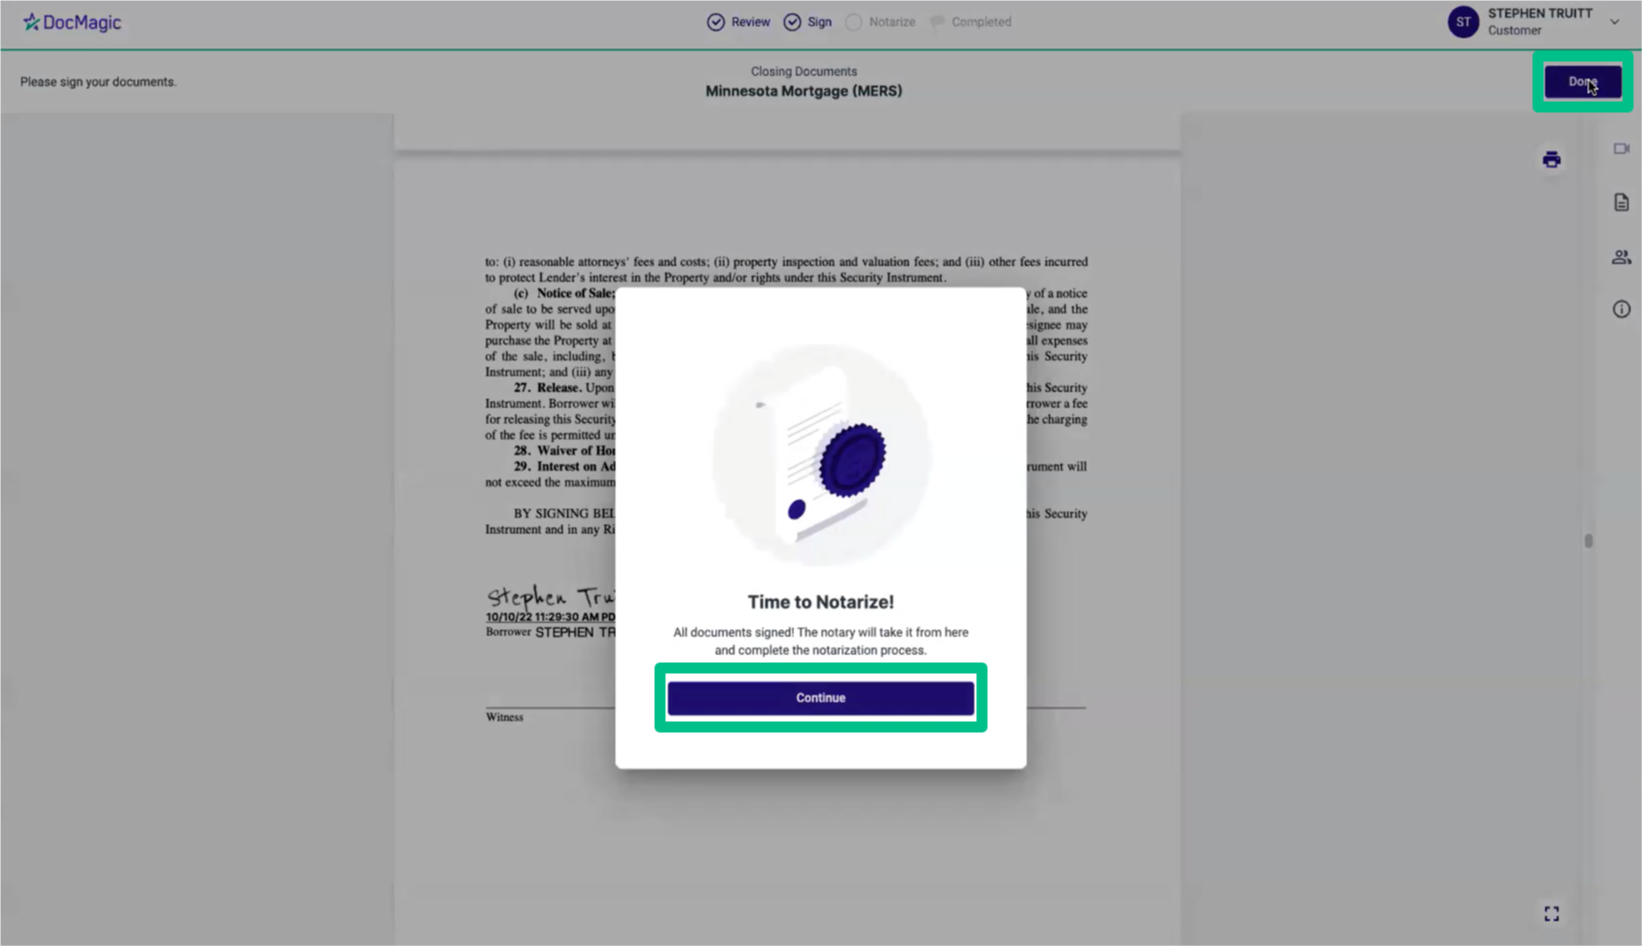
| 32. | When the borrower is done signing, they'll click Done. A window will appear where they have to click Continue to move onto the notarization process.
|
| |
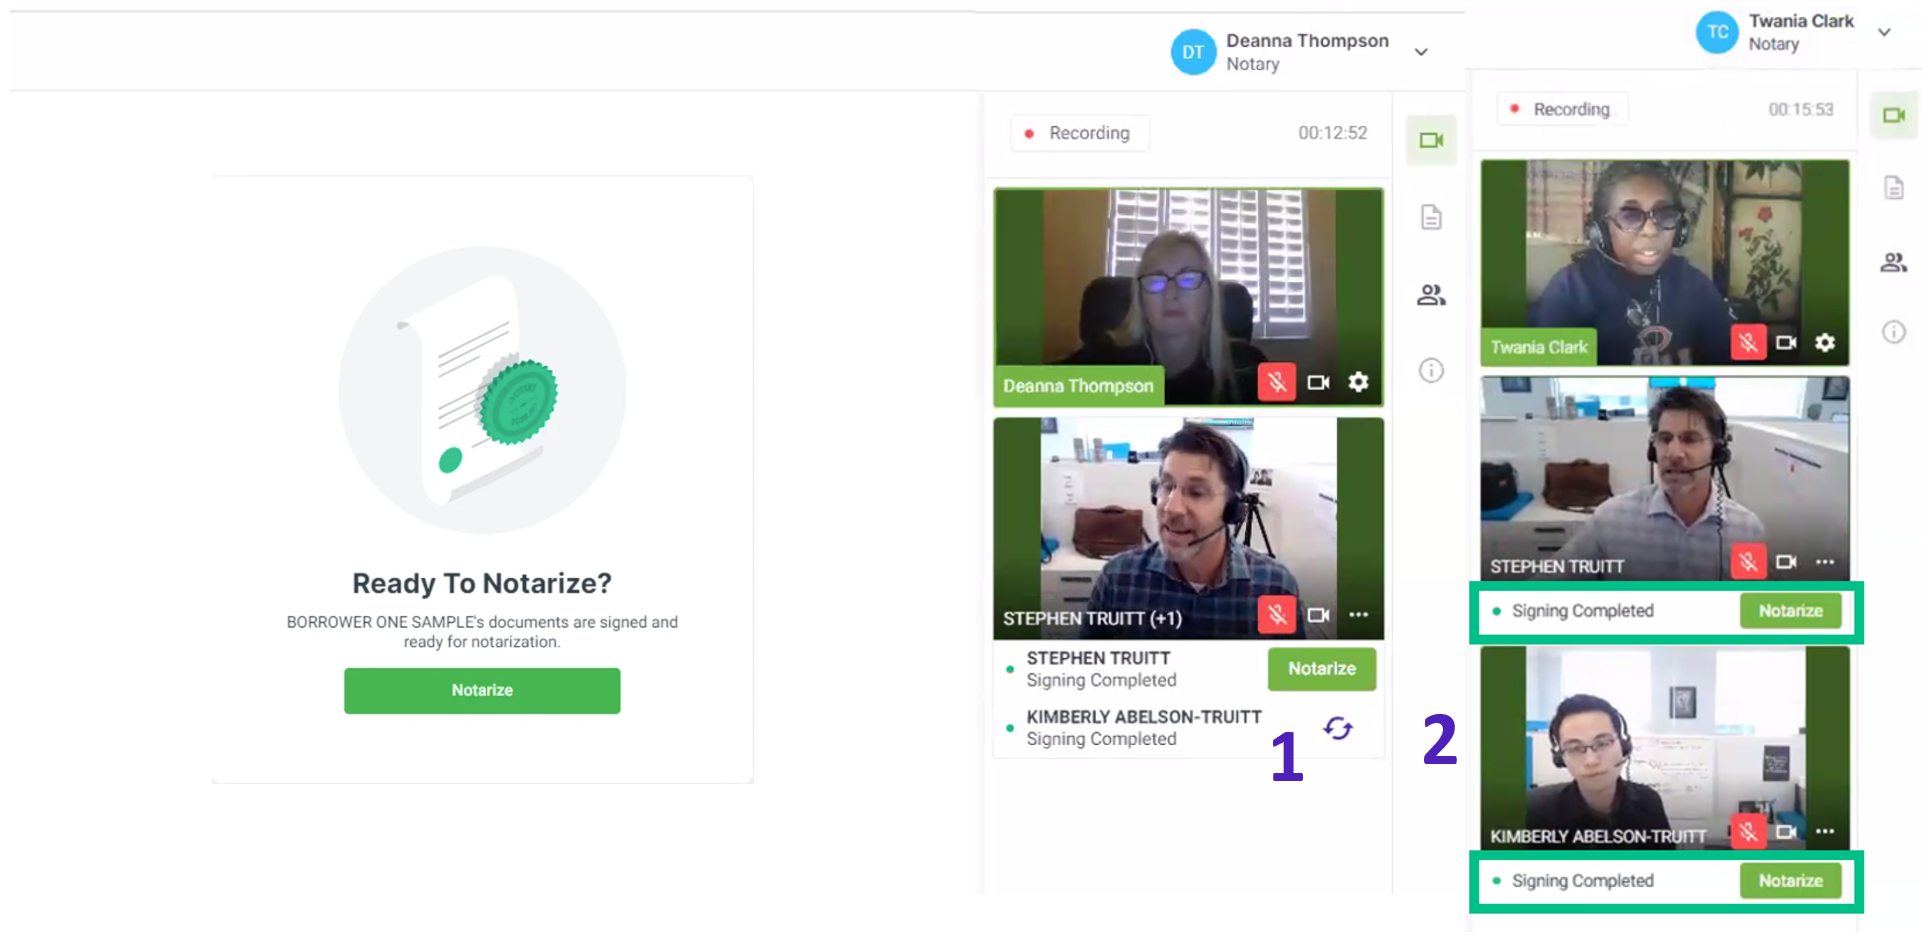
| 33. | If you have multiple borrowers on their own devices, you can choose if you want the other signer to sign first, or if you want to notarize the first signer's documents and then return to the other signer.
After the borrower(s) sign(s), control and signing ability is transferred to back to you, the Notary. You will now start the notarization process.
1. If you have multiple borrowers on their same device, you can choose who goes first. Toggle using the two-arrow icon.
2. If you have borrowers on multiple devices, you can also choose who you want to notarize first.
|
| |
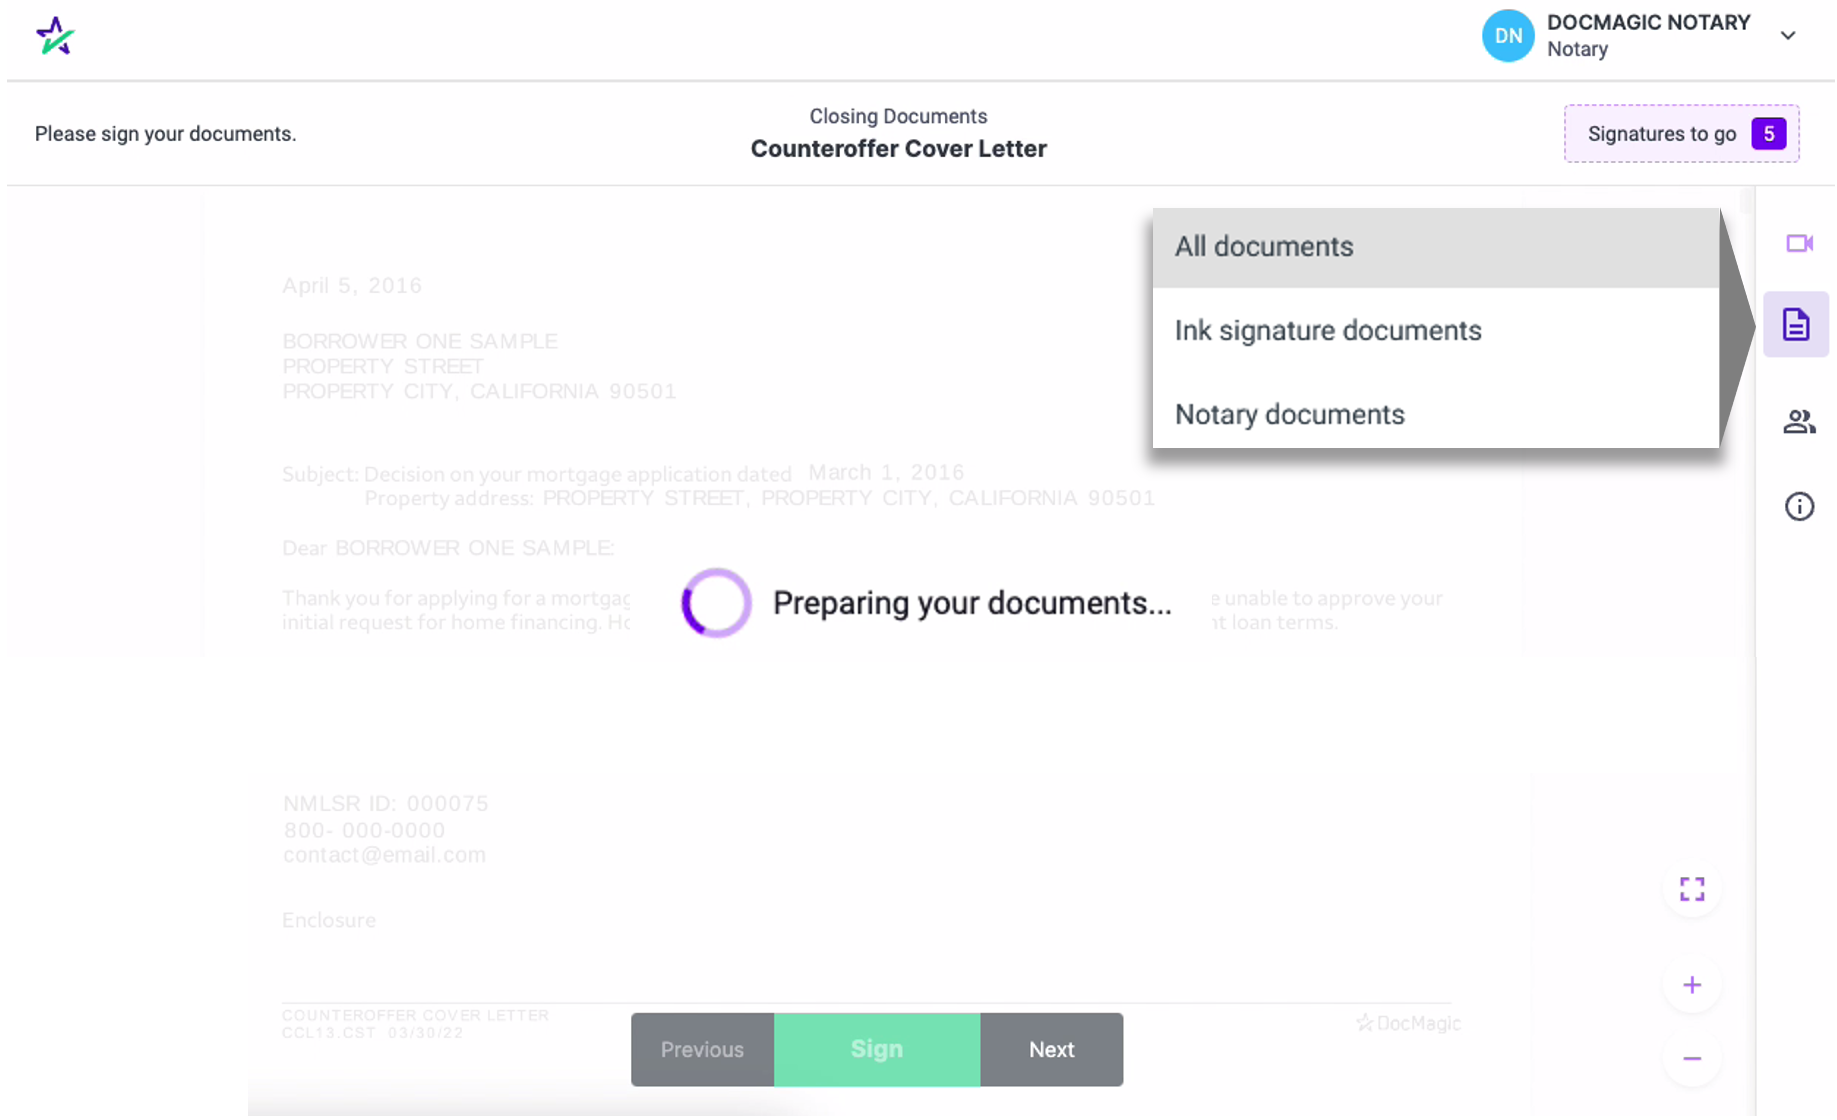
| 34. | After you select Notarize, you will see this "Preparing your documents" loading screen. You will automatically be brough to the first document that needs to be notarized.
By default, only the documents that need to be notarized will be loaded during this phase. If you want to render all documents, you can select that from the documents section here.
|
| |
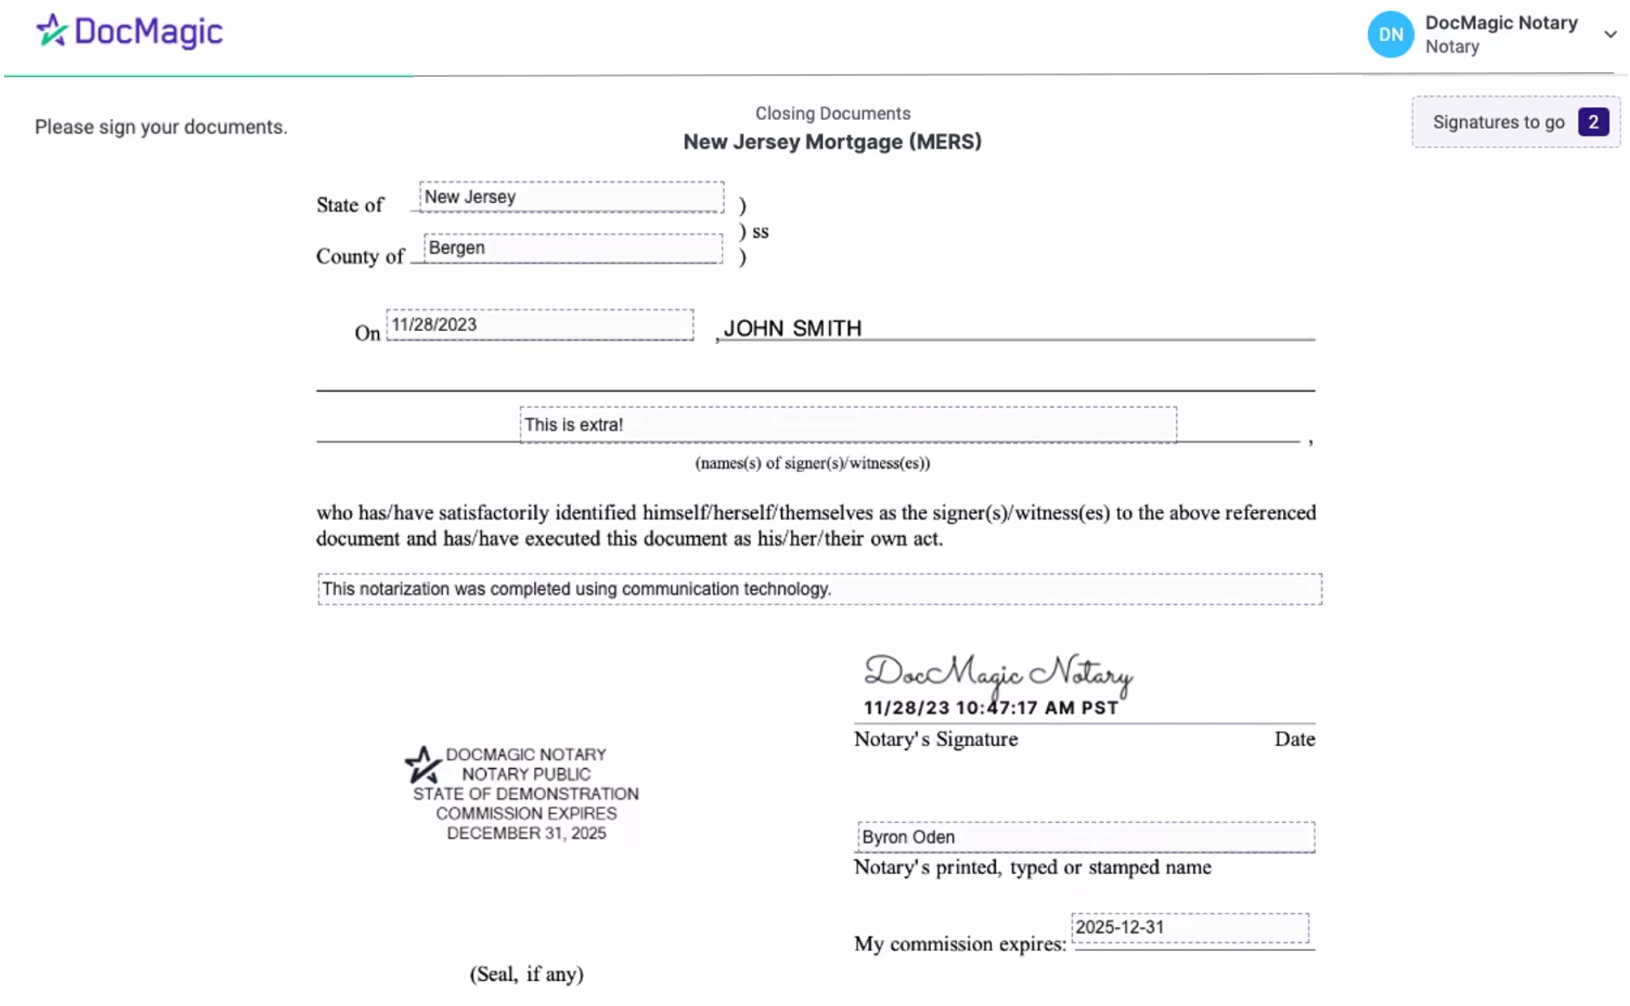
| 35. | When you click on the signature line, your signature and any other pertinent data, such as your Notary seal, will be automatically inserted.
We recommend that you don't scroll during this part of the signing experience - the system will move for you. After you fill in any line of text, hit enter, and you'll automatically be taken to the next task.
Middle names are now supported for notaries. If you find a discrepancy on how your middle name or initial should be displayed, please contact Secure Insight.
|
| |
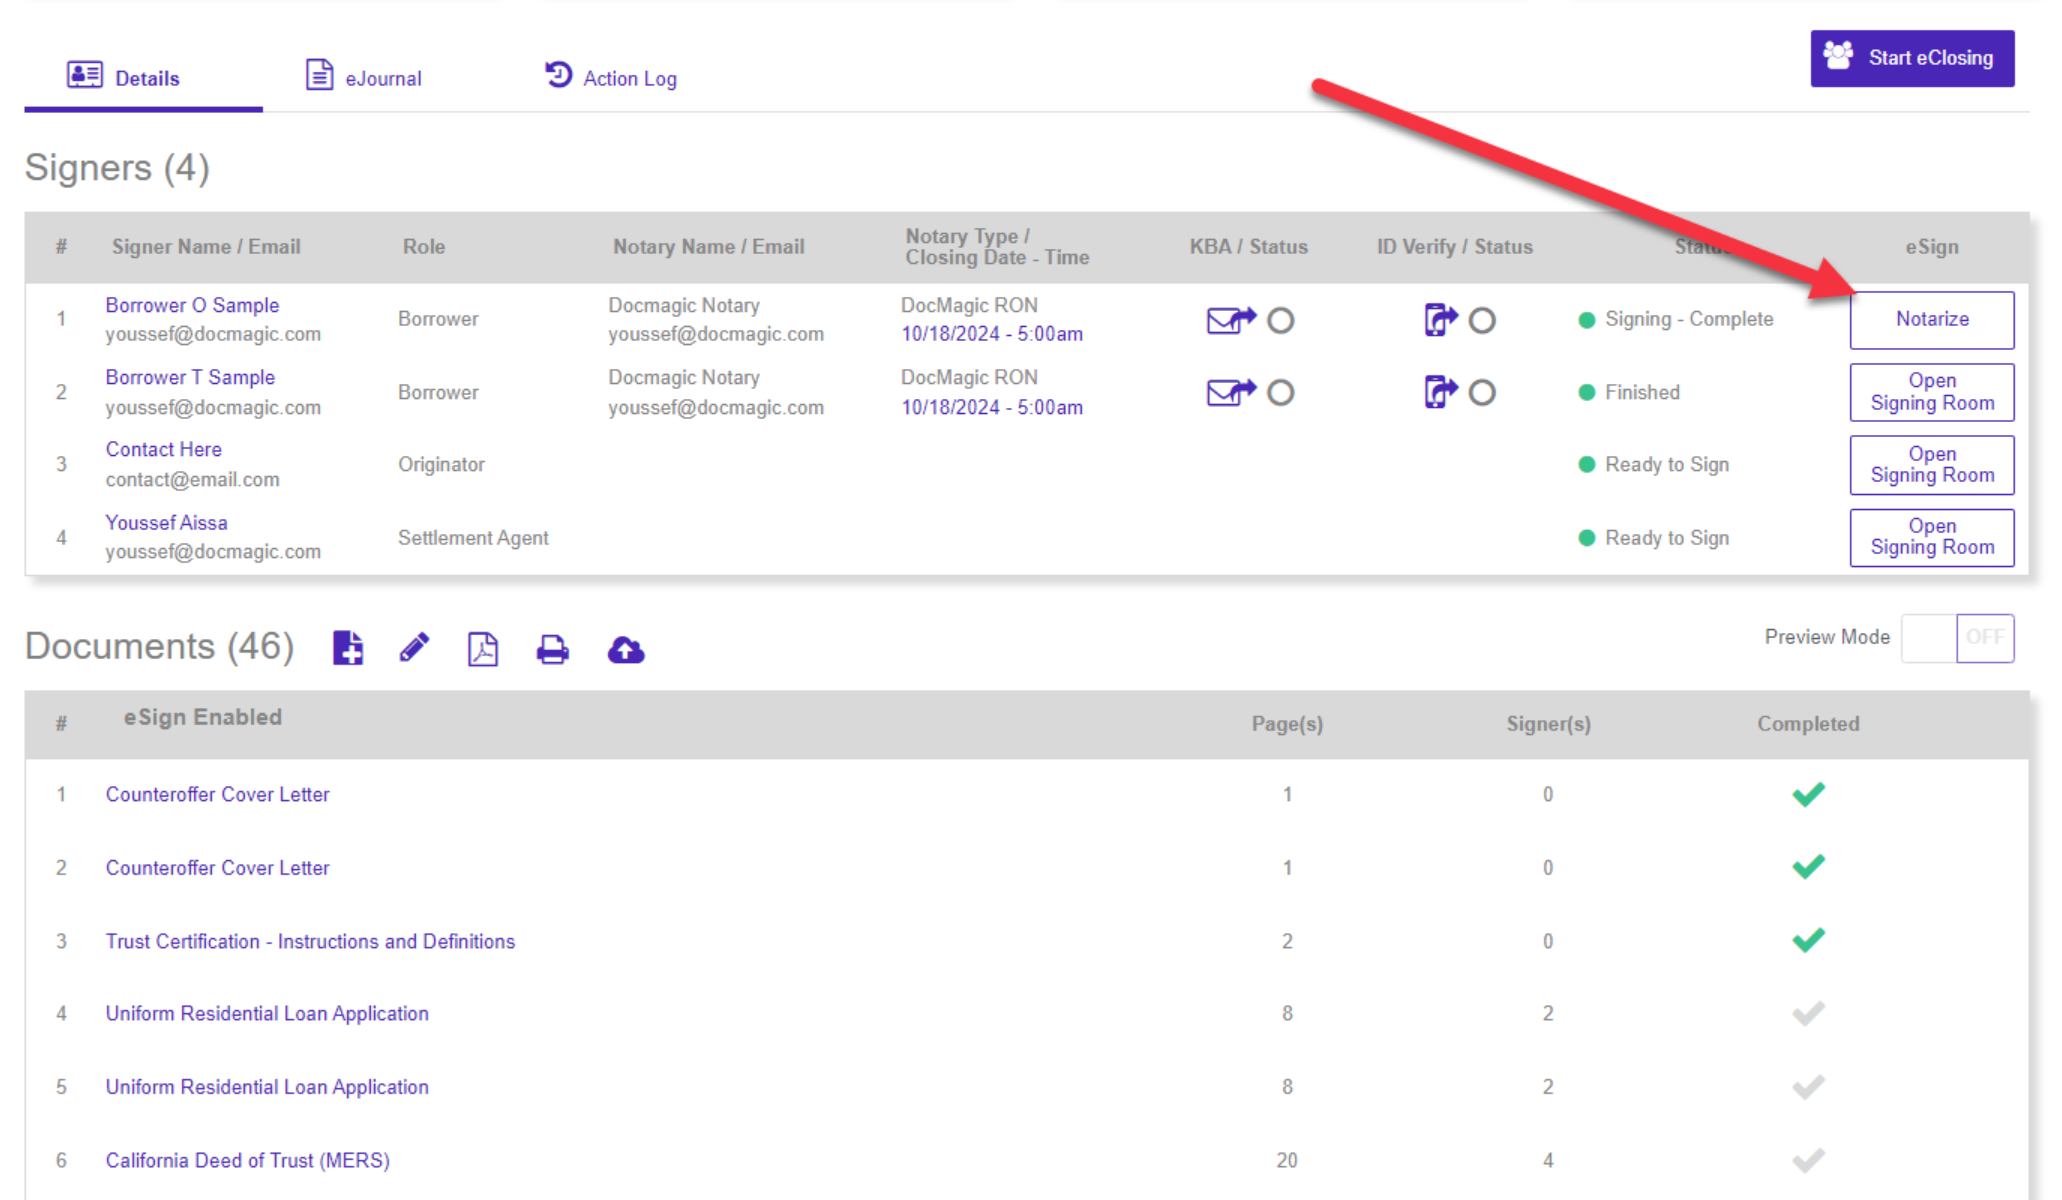
| 36. | In certain cases, you can notarize the documents outside of the RON meeting if the borrowers have signed all required documents.
This "Notarize" button will appear in your Notary console by the borrower's name if all criteria are met.
|
| |
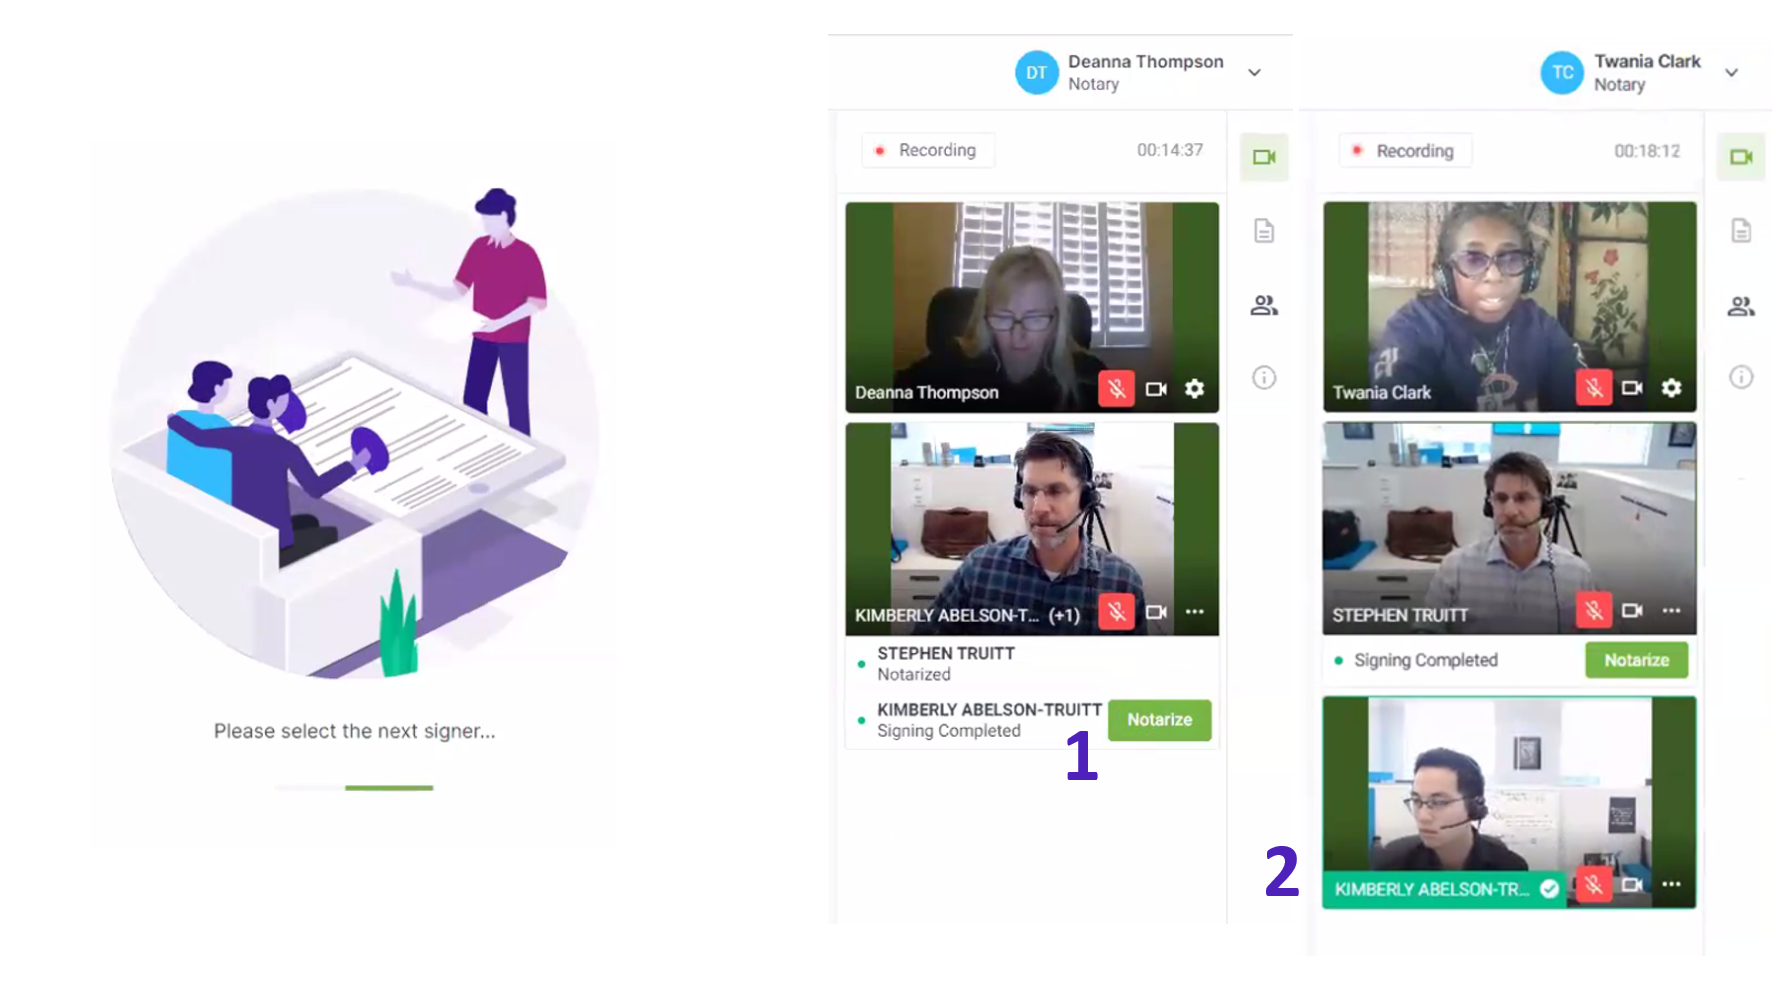
| 37. | 1. If you have multiple signers on the same device - once the first signer is finished, you'll see their status changed to Notarized. You may then repeat the process for the next Signer by clicking their Notarize button.
2. If you have multiple signers on different devices, a participant that has completed all tasks will be marked with a green band over their name and a check mark next to it.
|
| |
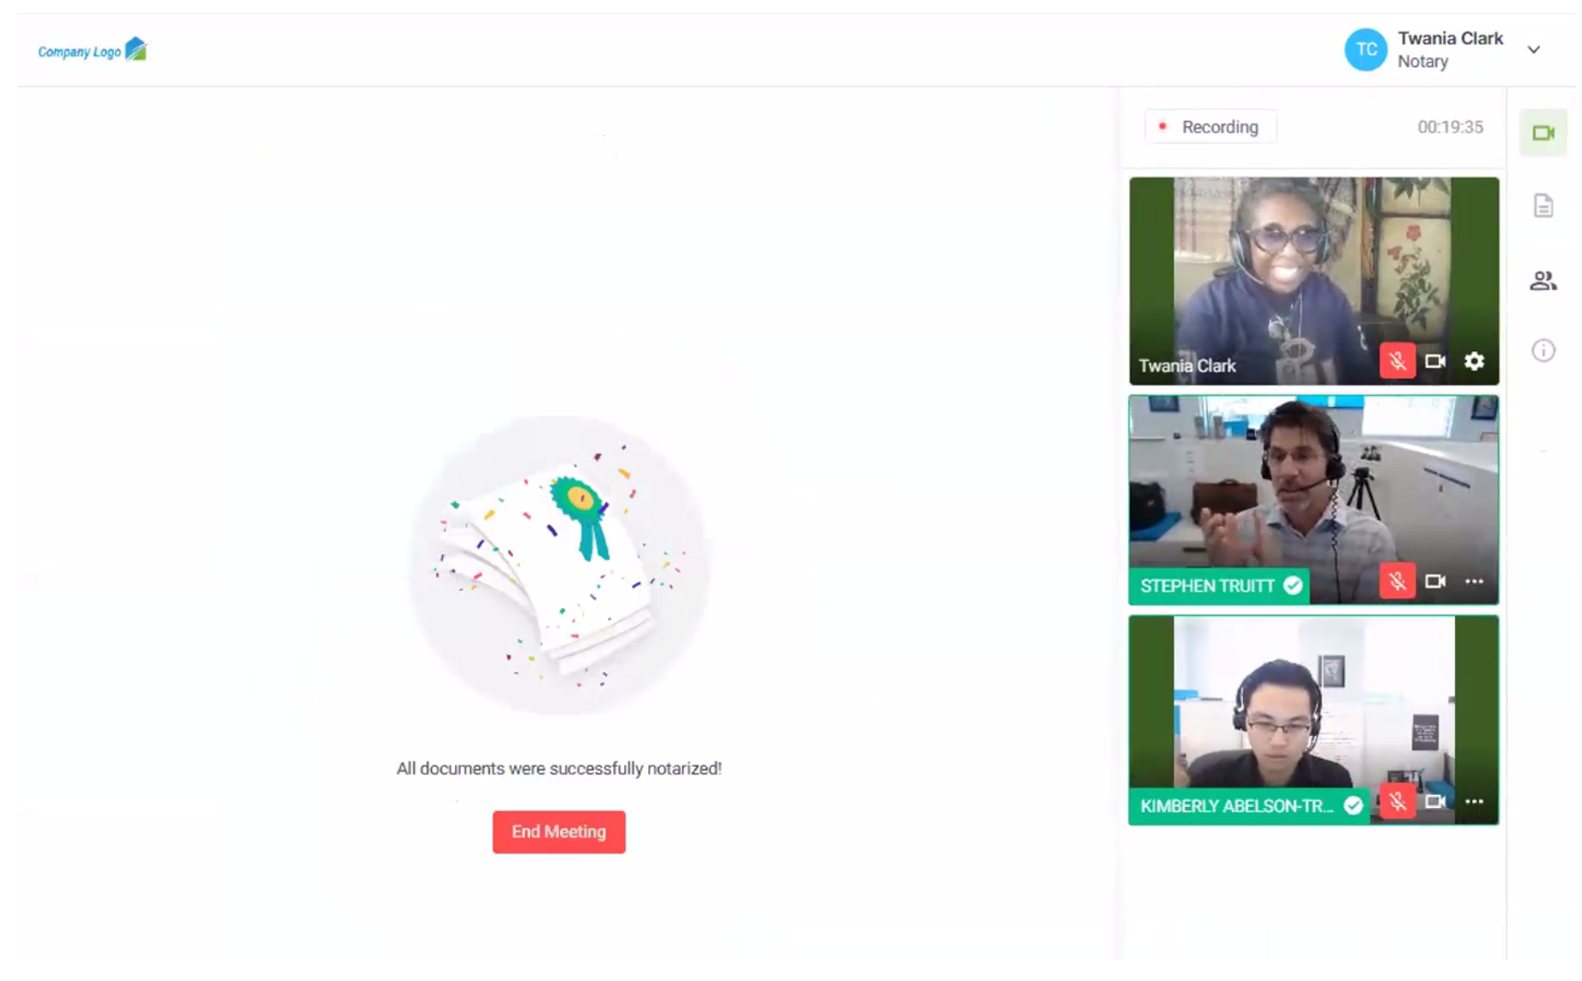
| 38. | The process is complete once all the participants' and Notary's signatures have been captured. The meeting may now end.
|
| |
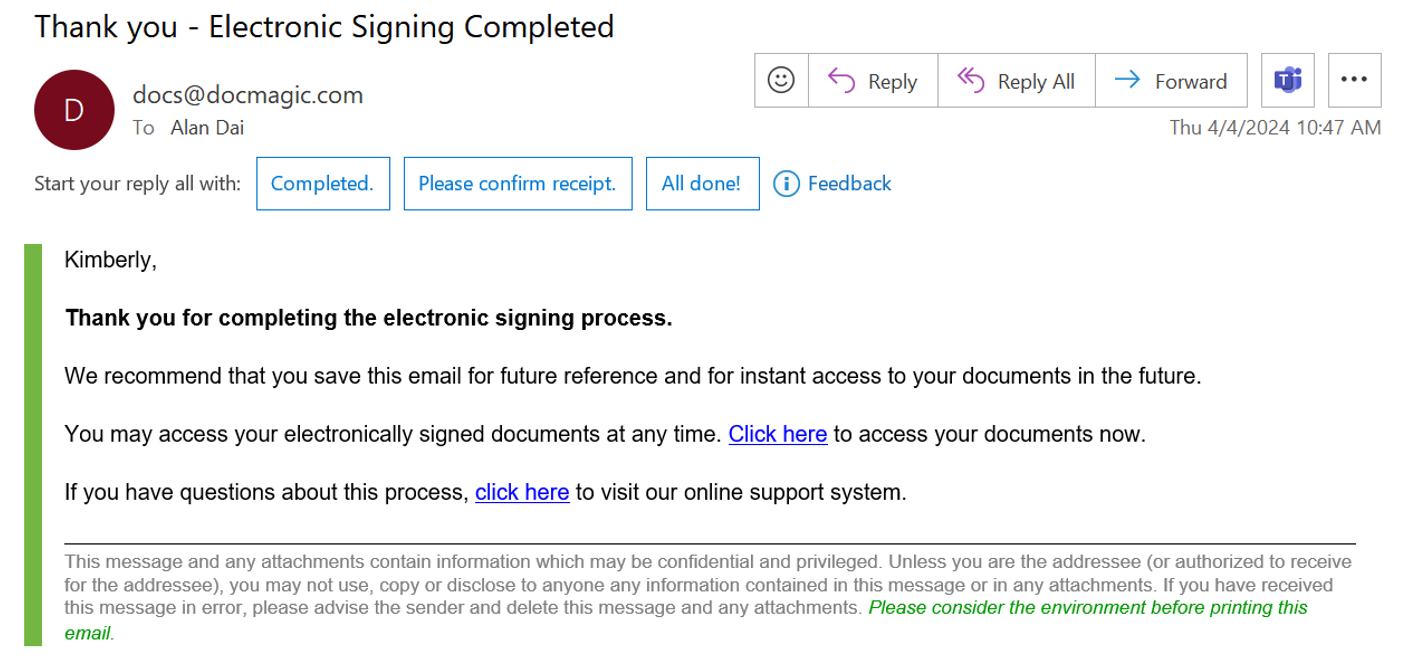
| 39. | Notification e-mails are sent to all parties. The email will allow the Borrower to download their signed and notarized document package from a provided link.
|
| |
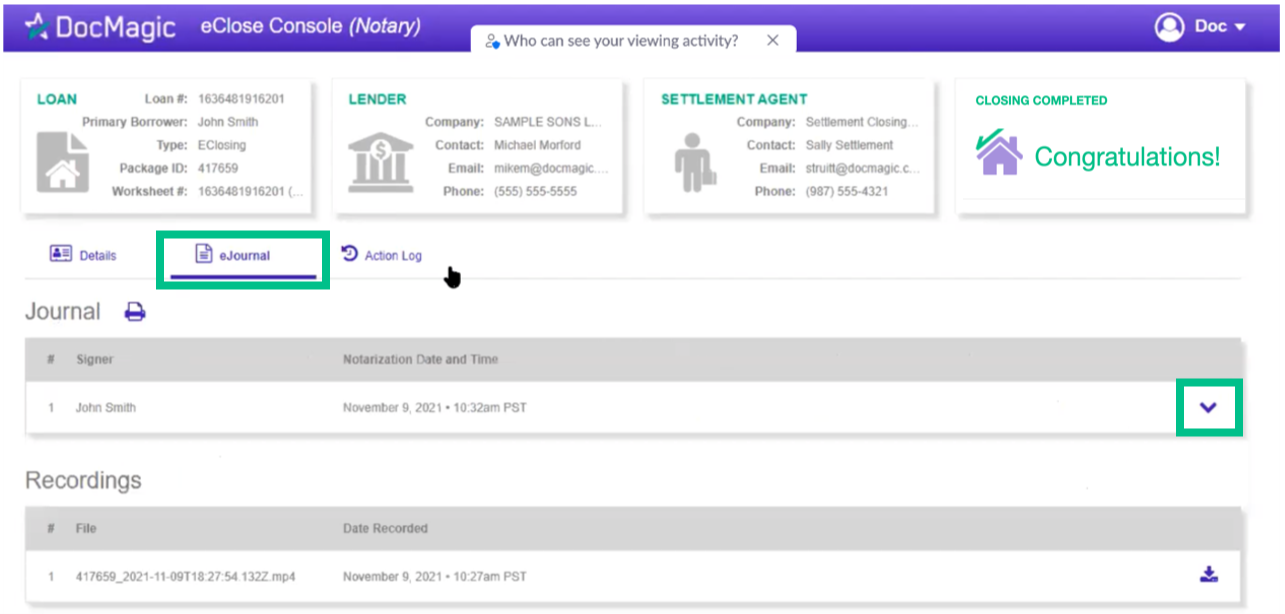
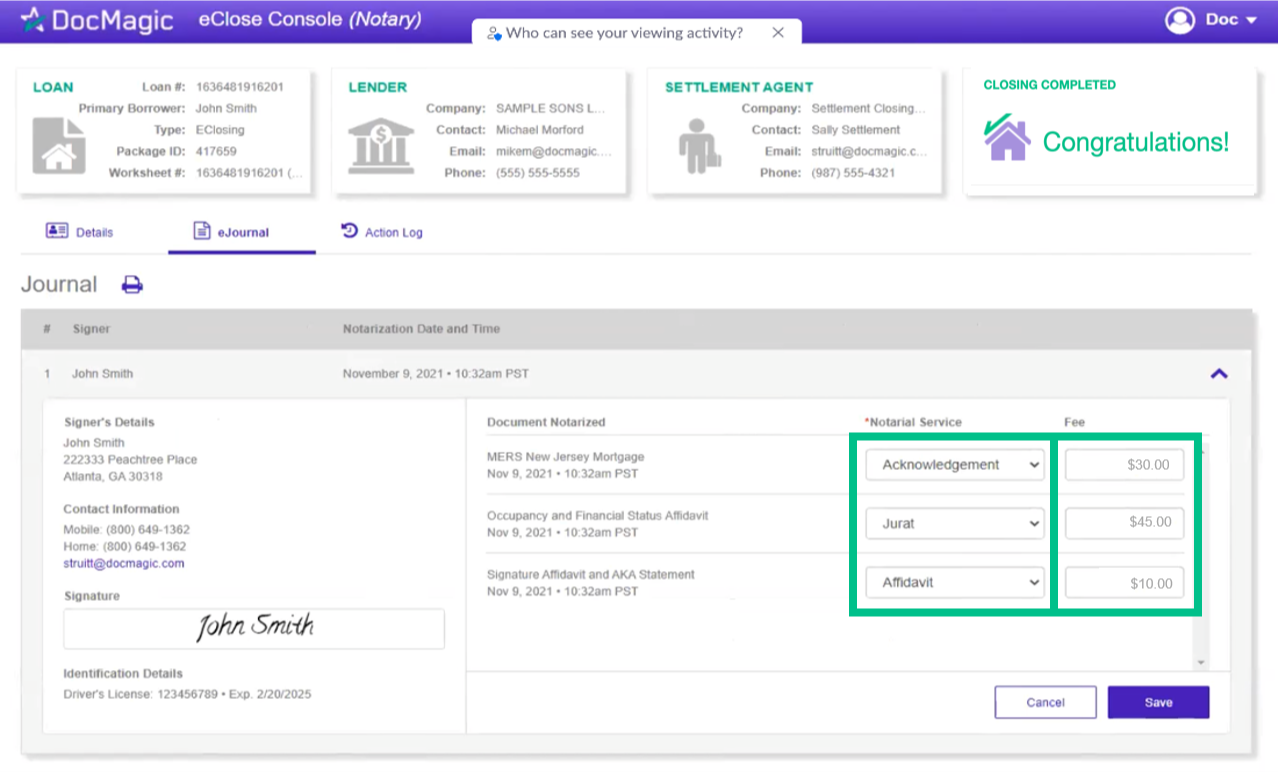
| 40. | Go back to the Notary eClose Console. Click on the eJournal tab, then click on the down arrow to expand the borrower's journal.
|
| |
| 41. | Use the dropdown menus to select the type of Notarial Service. Toggle choices by clicking on the box and using the up and down arrow keys.
Enter the fee for each Notarial Service performed.
|
| |
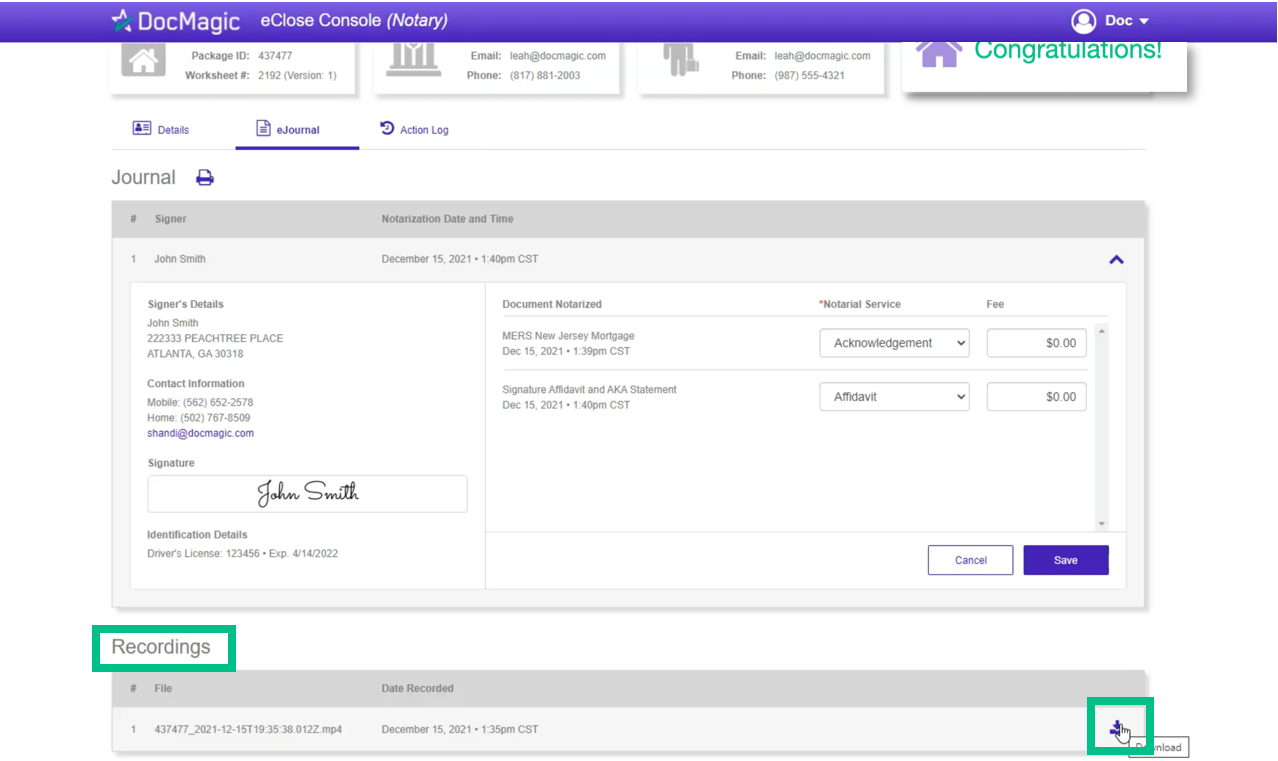
| 42. | The Recording section at the bottom contains the audio and video of each RON signing session.
The best practice would be to store these materials right after the signing experience. Click the button on the bottom right to download.
|
| |
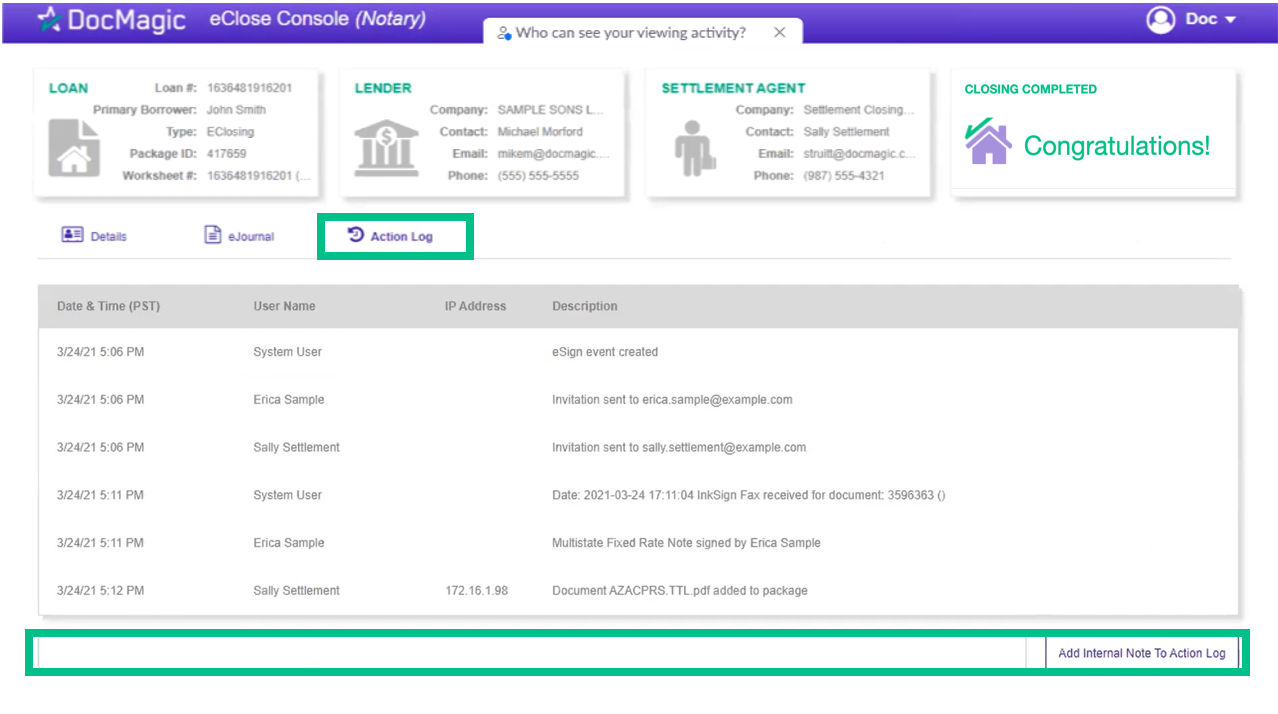
| 43. | The Action Log tab shows the actions that everyone involved in the process has taken, and when.
You may add notes at the bottom.
|
| |
FREQUENTLY ASKED QUESTIONS |
QUESTION | ANSWER |
| How do I log into my notary portal? | You do not have a username or password. You'll receive an email from title when they're ready to close and need a Notary. Then you'll be able to access the portal through a link provided in the email. |
| How do I get assigned notarial services through DocMagic? | When it's time for title to choose a notary, they will be presented with a list of notaries to choose from. If they select you, you'll receive an email and you can access your eClose Console. |
| Can participants use a phone for Remote Online Notarizations? | No. Signers can validate their identity or sign ancillary documents (those that do not need to be notarized) on a phone, but the actual Remote Online Notarization experience is no longer available on a phone. |
| What if I notice an incorrectly tagged document during the signing? | Go back to the Notary portal which should be open in another tab. Click on the pencil icon and make the necessary tagging changes. Go back to the signing window. Click on the three dots at the bottom right of the borrower's window and click "Refresh Documents". See step 31 and 32 for more details. Note: You can only change tagging on documents that have NOT been fully signed. |
| What's the difference between adding a document and uploading one into the portal? | Adding a document means inputting a new document into the stack. This can be done by clicking the icon that resembles a piece of paper with the plus sign on it. Uploading a document means scanning documents that needed to be printed out and ink signed. This can be done by clicking the icon that looks like a cloud with an arrow pointing up. It's important that you do not confuse these functions. See step 6 for more details. |
| What happens if the page freezes during the signing experience? | Click your name in the top right of the screen and choose Restart Meeting. This will kick you and the signers out of the signing experience, but not the actual meeting. All participants will simply click to re-enter the signing window again and pick up from where it left off. If the borrower's screen freezes after their first signature, refresh their documents (step 32). |
| Why did the system skip my signature and seal during my signing experience? | The system will do this if there is more required postfill on the same document even though it's on a different page. You need to fill out all of the text fields, initials, and other items before you apply your signature and seal, because you may not edit a document after you sign and stamp it. |
| I keep running into technical issues. What should I do? | Before you submit a ticket, try clearing your browser cache or running the experience in an incognito window. Issues can also be caused by slow or unstable internet, VPN's, antivirus software, or browser extensions. |
| Can I get a list of title and settlement companies that work with DocMagic? | Unfortunately, not. We do not disclose our customers for privacy reasons. |
| Can we use the notary platform for things other than DocMagic? | Unfortunately, not. You must be invited by an existing DocMagic Settlement or Title Agent to use the notarization platform, and it can only be used to conduct DocMagic specific transactions. |
| What happens if the borrower fails KBA twice? | They can't try a third time. They need to wait 24 hours to conduct the KBA process again. Alert the lender, Title and anyone who needs to know. Then reschedule with the borrower. |
| Does DocMagic pay notaries? How do I know what to charge? Can I bill through DocMagic? | The DocMagic Notary Console is a free platform for you to use. We do not pay Notaries, nor do we offer a charging service. Payment is 100% handled between you and the title company. You can request a quote, or give your fees in the comments section of the DocMagic acceptance screen when you are invited to provide services. Please see the guidebook for more details. |
| What happens if I get the "Application Issue Encountered" error? | Just click "Okay" - most times it will allow you to proceed. |

